

Miniware TS1M
The TS1M is intuitive, straightforward, and powerful — and there’s not a lot more you can ask of a sub-$100 soldering station. It's a heftier option than standalone "smart" soldering irons, sure, though it offers a more comprehensive and expandable feature set, and a more comfortable user experience.
Pros
- Affordable
- Fantastic performance
- Supports C245, C210, and C115 cartridge ranges
- Comfortable user experience
Cons
- A couple of slightly awkward design choices
- Needs a beefy external power supply
All the soldering stations we’re used to are bulky bits of kit. Compared to standalone irons, a soldering station comes with the whole… station part, which usually translates to a few pounds worth of power supplies and control electronics presented in a benchtop control unit. Traditionally, stations offer significantly finer temperature control, while standalone irons offer only rough settings, if any — not to mention more advanced preset memory, calibration, and logging features that can be found on higher-end, digital stations.
While both being means to the same end, soldering stations and soldering irons tackle the problem of getting-the-tip-hot-in-just-the-right-way much differently. Most irons simply pass mains voltage (that’s 220 VAC where we’re from) to the heating element and use rudimentary bimetallic thermostats to make or break the circuit.
Stations, on the other hand, step down the voltage they send to the heating element, often to ~20 VDC. This requires a pretty chunky transformer (hence the heft in the control units; this is where most of it comes from), but offers enhanced safety and finer control — working with lower voltages is simply… simpler. And as most soldering stations connect to their respective handles using a relatively complicated connector, it’s possible to build precise temperature feedback loops — and let’s not forget all the extra space for the fine circuitry in the control unit itself.
Okay, let’s take a short break here. Since the terminology can get confusing (…iron, handle, station?) and somewhat redundant, let’s establish that, in this article, we’ll be using the term soldering iron to refer to standalone soldering irons (i.e., ones that plug straight into a wall outlet or other power source), and soldering station to refer to systems that come with control units compatible with various soldering tools. Of these tools, the most common one is, naturally, a soldering iron, but to avoid confusion with standalone models, we’ll be using the term soldering handle to refer to all soldering irons designed for use as part of a station.
With the advent of smart soldering irons, we’ve started seeing some of the features trickle down, notably the superior temperature control. Unlike traditional offerings, these smart models are often USB-powered. Sure, there are some inherent drawbacks, most notably the fact that you have to bring your own reasonably beefy USB power supply (that’s doing the bulk of the heavy lifting), but the highly competitive pricing and excellent performance have made these a favorite among hobbyists, tinkerers, and students. Miniware is an already established name in the field, with the TS-101, TS-80P, and TS-21 being some of the most beloved models currently on the market.

Well, Miniware’s new TS1M is a soldering station, designed to work with several series of JBC cartridges. It’s an adorably tiny station, sure (but that’s par for the course when it comes to the company), yet surprisingly fully featured. Truth to be told, it doesn’t exactly have to be as big as a traditional system since (like many of Miniware’s other offerings) it requires an external power supply. There’s the option of using a USB-C power brick, or, alternatively, supplying the TS1M with 12–28 VDC through its DC barrel jack — more on this later. Despite there being no built-in PSU, having a separate control unit has let the designers cram a lot more components and a larger screen into the TS1M, as well as offer end-users the option of choosing their preferred soldering handle. This all adds up to a system that offers more flexibility and power than any of Miniware’s standalone irons, at the cost of some portability and overall simplicity.
Before we dive a bit deeper, we’d like to thank Miniware for sending us a review unit of the TS1M. As always, all opinions stated in this article are our own, and the team at Miniware had no say or input in the creation of the review.
Miniware TS1M: an overview
We generally like to start by talking a bit about the packaging and unboxing experience. It’s not the most crucial thing out there, but presentation can sway opinions. Sadly, our TS1M review unit is of the pre-release kind, so it came in a set of plastic Ziploc baggies instead of its retail packaging. A bit of a shame, especially since Miniware always gets their packaging right, and the TS1M’s seems no less delightful. Alas, the sacrifices we have to endure…
In addition to the TS1M control unit itself, we’ve got a set of accessories: two handles (one compatible with JBC C245 and one compatible with C210 cartridges), a USB cable, a K-type thermocouple, a sleep wire, and a small selection of cartridges. Neat! There’s no iron stand nor power supply included, but that’s true of most retail sets too — we’ll check out the various purchase options and pricing later in the review.
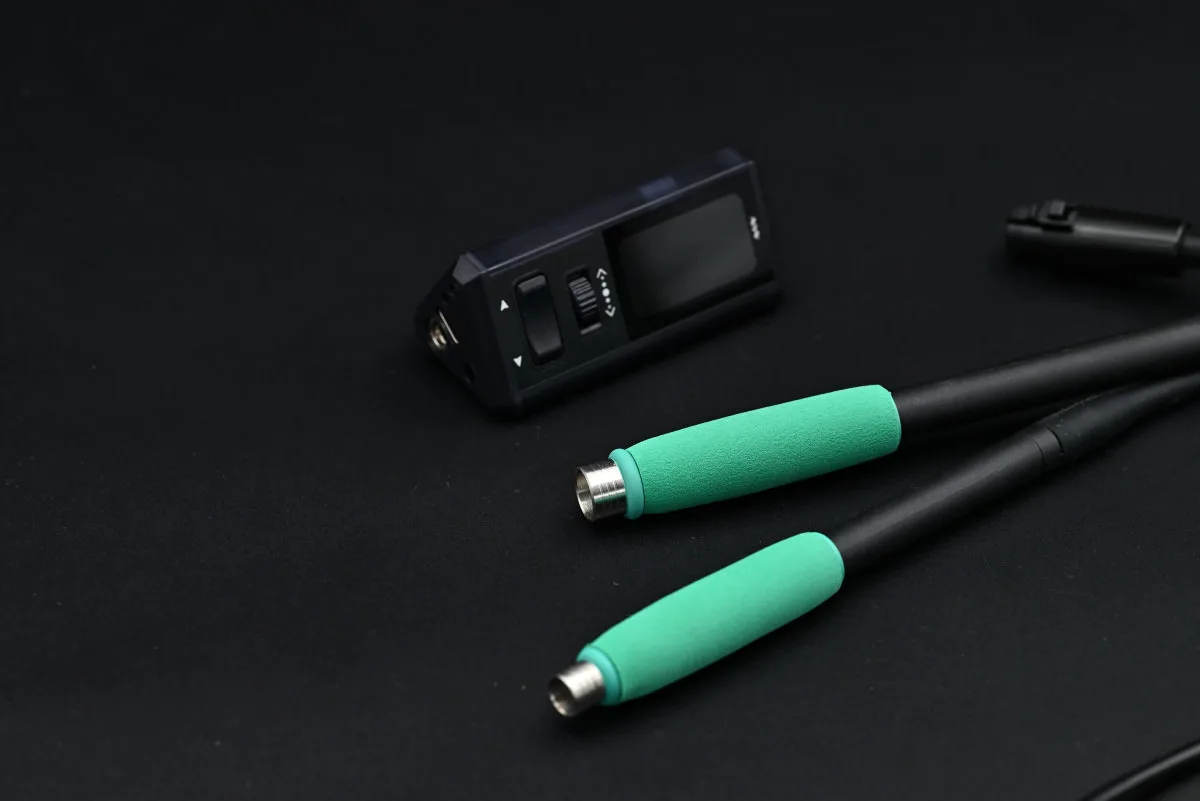
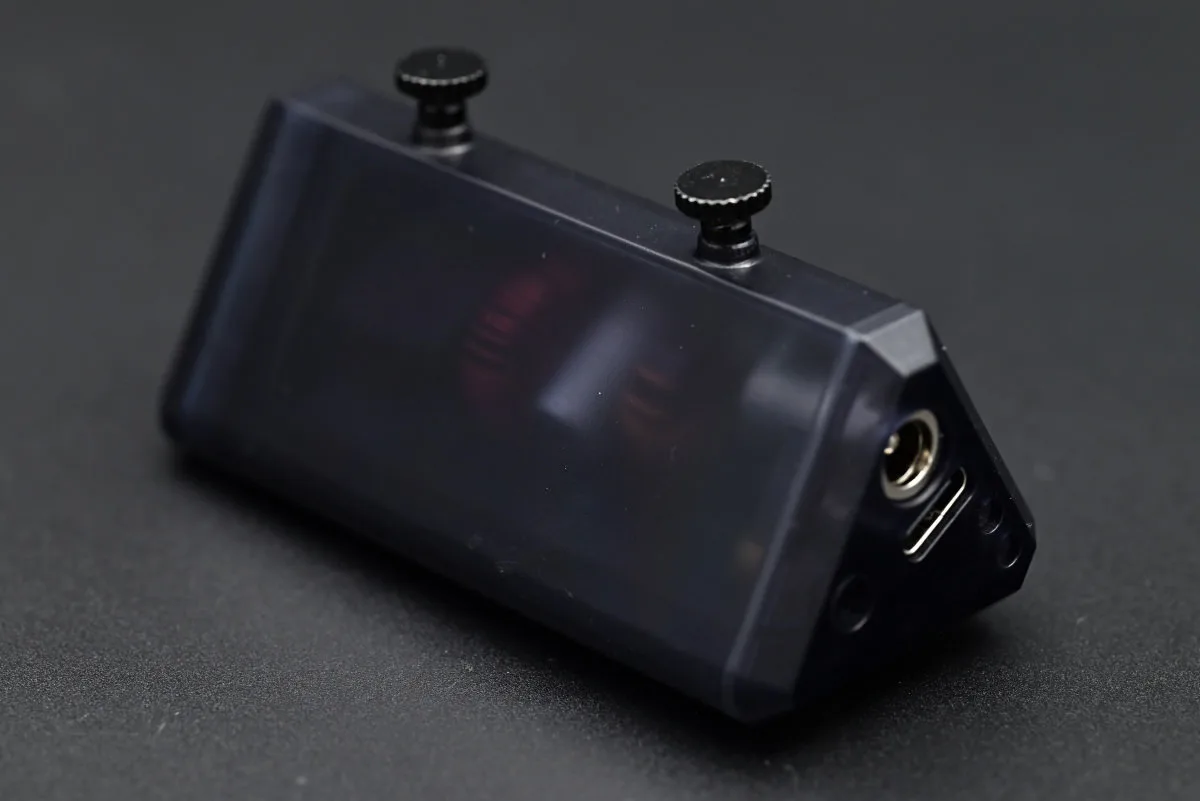
The control unit itself is compact, lightweight, and… triangular? The shape immediately sticks out as odd, though a quick peek through the ever-so-slightly translucent plastic body reveals a clever arrangement of the TS1M’s multiple PCBs. The unique body shape also helps with overall ergonomics, as it means that the front panel is slanted back. Such a tiny device would’ve been a usability nightmare with its controls so close to the surface it’s sitting on if not for the slant.
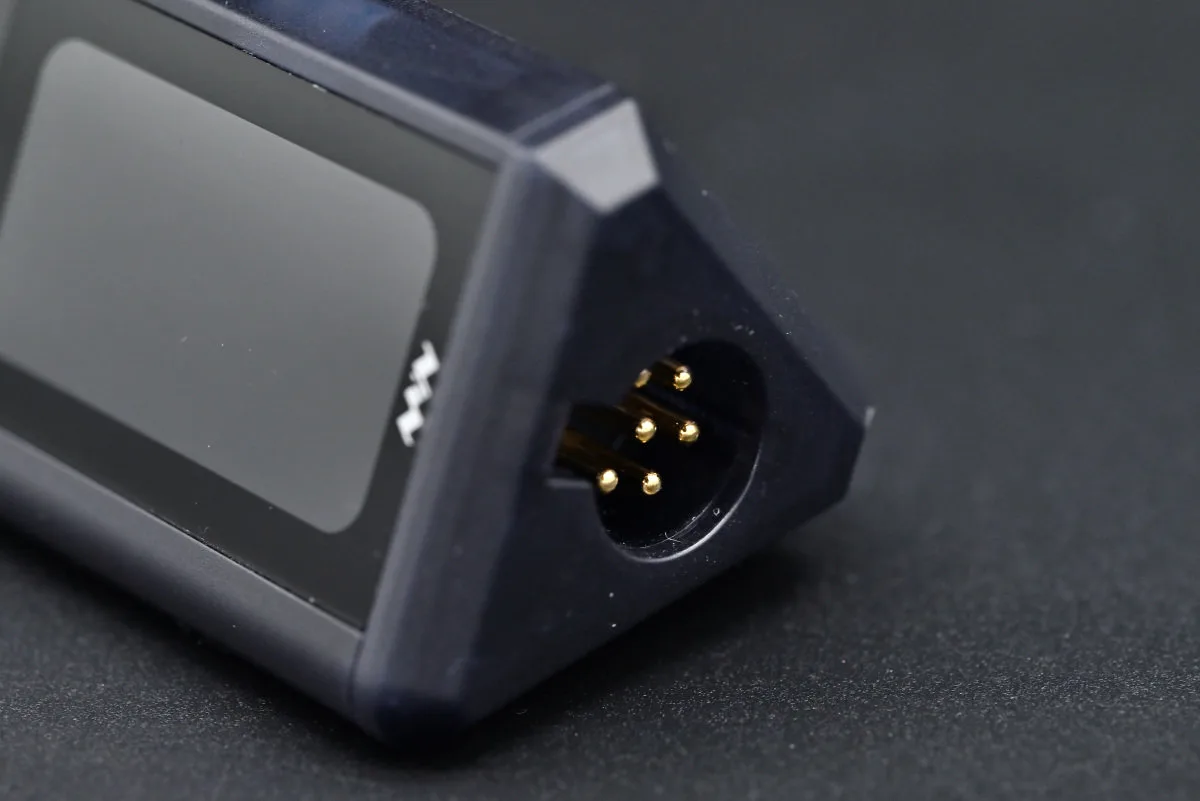
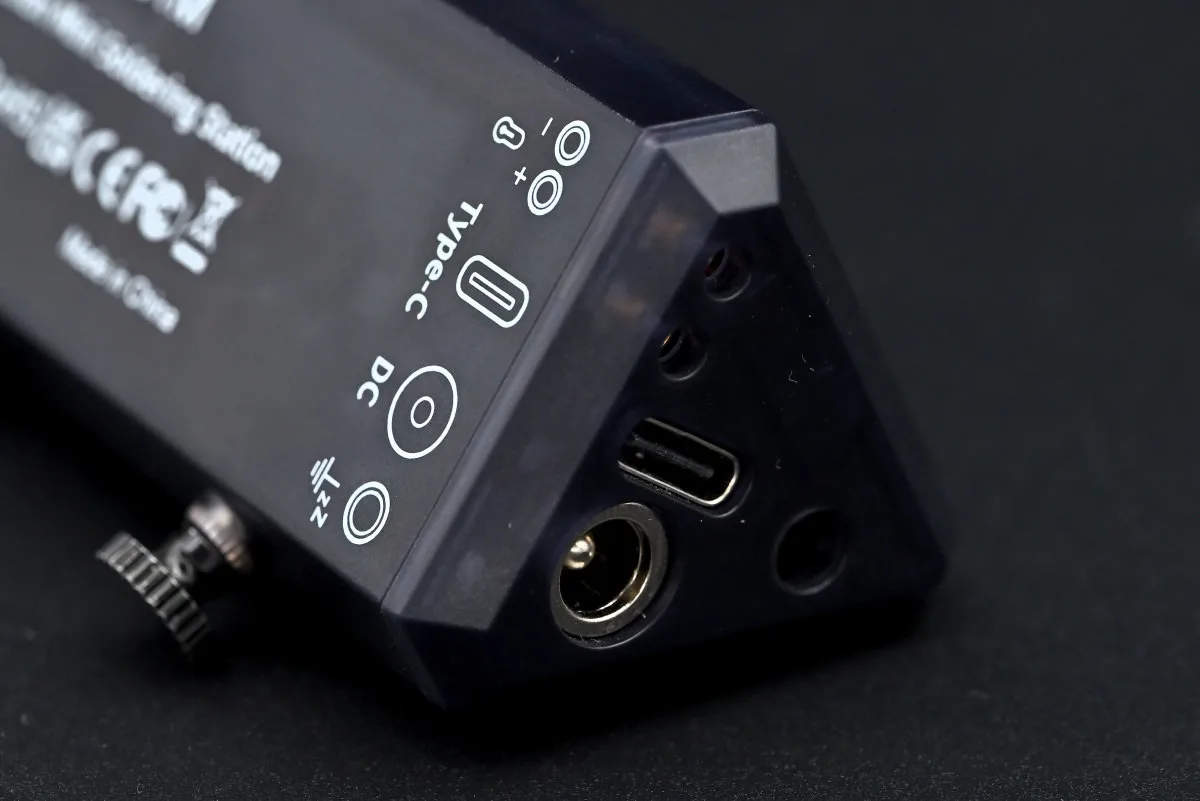
The UI on the TS1M is reasonably simple: the front panel features a small 1.47” screen, a pair of volume rocker–style buttons, and a clickable scroll wheel. All the ports are located on the control unit’s sides, with the USB-C port and DC barrel jack, thermocouple connector, and sleep cable jack located on the left, and a 6-pin aviation connector for the soldering handle on the right, the same one found on many first-party JBC tools.
And that’s basically it, save for two thumbscrews that sit on the back, screwed into a pair of threaded brass inserts. These ostensibly provide a bit of extra stability (though, being a triangle, it’s not like the TS1M isn’t inherently stable), and can be used to mount the unit to a holder or something similar. The phrasing that Miniware uses in the manual — “A universal screw interface is set on the back to support external expansion.” — yeah, okay, this makes it sound like there’s something electrical going on here, but as far as we can tell, it’s quite literally just a pair of screws.
The TS1M boasts a 200 W power rating, though it’s unlikely that you’ll often be reaching for settings that high. As we’ve already mentioned, the station can be powered using either through the USB-C port or through the DC barrel jack, though the former only lets you get up to 140 W, as per the USB PD 3.1 spec. To tap into the remaining 60 W, you’ll have to grab a DC power supply. The TS1M isn’t terribly picky about the specs here, and as long as it provides between 12 and 28 V, and is capable of delivering the full 200 W, it’ll happily chug along. The DC barrel jack on the TS1M is 5525-sized, and center-positive, so it shouldn’t be terribly difficult to find a power supply with the right cable, or simply find the right connector to solder to your power supply’s cable if all else fails.
You’ll likely be fine with a USB-C power supply, though. The TS1M is designed for JBC C210- and C245-style cartridges, respectively rated at 40 W and 130 W. This is what JBC’s first-party soldering stations run them at, and while it’s possible to get extra performance by driving them harder, it’s likely to shorten their lifespan. Many third-party systems opt to run these above spec, including Miniware’s own TS-21, which uses C210 cartridges and supplies 60 W by default, though this can be lowered or increased all the way up to 100 W.
The TS1M continues this trend, with C210 cartridges being supplied 60 W by default, and C245 cartridges being supplied 140 W, though these defaults are also user-editable. The TS1M is happy to supply C210 cartridges with up to 100 W, much like the TS-21, and C245 cartridges with the full 200 W. But whether the almost-guaranteed reduction in lifespan from doing this is worth the better performance is something you’ll have to decide for yourself.
For reference, C210 cartridges are meant for precision work, with quite an assortment of specialized tip shapes available, even though some larger members of the series work more than well for general-purpose soldering. C245 cartridges are purpose-designed for general soldering work, hence their bigger size and significantly higher power rating.
If you scroll a bit through the TS1M’s settings — and we’ll be touching on the menu system a bit later — you’ll notice that the station supports C115 cartridges too! Huh — intriguing, especially as Miniware doesn’t yet offer a C115 handle. However, thanks to the TS1M using a standardized, common connector (hah, we told you this’d be relevant), most third-party C115 handles should work just fine with the TS1M.
Weeell… okay. Notice the way we specified third-party just now? Despite using the same handle connector that many JBC stations use, the TS1M’s implementation isn’t exactly stock. C245 and C210 support works the same as on first-party tools. Both handles use the six-pin connector, though not all six pins are connected: C245 handles only use three of the six pins, while C210 handles use four — this is as per design spec and is how stations can tell between the two. C115 handles also use four pins, but on first-party gear they feature a different, five-pin connector, making it pretty easy for the station to tell them apart — you simply can’t plug in a C115 handle in the same place where you can a C210 one. From what we can tell, C115 handles are only compatible with one specific series of stations.
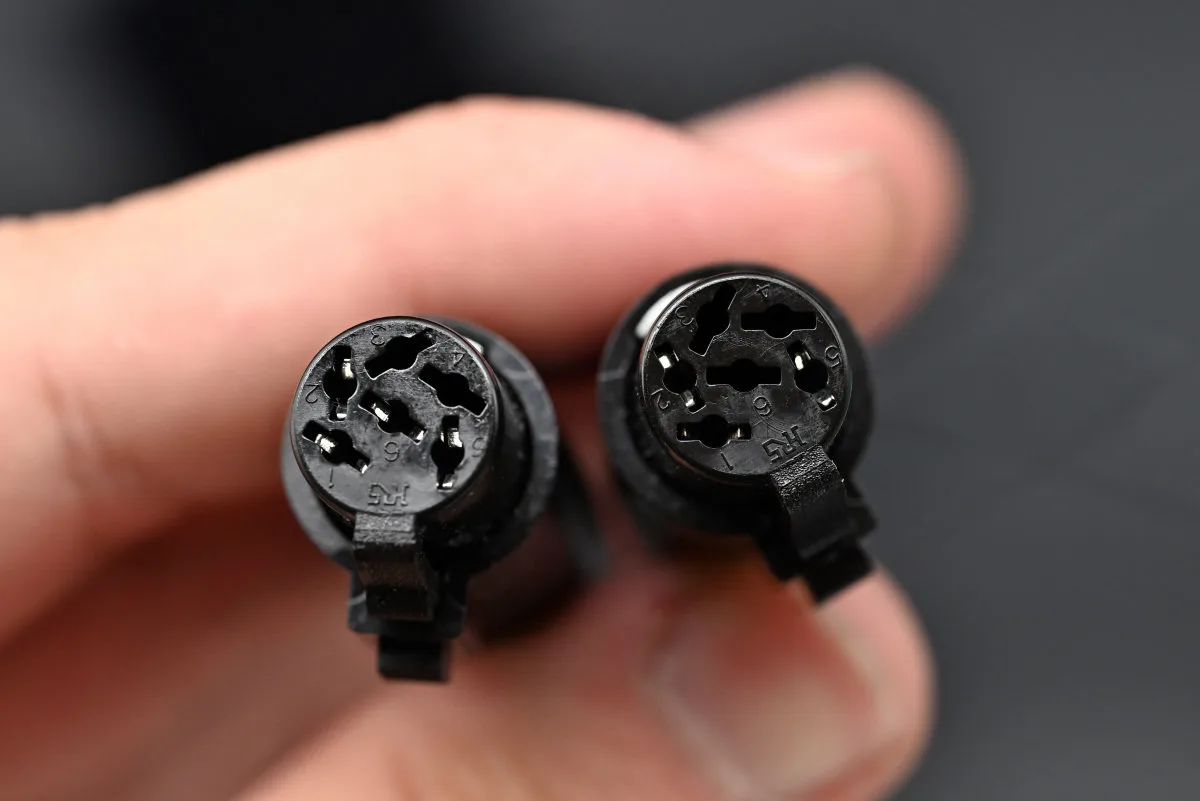
On the other hand, most aftermarket stations and handles that utilize C115 cartridges use a hybrid official-unofficial variant of the six-pin connector, wired similarly to a C210 cartridge. This is the case with the TS1M, too, likely for practical (compatibility) reasons. We’re pretty sure that we’ve seen Miniware use a third-party C115 handle in one of their promo videos, but if you want to be safe, waiting for Miniware to release their own might be the way to go.
All of the handles we’ve mentioned so far are standard, analog ones — but in a video we’ve come across (and in certain parts of the user manual), Miniware has teased an upcoming H100 handle, supposedly with certain smart features, like a built-in accelerometer for detecting periods of inactivity and automatically entering sleep states. We don’t even know the type of cartridges this handle is going to use, though we’re eager to see more details about it!
Standard handles handle (pun not intended) sleep in a different way — and that’s what the included sleep cable and sleep cable jack on the TS1M’s body are for (and by the way, this works in much the same way on many JBC systems too). We don’t have an official Miniware (or JBC) iron stand (so we’ve just been using the stand from our lab’s beloved Weller), but the concept here is simple: you connect the control unit to a metallic part of the soldering iron stand using the sleep cable, which pulls that part up to 3.3 V. When you rest a grounded part of the handle (chiefly the metal ring right below the grip section) against it, a circuit gets completed, which pulls this voltage down, letting the station know that the iron isn’t getting actively used anymore, which prompts it to enter sleep mode.
Our Weller stand is a bit unfortunately shaped for this to happen, as it grabs onto the handle using a plastic receptacle, but various models from Miniware and JBC have conductive bits in all the right places for sleep mode to function the way it should. Make sure to look into this and nab an extra stand if you need one, and if you’re interested in prolonging the life of your tips.
To be honest, we much prefer a system like this to all the smart accelerometer-enabled 21st-century stuff. Sure, fancy sensors are more modern and require fewer wires, and sure, we’ve seen an excellent implementation of such a system in the TS21, but it’s also finicky, and random bumps or shakes can prompt the iron to spring awake when it’s not supposed to — something that can’t happen with an old-school, make-and-break-a-circuit–based approach.
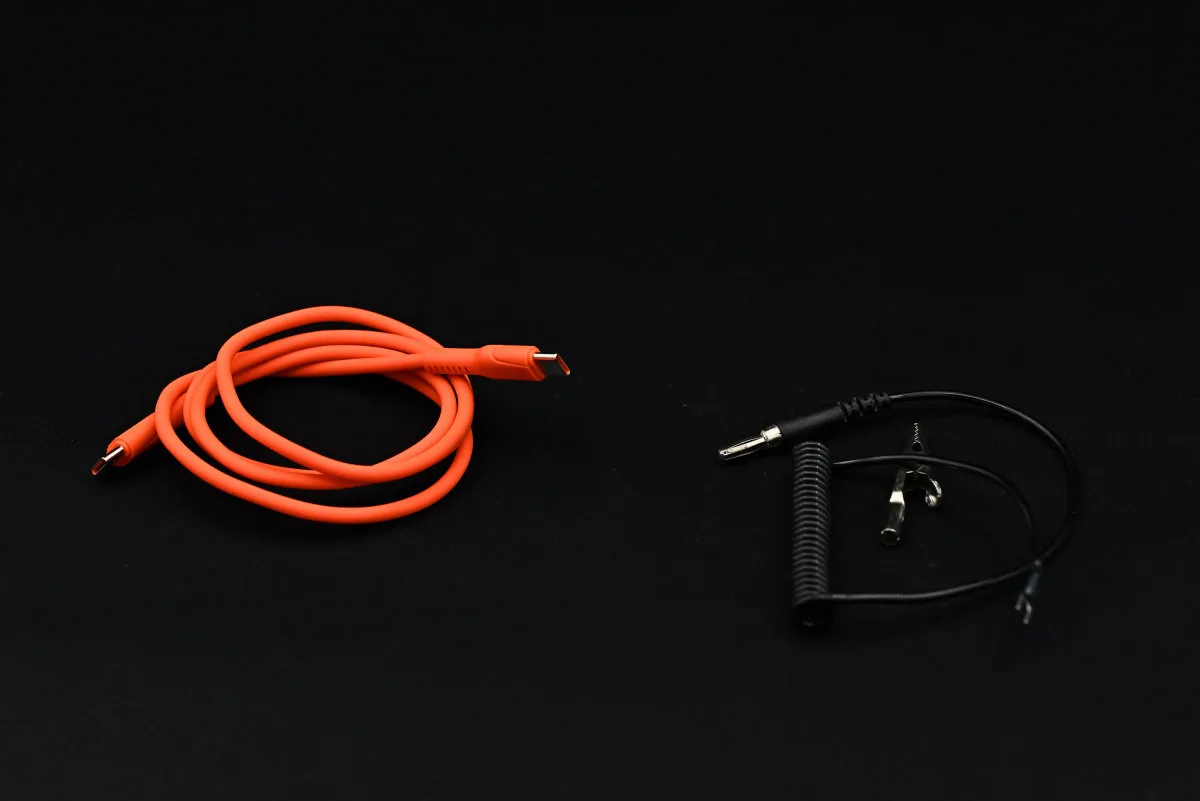
Curiously, grounding works in a bit of a roundabout way. The sleeve of the DC power jack and the shielding of the USB-C connector are both hard-wired to the handle’s tip. Using a properly grounded DC power supply is the go-to option (as grounded USB supplies aren’t terribly common, though many DC supplies are also ungrounded — so by default, it’s likely that your tip will float). A grounding wire is provided in the retail sets if only USB power is available.
The way this wire works is a bit odd, though. We’re used to soldering stations being equipped with dedicated grounding jacks, a feature also present on Miniware’s smart irons (like the TS21 and TS101), yet oddly absent on the TS1M. Despite the TS1M’s sleep cable jack featuring a graphic depicting both a sleep and a ground symbol, the manual is rather explicit in stating that this jack cannot be used for attaching a grounding point. Instead, the provided grounding cable terminates in a little wire loop meant to wrap around the port shielding of a USB-C cable, therefore turning your ungrounded USB power supply into a grounded one; and by either directly connecting this wire to ground, or through a ~1 MΩ resistor, you can either hard- or soft-ground your handle depending on your application.
UI and UX: hands-on with the TS1M
The TS1M’s UI follows a similar design philosophy to Miniware’s other soldering tools. It’s rather menu-driven, with the main menu — referred to as the standby interface in the manual — being the first thing you’ll see upon every boot. This screen immediately presents you with three options: a settings menu, the main heating interface and a temperature measurement interface.
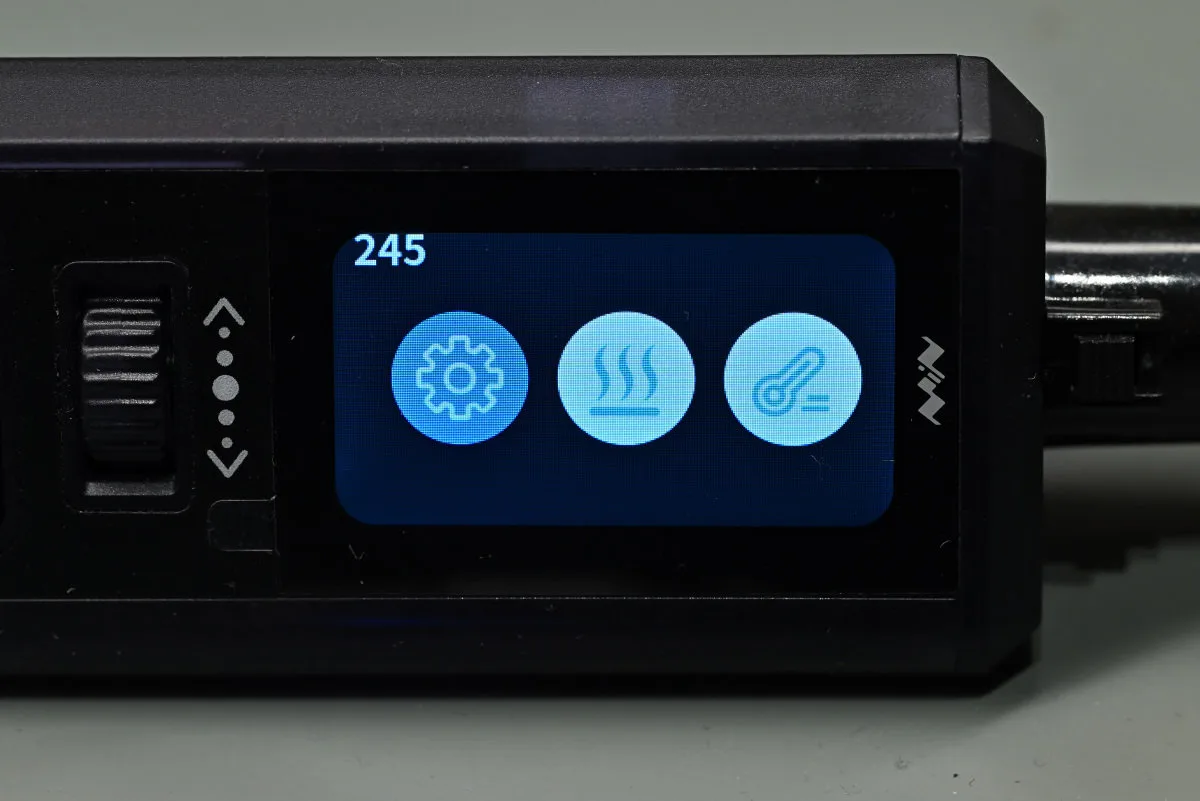
Before you do anything, you’ll want to connect a soldering handle to the TS1M. The station automatically checks whether a compatible one is connected, and also kinda automatically detects the model — kinda, as it can tell C245 handles apart, but needs a little manual help when connecting C210 or C115 handles. It shouldn’t be hard to figure out why given our cartridge connector rambling in the previous section.
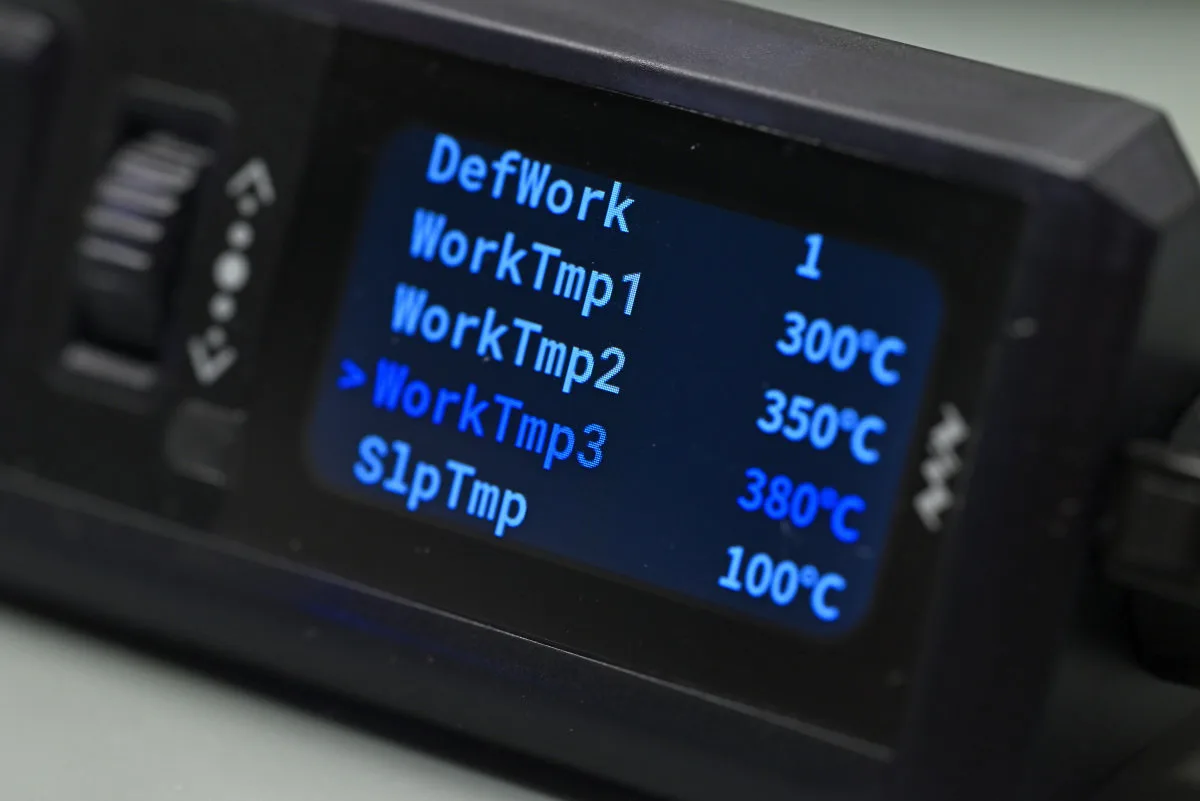
Proper cartridge detection is important as the TS1M features separate power levels for each cartridge type. Running a C115 cartridge at 200 W would be a surefire way to wreck it within minutes, so much more reasonable levels have been set by default. We’ve mentioned that these levels are user-definable, and the aforementioned settings menu is the place where you’ll want to go to do this.
But there’s a lot more to customize. The TS1M has three temperature preset slots that are all editable using the settings menu, as well as an instantaneous boost temperature setting. Multiple sleep-related parameters, including sleep temperature and time-to-sleep (as well as time-to-standby) are also here, as are settings related to temperature calibration, low voltage protection and general cartridge information readouts. This menu also offers a number of UI options, including screen brightness and auto-rotation (yeah, the little station has a built-in accelerometer for this purpose), beep volume and language. If you’re willing to set some time aside, you can reasonably fine-tune the TS1M to suit your needs — and if you want a few extra options (or have several of these that you want to deploy with the same settings), all these tweaks (and then some) can be set directly by editing the station’s configuration file using a computer.
Let’s take a look at the heating interface now, as, y’know, that’s where you’ll spend most of your time when using a soldering tool (surprise, surprise). It’s reminiscent of the TS21’s heating interface, though the larger color display on the TS1M contributes to a more comfortable layout and a lot more information present at a glance. By default, the station uses a graph-based display that plots the temperature and instantaneous power draw on a scrolling graph. There’s a larger temperature readout in the top right, with three preset temperatures below it. Finally, the station displays two sets of data in the bottom right corner. The first bunch relates to the electrical characteristics of your setup: the station’s current input voltage, the set power level, and the cartridge heater resistance. Keep in mind that the power level displayed here correlates to the cartridge type and the specs of the power supply you’re using, representing the maximum, and not the instantaneous power drawn by the handle. That’s what the green graph line is for!
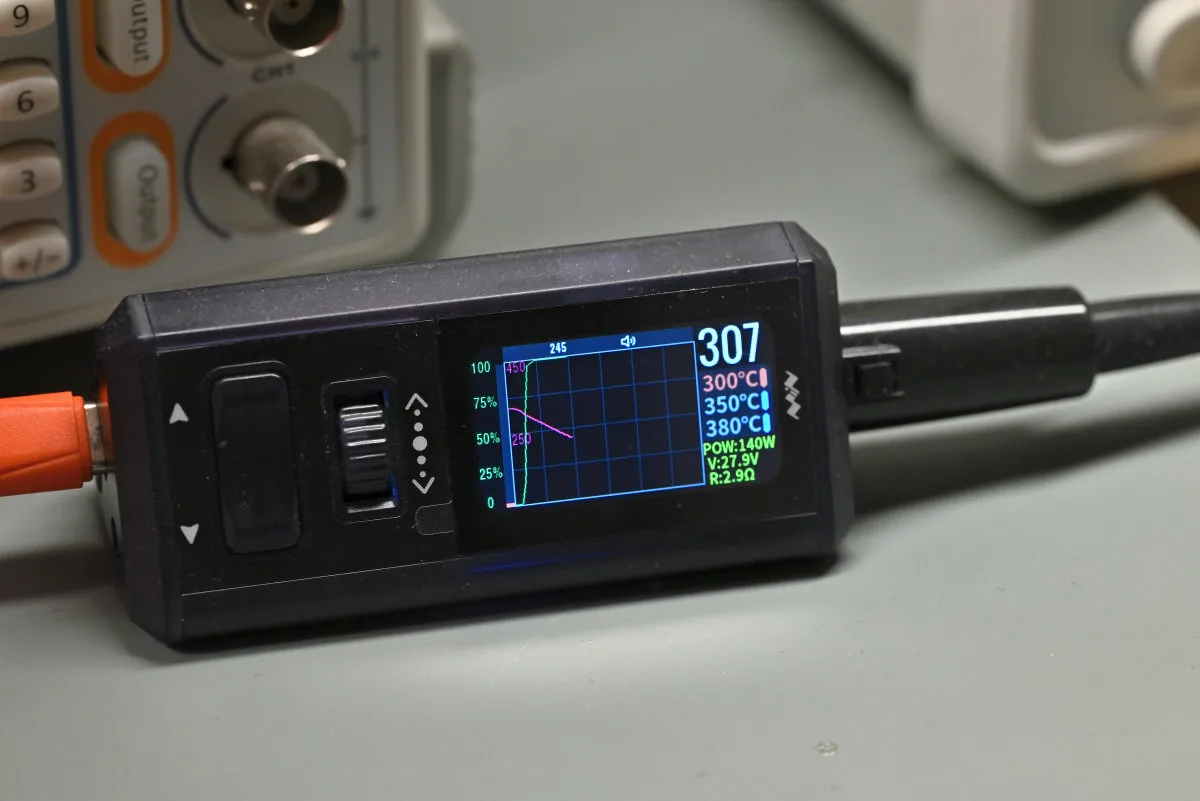
The second lot is all about temperature. It shows the temperature calibration value and the external temperature measurement — if any — obtained using a connected thermocouple. More on this in a second. It’s a bit unfortunate that all of these can’t fit on the screen at the same time, so the station swaps between the two sets every few seconds, though it did make the whole readout a lot more compact, leaving more space for the graph display.
There’s also an alternative, “digital” mode, where a large temperature display takes up most of the screen. We like this mode as it shows all of its information constantly! The flickering data of the graph mode now occupies two ribbons that run along the display’s top and bottom. The three preset temperatures are once again listed on the display’s right side and an immediate power indicator bargraph is situated on the left.

The top information ribbon shows all the same electrical characteristics, while the lower ribbon is once again all about temperature. In addition to all the thermocouple and calibration data, it also shows the set target temperature (whereas the main temperature display shows the real-time tip temperature which can differ).
Now that we’ve mentioned thermocouples twice in the span of three paragraphs, let’s actually see what they’re even doing here. It needs some explanation.
Every soldering cartridge nowadays features built-in temperature-sensing circuitry (often of the thermocouple kind), as do the handles of older-style soldering stations (with heaters built into the handles, separate from small, replaceable tips) — but what if you need to actively monitor another spot on a board as you work, or check your iron’s temperature calibration? Say you’ve got a particularly sensitive component close to the area of work, or that you’re working with a sensitive component, thus requiring extra confidence in your temperature readouts.
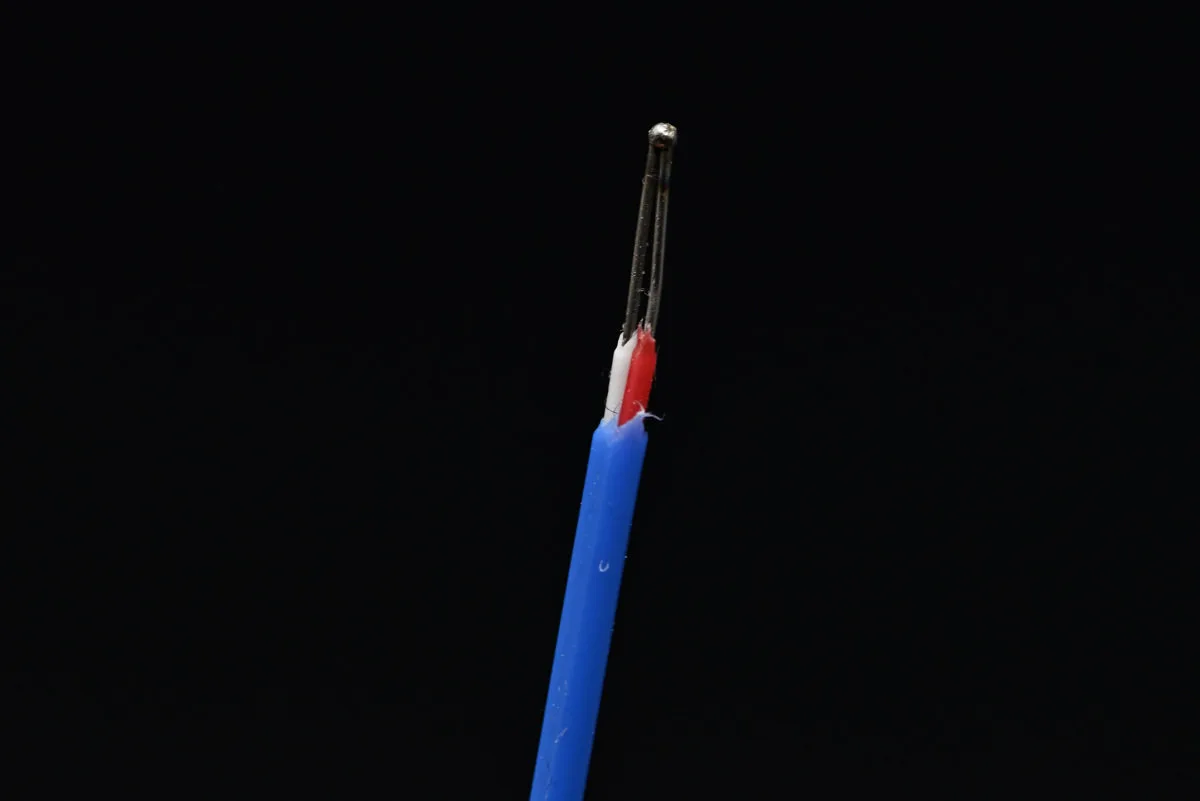
Well. Enter thermocouple. These low-cost, robust devices are well-suited for measuring the kind of temperatures common when soldering. The kit includes a K-type thermocouple, which was expected — but was surprisingly hard to confirm as it uses the Japanese color-coding standard which is not too common in the West. The thermocouple plugs right into the TS1M’s body which enables the external temperature readout in the lower UI ribbon.
There’s (luckily) nothing inherently smart about the way this feature was implemented. It’s just a simple readout. This gives it a lot of flexibility, as you’re not forced to use the probe for temperature calibration, its intended use. Calibration is, thus, a rather manual process — first you dip the thermocouple into a blob of solder on your iron’s tip, jotting down the temperature delta (if any), and finally you punch this number into the corresponding field in the settings menu.
It’s really nice that this functionality is integrated into the station itself, though standalone thermocouple-based iron calibrators are generally affordable and rather useful. But it’s the constant temperature readout functionality that makes it a worthwhile feature for us — we’ve already mentioned this as a headlining feature of the thermocouple. Affixing a thermocouple to a specific component or PCB area is simple enough with a bit of Kapton tape. The only thing that could have made this feature even more useful would be an automatic lock-out system that cuts power to the cartridge if the thermocouple reaches a user-set temperature, therefore forestalling any damage to monitored areas of the board. This system should be simple enough to implement through a system update, so we don’t see a reason it shouldn’t (or can’t) be an option in the future.
Remember the temperature measurement interface from a few paragraphs ago? Well, it’s also designed with the thermocouple in mind. It’s a passive mode designed for simple temperature monitoring with basic on-screen plotting. Even though seemingly superfluous at first glance, it’s the only way to get a temperature measurement without engaging the iron’s heating element. The whole implementation leaves a bit to be desired, though. The graph’s scaling can’t be adjusted, and the default setting is much too zoomed out, with room temperature measurements not even registering on it, and there’s a distinct lack of any data logging functionality. Meh — compared to the gorgeous heating interface, this one needs some rework.
The button layout (or rather, the things that buttons do once pressed) also makes a lot more sense. Most of navigating around is done using the scroll wheel, and pressing it confirms the selected option. The volume rocker is, disappointingly, not used for volume controls (nor for navigating around), but rather for exiting out of menus and modes (by long holding the up button) or for selecting options (by hitting the down button). This is the intuitive, right way round that we were calling for in our TS21 review. We’d like to think that we influenced the decision at least a little bit, but…
There is some intermodal inconsistency in the way that the buttons behave. In the heating mode, for example, pressing on the scroll wheel switches between the two display styles, while pressing the up and down buttons selects between a custom temperature and one of three presets. In the graph mode, long-pressing the scroll wheel also becomes a command, used to clear on-screen graph data. This might seem a bit convoluted at first (and it is, to be honest), but it doesn’t sully the experience. After all, this sort of compromise was unavoidable given the extremely streamlined set of controls.
But we can’t complain too much, really. The TS1M has one of Miniware’s nicest interfaces yet, thanks to its larger display. If we were to nitpick, the unit’s lightweight construction presents a usability concern: it’s all too easy to send the whole station flying with a careless tug of the handle’s cord — though we can’t exactly blame Miniware for making a purposely mini station that’s… mini.
TS1M soldering performance
A soldering iron, no matter how nicely designed, is no good unless it performs well. Heck — look at our lab’s old Weller. It’s an ancient (though not quite antiquated yet), analog design that earns its stay because it’s darn reliable. It’s all but mini.
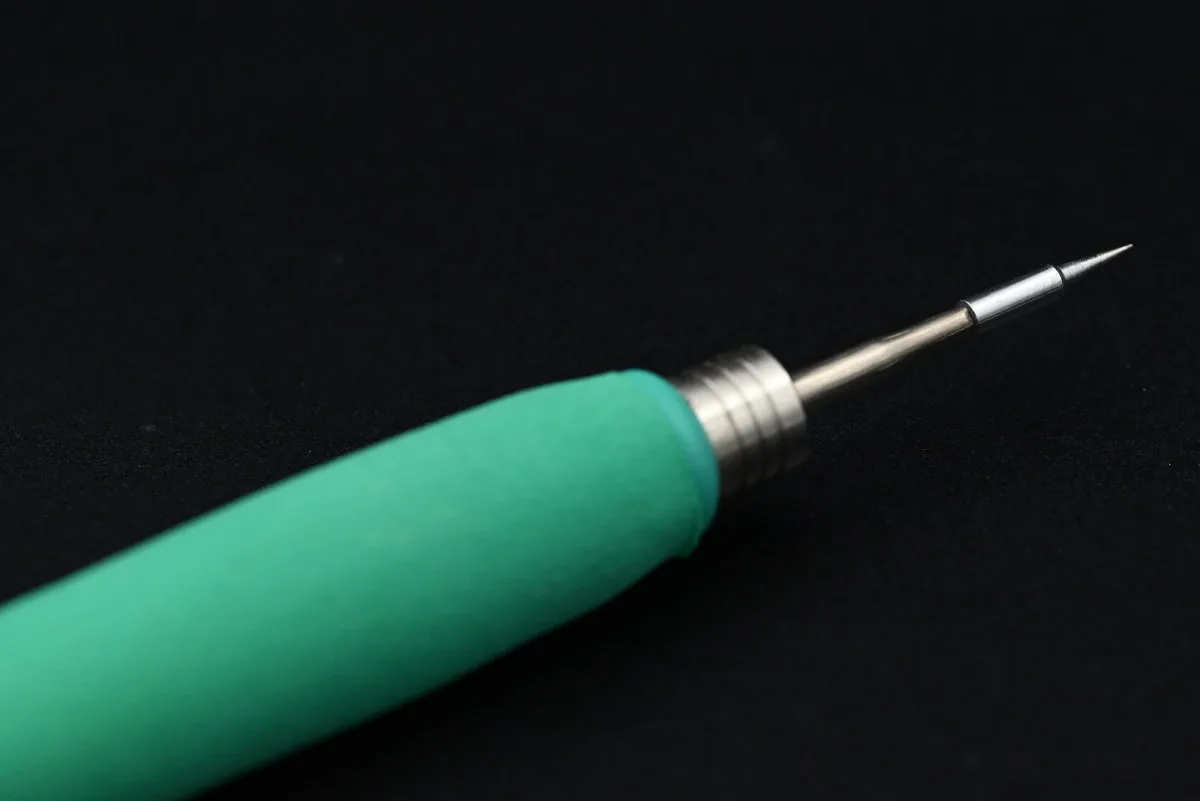
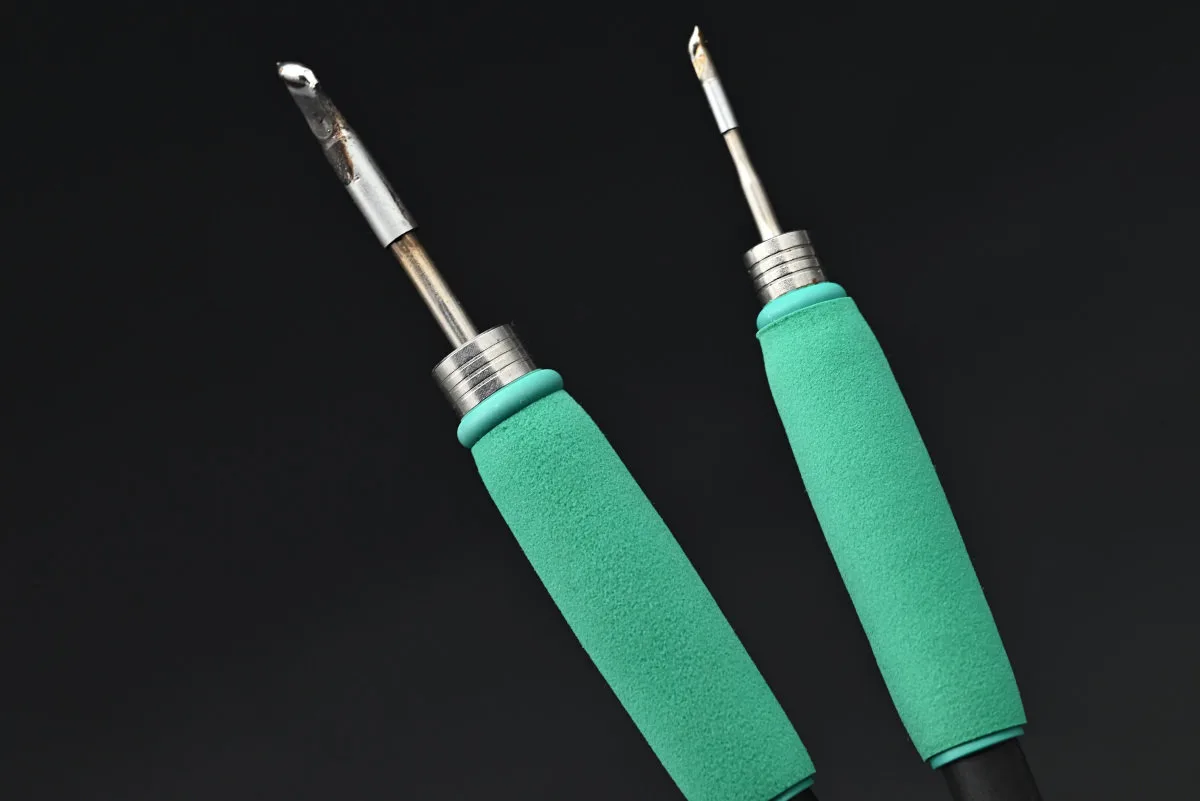
Since Miniware sent us C245 and C210 handles with the TS1M, those are the ones we’ll be trying out. We’ve got a small assortment of cartridges, both Miniware-branded and a pair of third-party aftermarket ones (which is just a little funny to say as, technically, all of these are aftermarket JBC cartridges). The default option that Miniware seems to bundle with the TS1M seems to be a knife tip. In addition, we also have a conical and a bent conical tip cartridge, though only in the C210 format.
Miniware has already included the knife tip as the default pack-in option with the TS21, which we found to be a somewhat polarizing choice. Maybe this is a very hot take on our end, but these aren’t quite it for us. We prefer a nice, chunkier conical/chisel tip, especially in the more substantial C245 format.
Talking about chunky (what a segue, we know), the TS1M’s handles with molded foam grips are a treat! As far as we can tell, there’s no design difference between the C245 and C210 handles, meaning that both share the comfortable grip section. Compared to Miniware’s other C210-compatible offering, the TS21, the TS1M offers a much nicer ergonomic experience for longer-term use — and, dare we say, a much safer one.
The TS1M has a wide settable temperature range, from 50 °C to 450 °C. You won’t be reaching for either extreme of this range often, but it’s nice that it can work with some more esoteric solders.
Let’s start with the C245 handle. We didn’t want to tweak any of the preset power limits, as 140 W ought to be plenty for a general-purpose cartridge. The C245-series knife tip is undoubtedly bulky compared to its C210 counterpart, though with great size comes great thermal mass… or something. In short, it’s got a rather precise tip (if you can get close enough to a joint and not melt five others along the way) and a nice, long edge that’s perfect for solving solder bridges, while its large side area makes it excellent for transferring loads of heat.
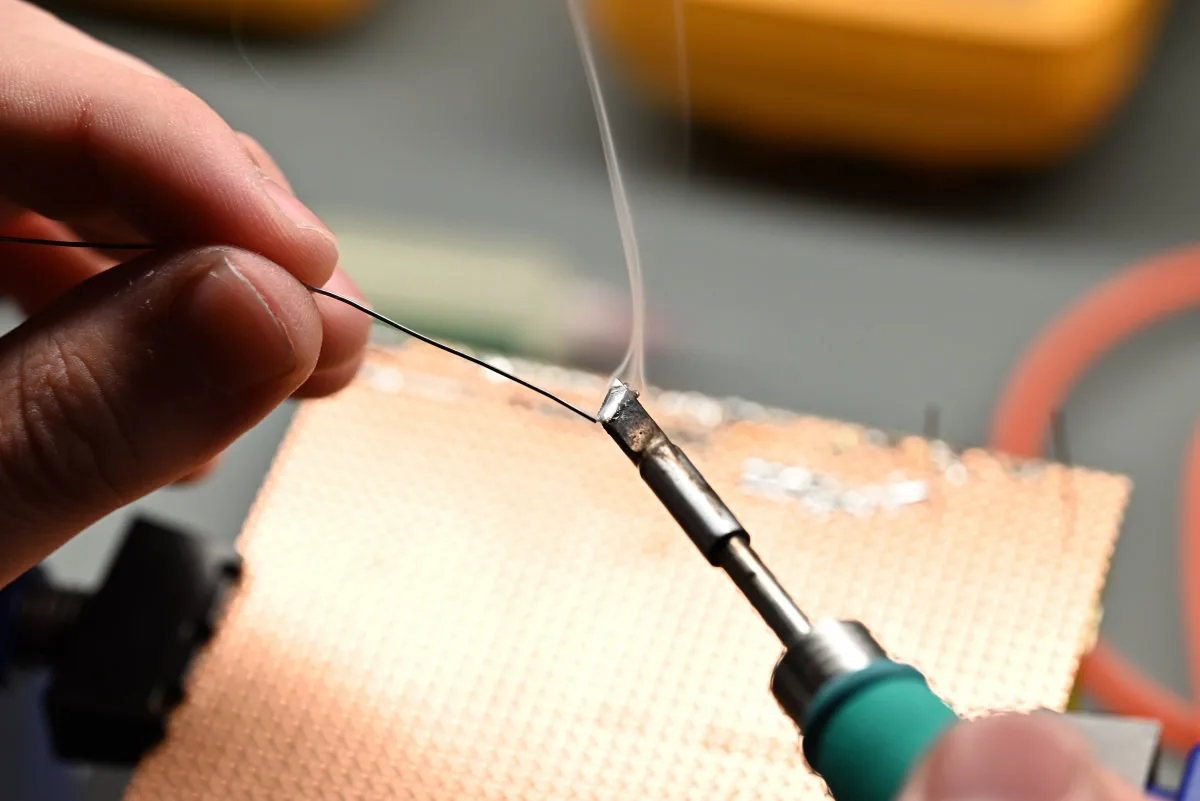
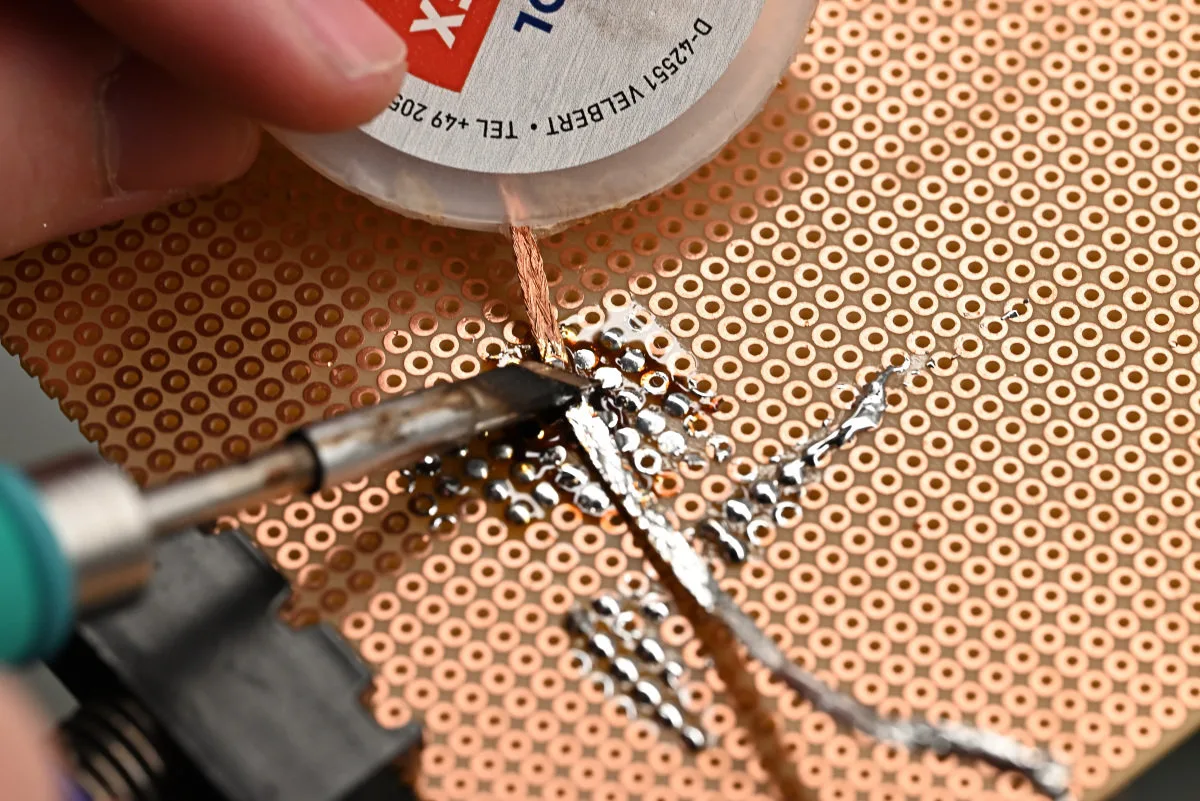
How excellent? Well. We messed around with a spare THT prototype board and found that things work a bit too well, even. The thing heats up in under three seconds. Solder melts instantly. Making conductive traces is fast (sometimes too fast, as the iron ends up melting everything it touches within a literal second). Most impressively — after we had a bit too much fun and made a humongous solder-blob that covered some fifteen pads —we managed to wick it all up. The final results aren’t too pretty due to all the flux residue, but seeing the copper braid drenched in solder (pics provided below) should give you a bit of an idea of how much heavy lifting the TS1M did here. And all this happened with the temperature set to a cool 300 ºC. Many smaller tips on less powerful irons would have significant issues pulling something like this off. Heck, with a C210 tip, even at a higher temperature, you’d likely end up soldering your copper wick to the blob instead.
And if the default 140 W somehow aren’t enough, you can always crank it all the way up to 200 W — though do keep in mind that you’ll, as we mentioned already, need a DC power supply for that. Also, just what are you soldering if you need this kind of power? Large shielding elements? Automotive parts? Any even remotely heat-sensitive component is going to be toast within seconds if you go waving a 200 W heating element willy-nilly.
There is one thing to keep in mind, though. Given how tricky it was to be perfectly tidy due to the C245 knife tip’s width, we wouldn’t use it for SMT components. Some smaller C245-series options might be better-suited, but… C210 cartridges are a much better option for finer work.
But that’s why the C210 handle is there, isn’t it? Performance here is virtually identical to that of the TS21. The default 60 W power setting is more than enough, and delivers reliable and (compared to the C245 tip) much more… controllable performance. For finer THT and SMT work that we do most often, these cartridges feel way better, though, naturally, they struggle with large, challenging joints. Choosing a cartridge lineup really is a case of picking the right tool for the job, and the flexibility of supporting multiple different handles makes the TS1M all the more appealing.
We’ve hit the C210 handle with quite a few tasks: soldering pin headers, desoldering tiny 2012 SMT diodes (the long edge of knife tips makes this really easy), soldering said diodes, and even fixing a USB-C connector with a broken pad. All with the knife tip, too — and while not our favorite (how many times are we going to say this…), it’s undoubtedly versatile.
The conical microsoldering cartridges are a treat, though they’re right tools for a specific, very precise type of job. Miniware doesn’t offer any other C210 cartridge models yet, though JBC themselves, as well as many third-party vendors, offer an extensive range of models, both general-purpose and specialized. Same goes for C245 cartridges, so browse away and find ones that suit your work best. It can really make all the difference.
It’s safe to say that the TS1M performs really well. It’s a shame that we don’t have a compatible C115 handle to try out, but we don’t doubt that it’s a fine bit of kit too. And we really didn’t expect any less: all Miniware gear that we’ve tested performs as advertised. In the case of the TS1M, it gives higher-end gear a run for its money — and that’s high praise, coming from us. While perhaps not as durable in the long run as an industrial bit of kit (like our Weller), the TS1M, especially with the larger C245 handle, covers all the bases. For the weekend tinkerer, in a educational makerspace or on a hobby workbench, it’s a much more appropriate choice than a prohibitively expensive professional option.
A mishap and a concern…
Before saying what we’re about to, we felt it important to mention once again that we have a pre-release version of the TS1M. Heck, we’re running software version 0.13 on hardware version 0.01. That’s how pre-release we’re talking. So, take everything here with a grain, no, lump of salt, and keep in mind that retail hardware running on a newer software version might not have any of the issues we’re about to mention.
With this disclaimer out of the way, let’s get to it. Perhaps the most notable issue we’ve run into during our time with the TS1M was an occasional reboot loop that tends to happen the first time the C245 handle gets connected to the station after connecting it to a USB power supply. This sort of issue can be rather scary, especially since there’s a little relay click involved as the system auto-detects the handle before bootlooping. After quite a bit of fiddling around with our power supply’s settings, we decided to — embarrassingly late into the whole ordeal — try a different USB-C cable.
Well. Guess Miniware sent us a bogus USB cable to test us. And it being all nice and red and made out of silicone was part of the ploy! Hah, we jest — but we’re genuinely not quite sure what went wrong here. It’s something to do with the higher power modes of the USB PD 3.1 specification, since we had no issues with the C210 handle, nor when limiting the power output of our supply to 100 W. Perhaps there’s something wrong with its A5 and B5 pins, or it’s somehow preventing proper communication because… we don’t even know anymore.
Whatever the case is, grabbing a new USB cable solved the issue. From what we can tell, the same red USB cable is a part of retail kits too, but we don’t suspect that this is a widespread issue. It’s way more likely that ours got damaged during shipping since it did come pretty loosely packed in a baggie. If you do, however, end up with a problematic cable, make sure that the replacement is also made out of silicone, as a pretty hot soldering iron tip will always be close by.
Don’t ask how we found out that braided cables aren’t a good idea.
The other issue that we’ve experienced has to do with the TS1M’s scroll wheel (and this one isn’t related to the USB cable, we promise). It’s one you’ve likely experienced before with rotary encoders — sometimes it’s possible to rotate the wheel until you feel the tactile detent, yet have it not register until you’ve turned it a tad more; or contrary, have it detect a step before you’ve reached the detent. This isn’t a huge deal as long as you’re rather deliberate with your inputs, but there have been times where we wanted to press down on the wheel, only to turn it just enough for a scroll input to be registered too, causing us to enter another mode or select the wrong temperature preset. It’s not a common occurrence, but it does happen.
With that being said, stuff like this can often be tightened up in software, be it by tweaking the polling rate, optimizing the debouncing code, or changing the readout logic. On top of that, we’re on really early hardware, so it’s possible that this is a design quirk that reflects that. While really not a deal-breaker, we hope to see this fixed (if not already) in future software and hardware versions.
Pricing and accessories
The TS1M is available in quite a few kit variants, chiefly differing in the number of accessories that get bundled in. Pricing seems to vary quite a bit depending on the storefront you’re grabbing yours from, but the control unit with the base accessory set (USB cable, grounding and sleep wires, thermocouple) goes for ~$65 (though this is usually marketed as a “discount” from a higher list price), while separate C210 and C245 handles go for ~$20 each and come with a knife cartridge included.
Set versions that bundle the control unit with one of the handles are convenient, though they don’t necessarily lower your upfront costs, as they go for ~$80, while adding further extra cartridges for your selected handle brings your total up to ~$90 and ~$100, depending on if you want two or three total. Curiously, we haven’t found a set that bundles both the C210 and C245 handles, though we’ve found other sellers that include a 140 W USB power brick, various third-party cartridges or soldering stands in their sets (though these go for a bit more, ~$120 or up).
When ordering products that need to be shipped from overseas, keep an eye out on shipping prices and any import duties. Certain sellers might offer a better upfront price but charge more for shipping, which can end up in a costlier package. Beware of scams too, and use your best judgement when hunting for deals.
Miniware has provided us with a purchase link that seems to offer competitive pricing for the base station, and also has ordering options for kits, as well as standalone handles and kits. We don’t earn any commissions here, but we’ve decided to include the link since a first-party purchase link is likely the safest place to grab one of these from.
The TS1M is understandably priced above its standalone USB-powered counterparts, with the TS21 offering similar C210 performance for ~$40, and the TS101 offering a more general-purpose soldering experience for ~$60 — comparable to, though not quite as powerful as what the TS1M offers with C245 cartridges. In a way, if you’re not too concerned about portability, a station-based setup might make more sense due to better ergonomics and a more comfortable user experience — and the difference in price between having both cartridge sizes isn’t too great between the TS1M and comparable standalone tools.
Verdict: a soldering station for the masses
…as the heading says. All those wall-powered, copper-tipped, unwieldy irons you’re likely to buy on a whim can’t even come close. The TS1M is a proper station that is much more capable than its minuscule size would lead you to believe — and that can stand toe-to-toe with full-size desktop units. A downside due to its small controller size, naturally, is the required external power supply. Whether you choose a USB or a DC one, it’s going to have to be hefty in order to be able to provide the required 140 W or 200 W.
But it’s easy to love the TS1M when it takes so little space on your desk, yet offers all that a serious tinkerer might need out of a soldering station. It’s worth checking out other options from Miniware — or even other brands (though we’re a bit partial to Miniware) — especially if you’re looking for something a bit cheaper and more compact. We’ve mentioned the TS101 and TS21, but models like the TS80P or Pine64’s Pinecil V2 are high-quality, popular tools as well. Nothing in the price range can quite match the TS1M’s 200 W insane power rating (and even the lower, USB-powered 140 W are plenty to work with), so, especially if you know you’ll be soldering some massive components, the extra TS1M‘s extra oomph could be handy to keep in reserve.
Finally, there are some rough corners (we’ve mentioned them already throughout the article, so we won’t recap them here), but most of them seem like things that get fully patched by the time retail hardware rolls around and a few software updates get pushed out. Some design decisions are ever-so-slightly clunky (while some others we absolutely adore!), and a couple of features we’d love to see are nowhere to be found. But overall, we find the TS1M’s user experience one of the best that Miniware’s made so far. It’s definitely the best soldering tool they’ve ever made.