

Miniware TS21
The Miniware TS21 offers such fantastic performance that it's easy to look past its shortcomings, especially given the attractive price. While we have some gripes about the ergonomics and lack of a finger guard, the TS21 is an appealing and affordable tool for those looking to get more serious about their microsoldering skills.
Pros
- Superb performance
- Fantastic price
- The C210 ecosystem is expansive and offers many specialized cartridge options
- Plenty customizable
Cons
- Somewhat slippery shape, with no finger guard
- The UI can be a bit counter-intuitive at times
The folks over at Miniware are no strangers to designing a mean bit of soldering kit (in addition to their awesome miniature lab equipment). Modern entries in the TS-series are as close as you can get to a quintessential USB-powered soldering iron. The series’s progenitor — the original general-purpose TS100 model — was a landmark design that established smart soldering irons as viable alternatives to more traditional offerings from the likes of Weller, Hakko, and Ersa rather than one-off novelties destined for the tat drawer. Later models further refined the formula, but the new TS21 is the first that breaks the all-rounder family tradition and takes a bold leap into the specialized tool zone.
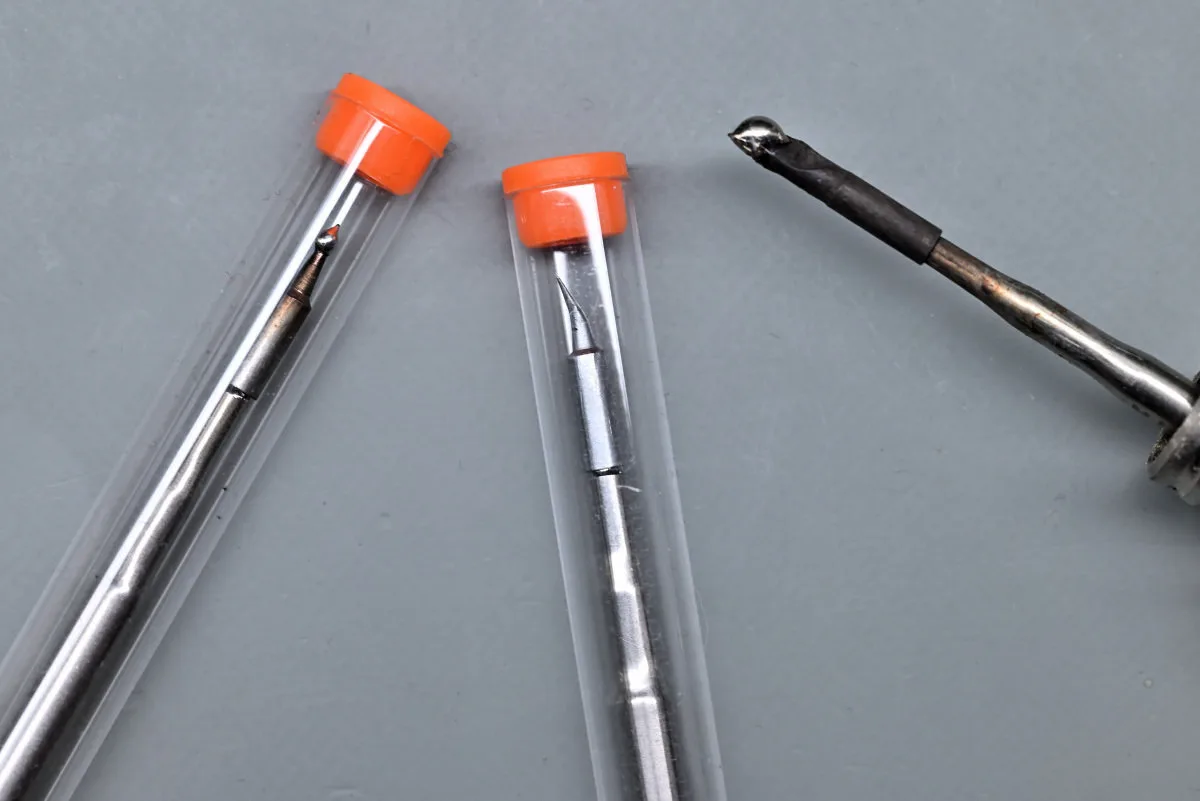
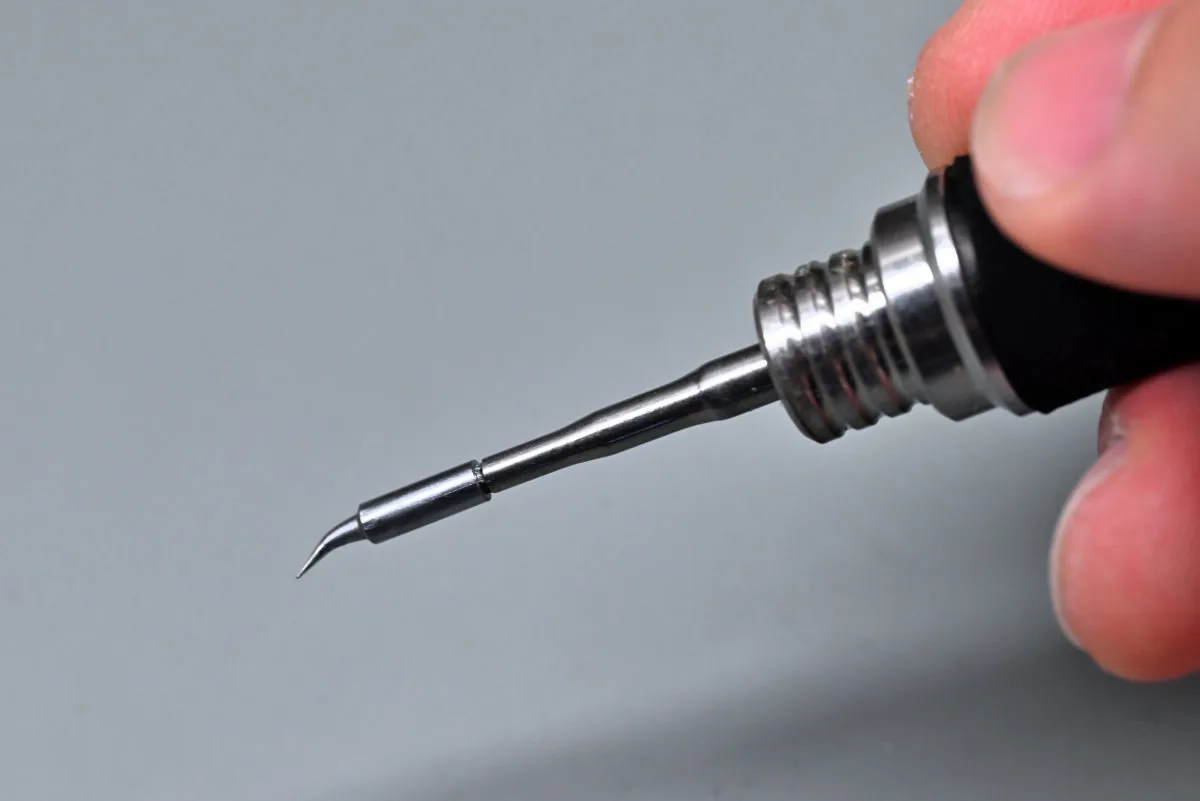
The Miniware TS21 is designed to work with JBC C210-series cartridges. While you’ll find a few general-purpose chisel tips in this lineup, it’s all the various precision conical, knife, spoon, barrel, and other specialized tips that are the series’s bread and butter. On top of that, all C210 cartridges offer a very short handle-to-tip distance that’s ideal for working on SMT or delicate THT components.
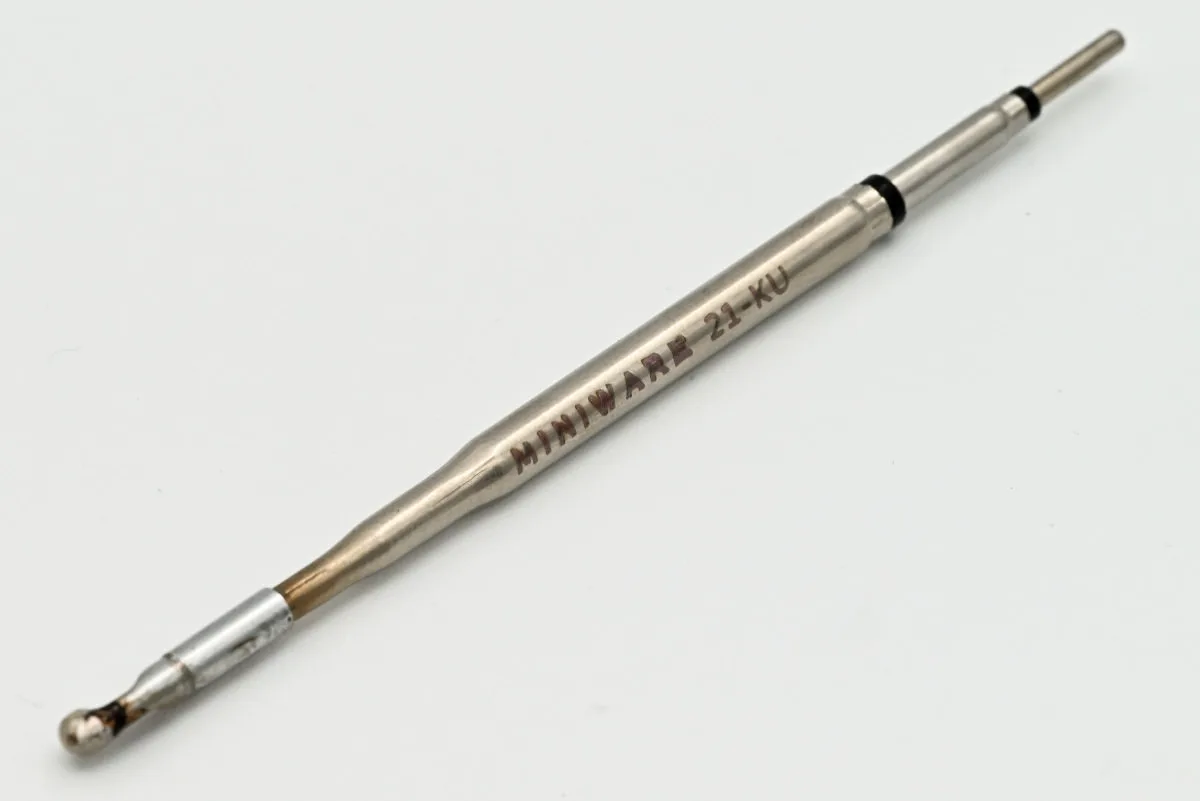
Miniware also offers a small, curated range of their own C210-compatible cartridges. Currently, at the time of writing, there seem to be three tip options available: a TS21-KU knife tip (this is the default one that comes bundled with the iron), a TS21-I precision conical tip, and a TS21-IS bent conical tip.
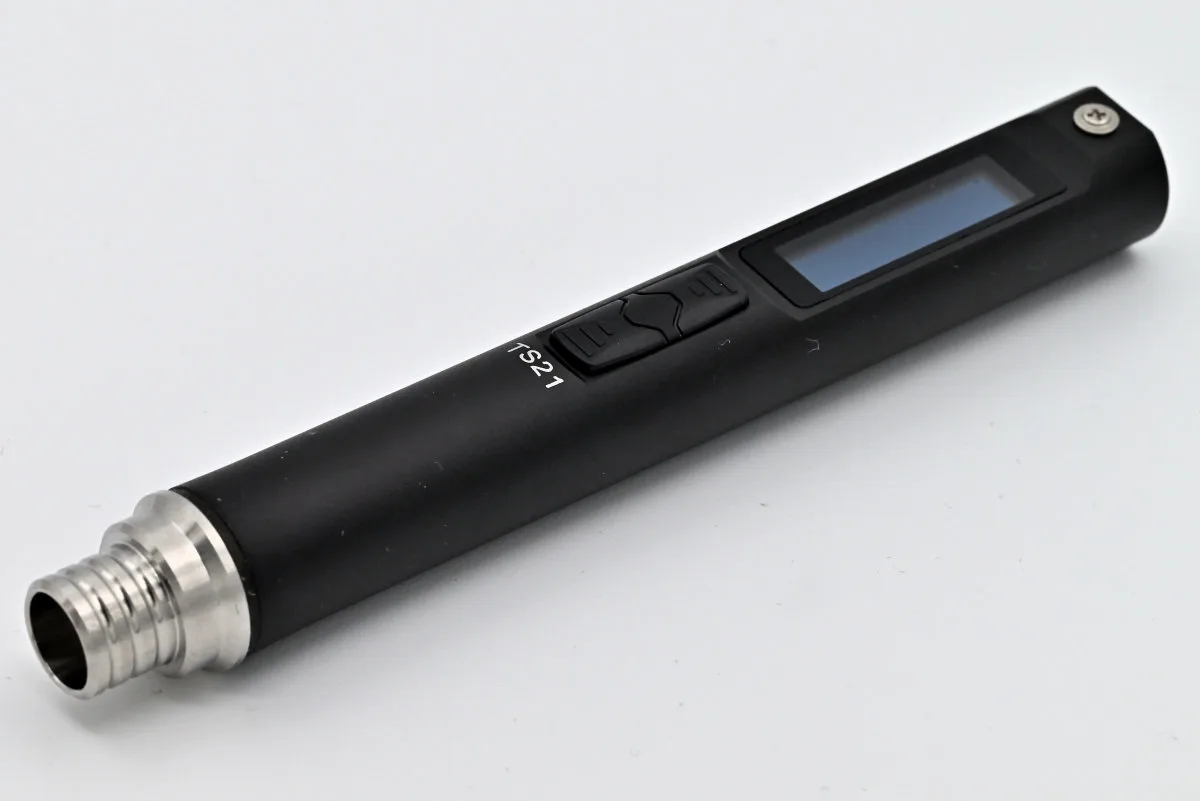
While the TS21’s svelte, rounded frame matches the bite-sized cartridges it’s designed for, it marks a departure from the chunkier, more ergonomic pencil grips we’re used to. It stands out even among Miniware’s own offerings — compared to the TS101, the current flagship, the TS21 looks adorably tiny. But don’t be fooled by its size — or ~$40 price point — this small iron is surprisingly fierce thanks to its 100 W rating (for reference, the TS101 is rated at 90 W) that, as we’ll discuss in a bit, might even be more than the CS210 cartridge format was designed to handle.
Before we continue, we’d like to thank Miniware for sending in a review copy of the TS21. As always, the company had no say in the making of this article and all stated opinions and thoughts are strictly our own.
Unboxing and setup
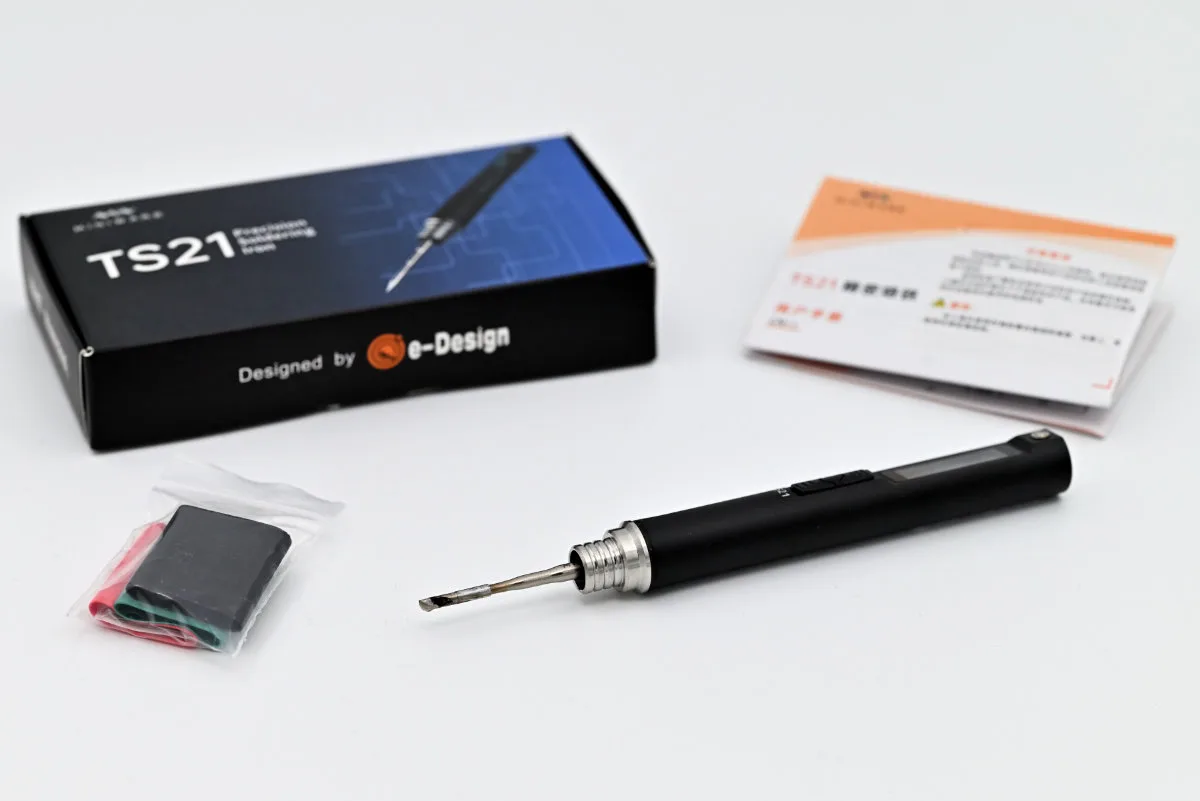
The TS21 comes in a sleek and simple box that’s characteristic of Miniware. Flipping the top open reveals some documentation, a resealable baggy with three bits of heat-shrink tubing, and, finally, a foam pad that houses the iron itself alongside a starter cartridge. That’s it — a small box with just the essentials. Notably, there’s no power supply unit or stand provided. You’ll either have to provide your own or shell out a little extra for one of the kit bundles that include these extra goodies. We’ll cover the extra accessories you’ll need in more detail below.
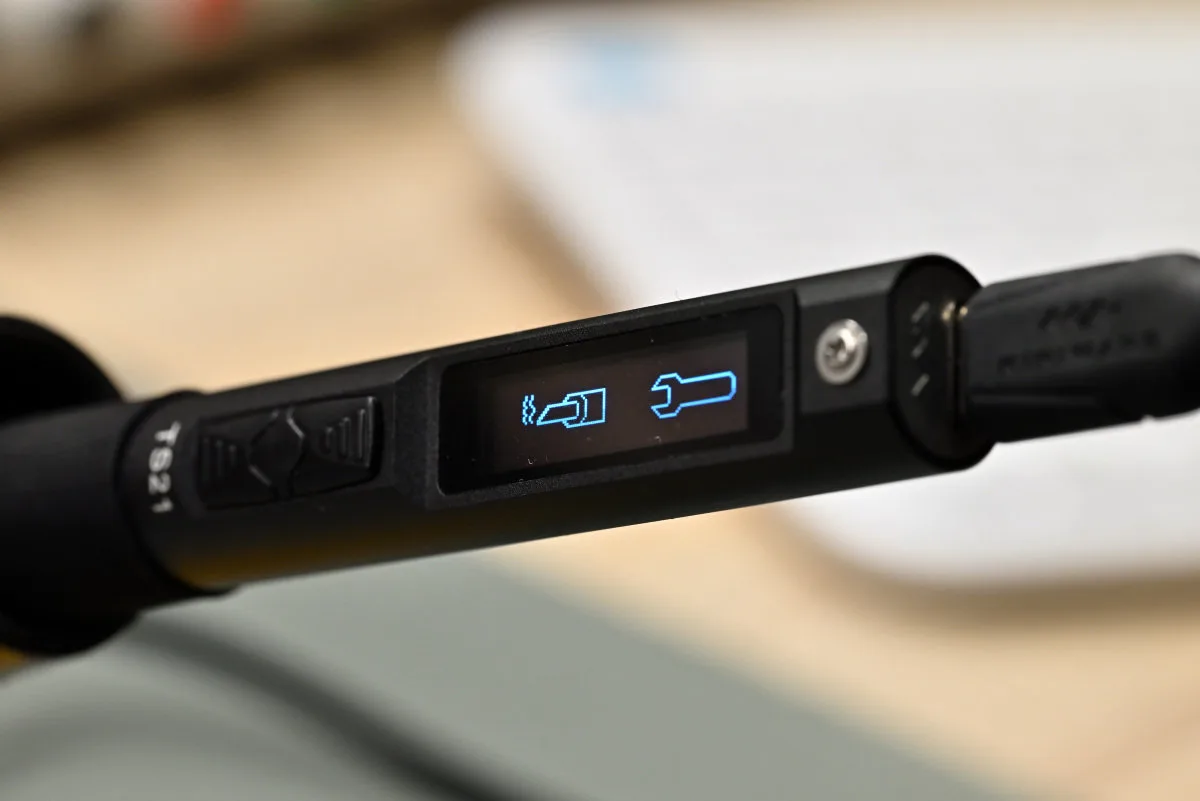
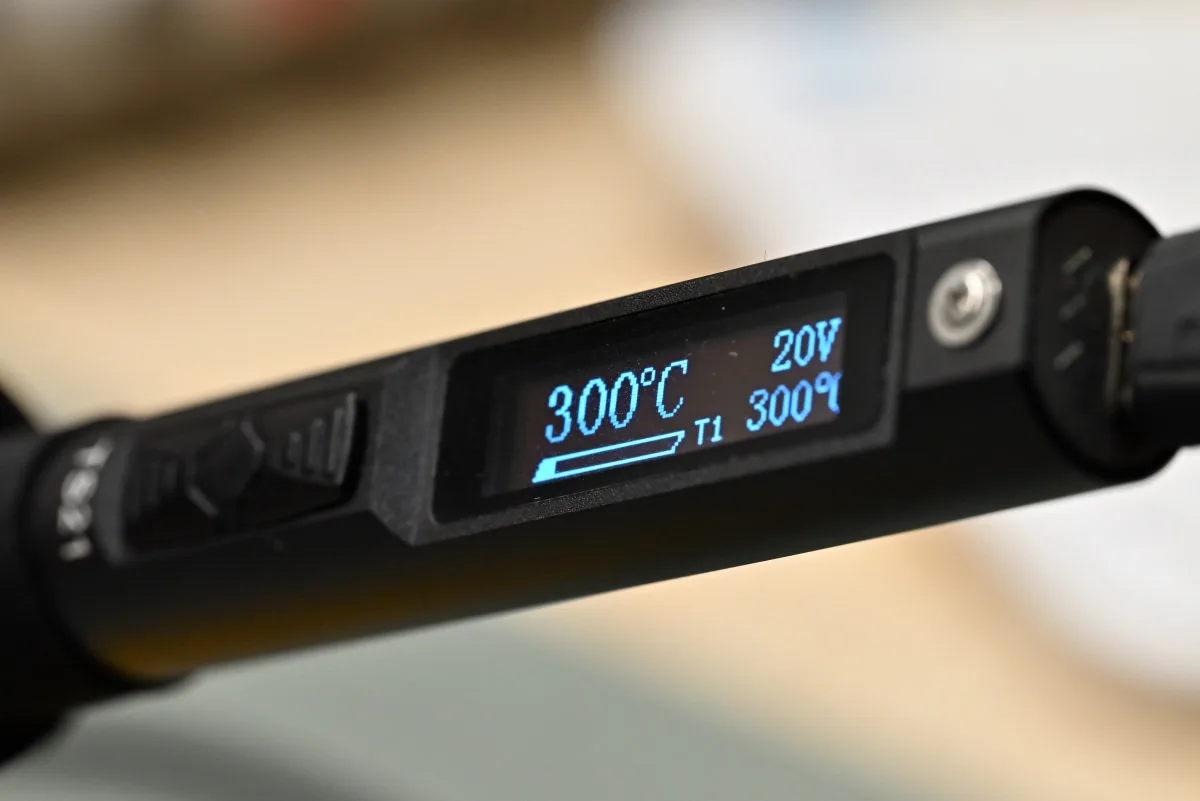
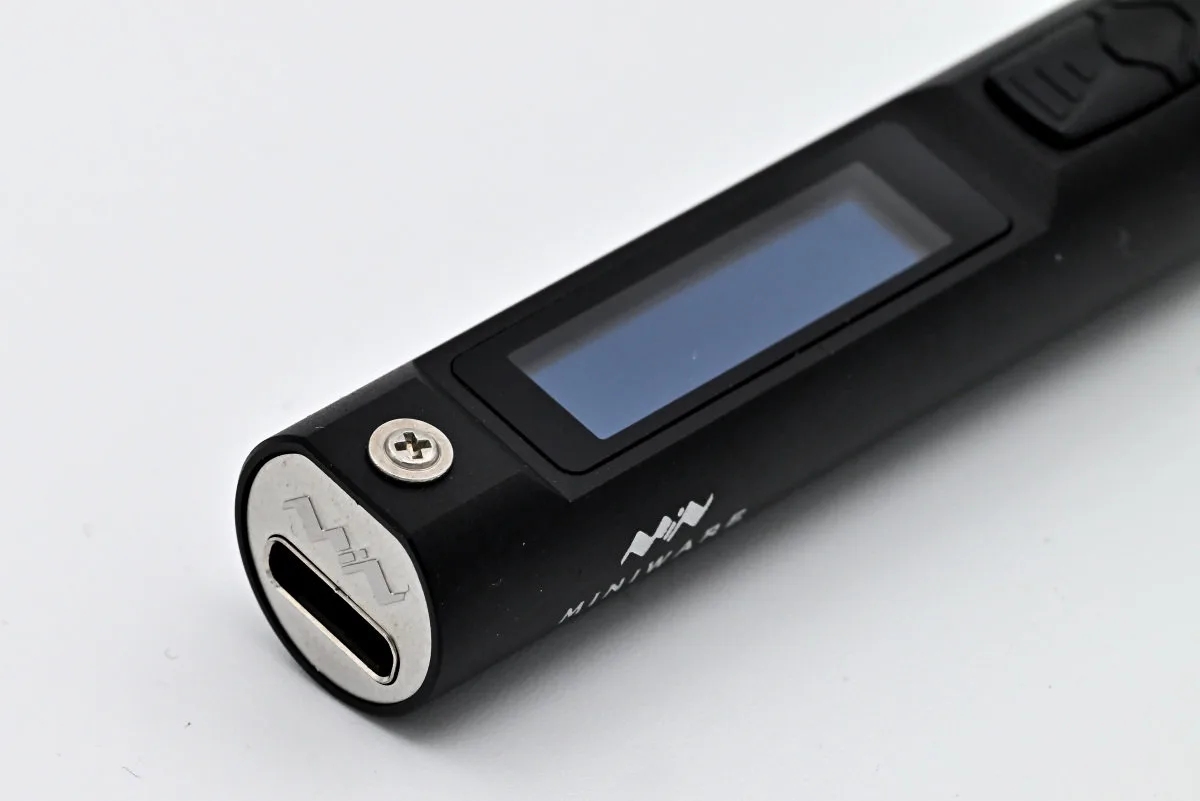
Until then, let’s talk first impressions. The Miniware TS21 is a lightweight iron, but its all-metal construction gives it a satisfyingly premium feeling in the hand. It’s not the most ergonomic thing out there due to its smooth, round chassis, but it’s got very logical button placement. There’s an appropriately-sized OLED display right above the buttons, as well as a small grounding screw should you require some extra ESD protection. The single USB-C port is located at the rear and has a Miniware logo etched above.
Sadly, there’s not much in the way of a grip, not even a textured surface — and let alone a nice finger guard, so the whole body can get slippery and rather ouch-y quite fast, especially if you’ve got sweaty hands.
This is when we turned our attention to the little heat-shrink tubing baggy. Apparently, there’s a little bit of assembly required with the TS21, with the included tubing meant to act as an (improvised) grip of sorts. Tack a bit of double-sided tape onto the iron, take a piece of heatshrink in your favorite color, and blast it with some hot air until it gets applied snugly. And, yeah — this works. It offers some friction to keep your fingers from sliding off and has a nice soft touch feel, though we’d still much rather there were a proper molded grip, even if it meant extra bulk (which, to some, would’ve been nice by itself, even).
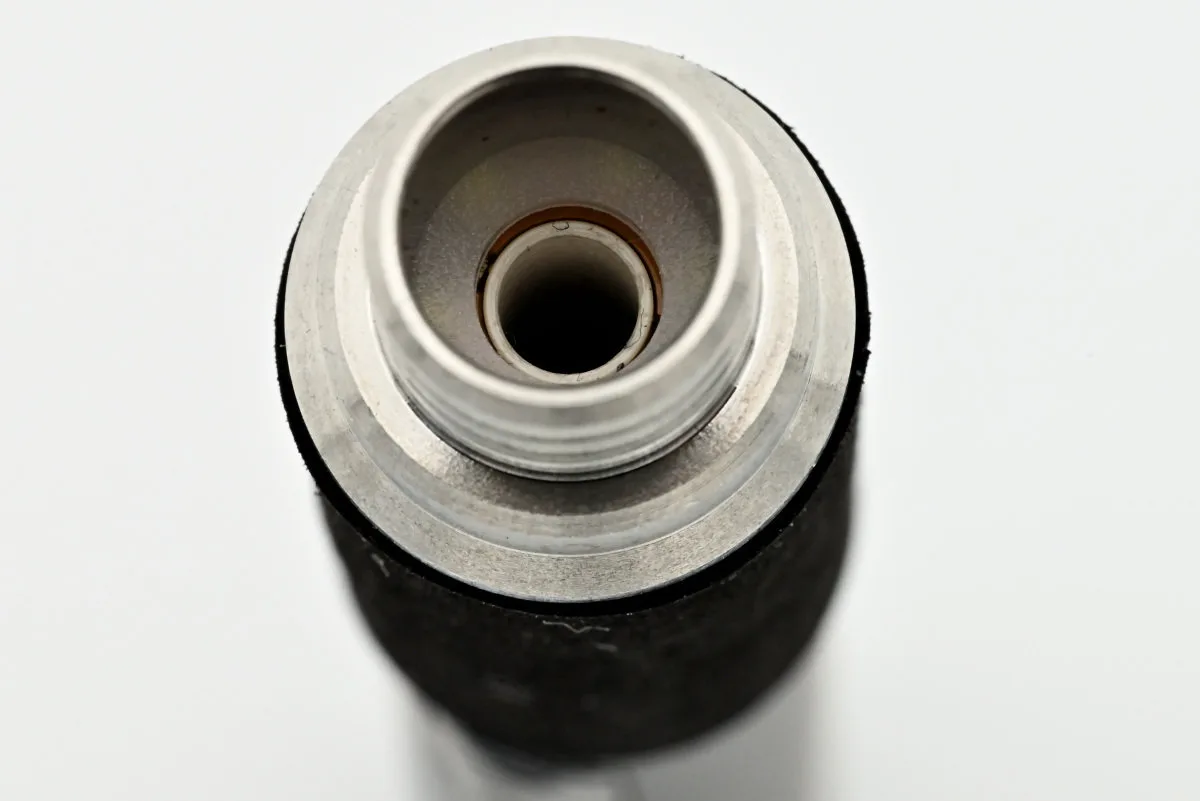
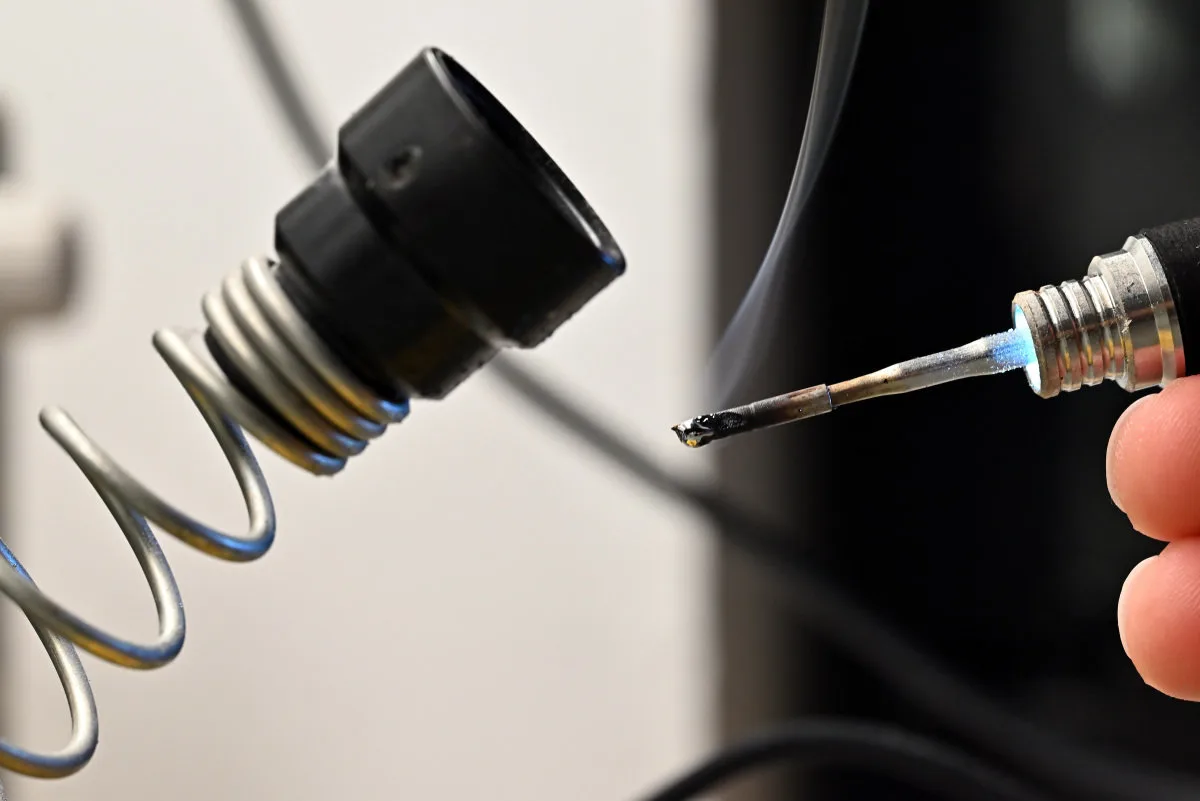
Installing the cartridge is as simple as pushing it into the socket. It takes a little bit of force, so you might want to grab some sort of tool if handling sharper tips. This is good, though, as it means that once installed, the friction-fit cartridges won’t be going anywhere you don’t want them to. Removal is similarly easy as long as you can get a good grip (and nothing’s at a sizzling temperature). JBC’s first-party soldering stations come with a set of built-in attachments for easy handling of warm (and/or pokey) cartridges, so it’d be nice to see something similar from Miniware.
Great! With our iron one-two-assembled, we can take it for a test drive. The Miniware TS21 gets power through its USB-C port, which supports the PD 2.0 protocol, meaning we need to grab an appropriately beefy USB power supply in order to fully utilize the available power. For this review, we’ll be using a 250 W Anker Prime charger to power the iron — just to make sure there’s no performance bottleneck (yeah, you’ll likely be fine with a lower-powered option; we’ll also soon delve into how we jinxed ourselves by mentioning avoiding bottlenecks). It’s also possible to power it using a DC power supply with a corresponding adapter, though you’ll be limited to 60 W in that case.
Getting to know the TS21 better
Miniware likes their UIs streamlined. The Miniware TS21’s two buttons are all you get for navigating around. This does sometimes lead to clunky interactions, but also makes sense from a product design perspective. Who’d like a tool so riddled with buttons that just holding it the wrong way leads to an unintended press?
The TS21 workflow is split across three modes. When powered on, the iron boots up in standby mode during which the tip stays cold. From standby mode, with just a short button press, you can enter the two other modes — heating and settings — as well as check your iron’s firmware and hardware versions and measure the cartridge’s internal resistance with a long press. In case the iron’s tip is hot, the standby mode interface also displays current temperature readings as a warning not to, you know, poke at it.
The settings mode is pretty self-explanatory — it’s a menu system where all of the iron’s customizable options reside. There are a lot of things you can tweak here, including three configurable temperature presets, temp calibration, and power limit settings (notably, power is limited to 60 W by default), just to name a few. And while we dig the overall menu structure, the two-button interface somewhat gets in the way. Navigating around is easy enough, with the buttons acting as up and down arrow keys. Selecting an option requires a long-press, as does returning to the previous menu. Once you actually start editing a field, the two buttons get reassigned to value input duty — but as there’s no dedicated back or enter key (and long-pressing a button in this case just quickly increases or decreases the value/cycles through options), in order to save an input you just have to… wait until the default 5-second time-out kicks in.
This is a nice segue into another, albeit minor, related quirk of the OS. At least to us, the buttons sometimes seem like they do the opposite of what they should. For example, why is the button that scrolls up in menus the one used to confirm a selection, while the button that scrolls down acts as an escape key? Wouldn’t it have made more sense if the reverse were the case? Dunno — to us, going up is very much related to escaping out of a menu or a selection. Perhaps we’re way too hung up on computing paradigms.
Heating mode is where you’ll spend most of your time. As soon as you enter it, the iron starts heating up to the temperature set in the first preset slot. By default, this’ll be 300 °C, with the other two presets at 350 °C and 400 °C, respectively. One of the buttons lets you quickly cycle between these, while the other allows for entering a custom temperature setting (not retained between power cycles — for that you’ll have to edit the presets in the settings). There’s also a boost mode, accessible by a long-press, that quickly heats the iron up to a preset temperature that’s maintained as long as the button is held (by default this is 400 °C, but can be cranked up to a reasonable 450 °C).
Over here, we’re used to the industrial Weller WS81 that’s our lab’s staple. It’s a chunky, all-analog beast that’s as old-school as it gets, built to survive the apocalypse. Nothing’s automated, but it works and is likely made out a chunk of adamantium or something similar. On the other hand, the Miniware TS21 has a lot of smarts — when its on-board accelerometer determines that it’s no longer moving around in your hand (that is, that you’ve slotted it into a stand), after 60 seconds (also tweakable!) the system enters a sleep state. While sleeping, the tip is kept much cooler, at just 100 °C. The TS21 automatically exits sleep mode when movement is detected, and returns to a working temperature. In addition to sleep, it’s also possible to set an idle time — a longer period of time during which no movement is detected, and after which the iron exits heating mode altogether and returns to standby mode.
These features are nothing new, and many more modern offerings from manufacturers like JBC and Weller offer a similar pair of sleep/standby states. But we’ll be the first to admit: we were a bit skeptical about the accelerometer-based implementation and potential misreads, especially at the TS21’s price point. However, there have been none such occurrences, though our springy iron holder can sometimes make the TS21 think it’s still being held for a few extra seconds as it wiggles around before settling (just to be clear, this is not the iron’s fault, but rather just a cute little thing to mention). The sensor is quite sensitive and reacts to the tiniest bit of movement. On top of that, the high power rating paired with the relatively small thermal mass of the precision tips leads to really fast heat-up times (2-3 seconds), meaning that the iron sleeping never really gets in the way. By the time you pick it up and bring it close to the board you’re working on, the tip will have gotten nice and toasty and ready to tackle your next joint.
But perhaps the TS21’s most endearing feature is its little built-in LED light that surrounds the cartridge connector. It’s set somewhat deep into the iron’s body, keeping it far enough from any solder or flux splatters while still offering decent and even illumination thanks to a plastic diffuser ring. And it really does help, especially as a supplemental light for small components located in shadowy nooks and crannies where your bench lighting just can’t reach (and who would’ve guessed it, that’s exactly what these precision soldering cartridges are great for).
All this and then some is covered in the user manual, which is generally well-written but has some clunky details. Even though it’s only a couple of pages long, it can be a tad difficult to navigate, and some important details seem to have been glossed over. Usually, a little bit of trial and error with a tool in hand is enough to answer any and all questions — and soldering irons (thankfully) tend not to be terribly lethal.
Hands-on with the TS21
Let’s start with something that’s a daily task for most avid electronics DIY-ers: soldering pin headers. While a precision tip won’t be ideal for this kind of work due to its lower thermal mass, the Miniware TS21’s powerful heat output and tried-and-tested cartridge design more than make up for it (after all, cartridge-based irons are as good as their cartridges are). We’ve tried both leaded and lead-free solder and, even though the latter requires more heat and tends to wet a bit worse, we really didn’t feel much of a difference, getting nice and shiny joints every time with the iron set between 300 °C and 350 °C.
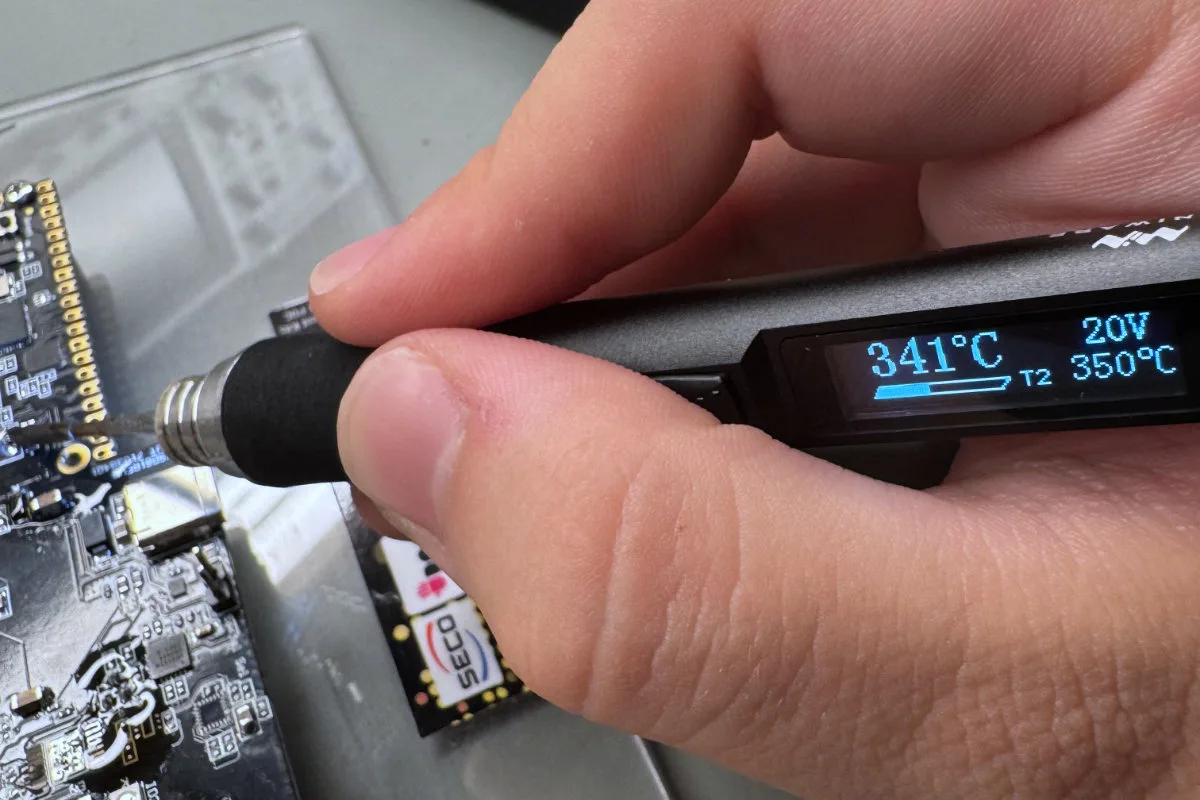
There’s also one very neat bit of UI that we’ve only discovered while actually working with the TS21. Below the chunky numbers denoting the current temperature, there’s also a bar graph showing the current power draw. This is a very handy feature present on many modern soldering stations that lets you actively monitor how hard your iron’s power supply has to work in order to keep the tip at your target temperature.
The USB power supply that we’re using comes with monitoring tools of its own, so we were able to confirm that the TS21 pretty strictly follows its power limit setting. This is especially useful when running off of an external battery. We’ve tried an old Huawei-branded power bank with a 40 W output (this guy’s spent the past 5 years charging our gadgets on-the-go and is still going strong), and while it (naturally) couldn’t keep up with the TS21 at the default 60 W (the iron kept detecting small voltage drops and refused to enter heating mode altogether), limiting the power to 35 W let us rock a portable setup with no issues.
Let’s also try some SMT work — after all, that’s what the Miniware TS21 was designed to do. The included knife tip not only makes quick work of even the tiniest 0402 components, but is also great for drag soldering and resolving bridges and can be used as a decent enough general-purpose tip thanks to its combination of a sharp edge for precise work in hard-to-reach places and a wide side profile (well, relatively wide in the case of the overall small TS21-KU cartridge). And while our usage of decent enough might have given away that knife tips are not our personal favorite, they have plenty of fans which would readily throw hands at us for saying this — and which would be overjoyed with Miniware’s default choice. Maybe we’re just bad at using knife tips.
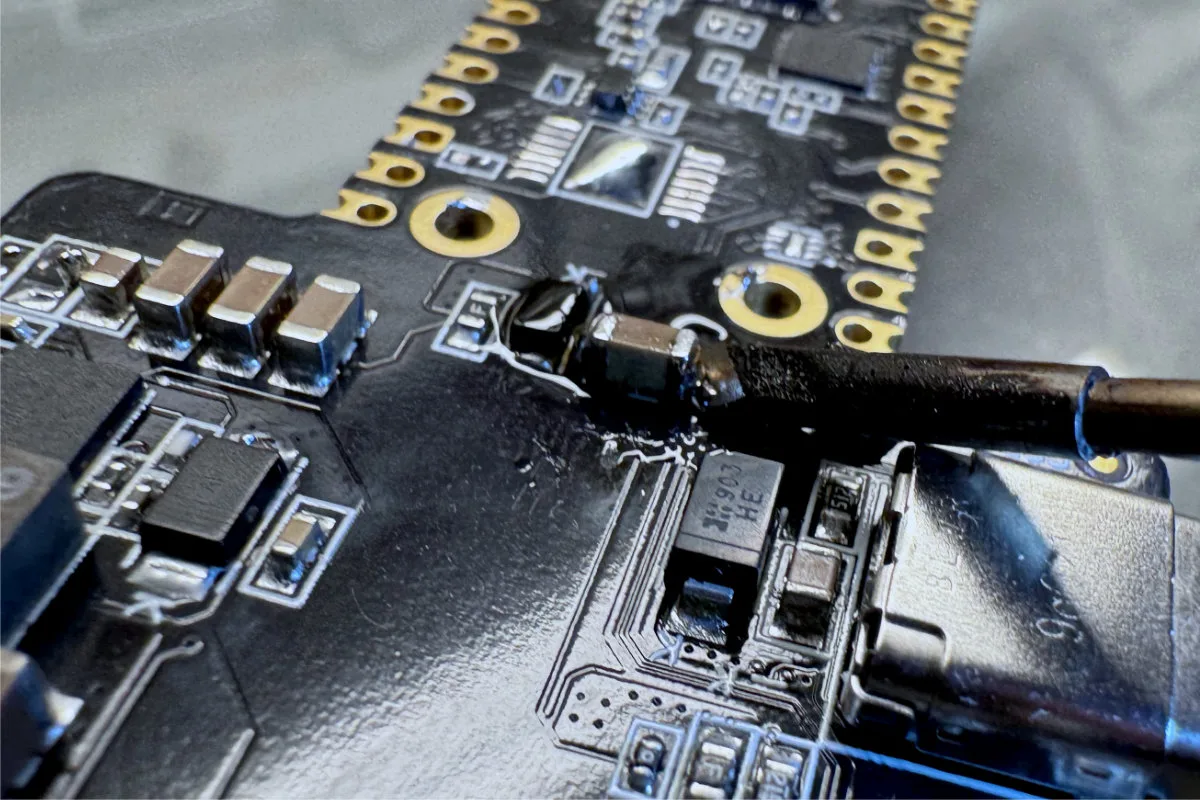
Nevertheless, the TS21 delivers stellar performance. With the temperature set to 350 °C, we’ve found it easy to desolder little surface-mount capacitors and resistors (we’ll give that to the knife tip — it’s really fun to remove stuff with). Soldering was just as simple, and even though we’d usually use hot air for components at this scale, a little bit of a manual approach never hurt anyone (and was surprisingly pleasant). Even our first go at drag soldering with the TS21 (performed on a poor, unsuspecting RP2040 microcontroller) went well. Fantastic stuff!
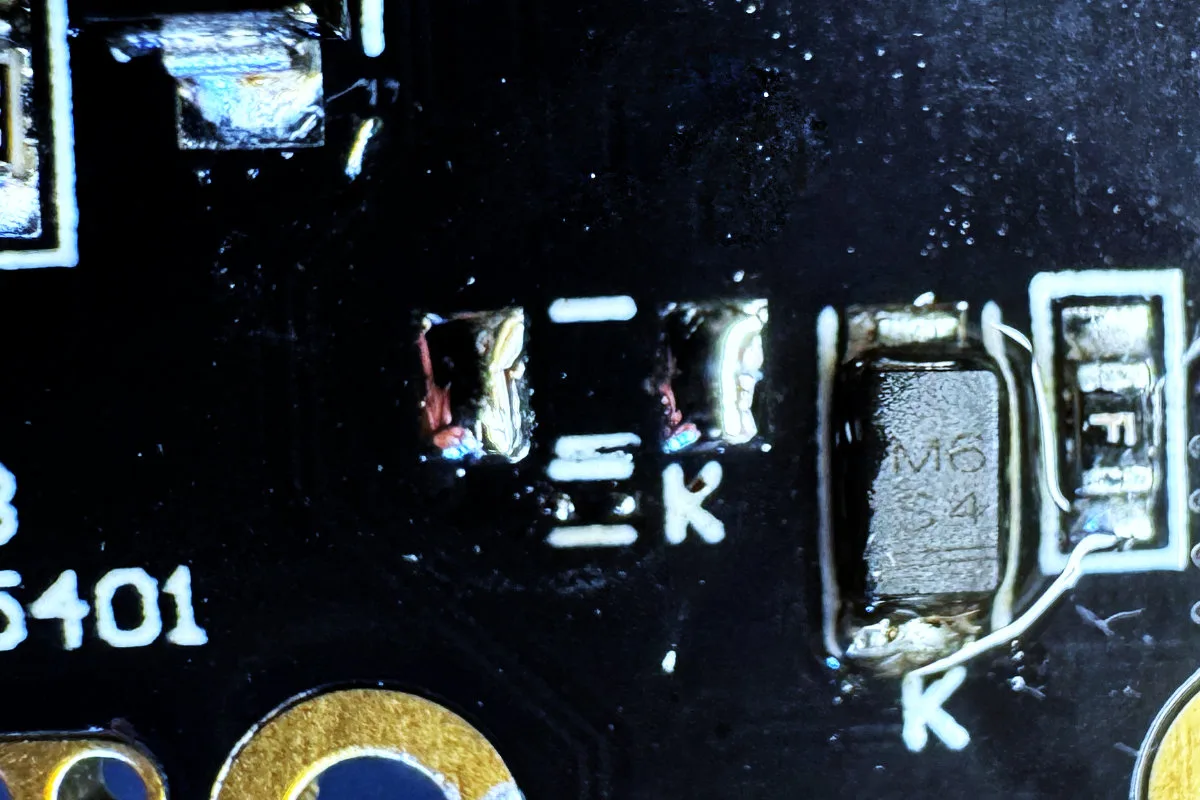
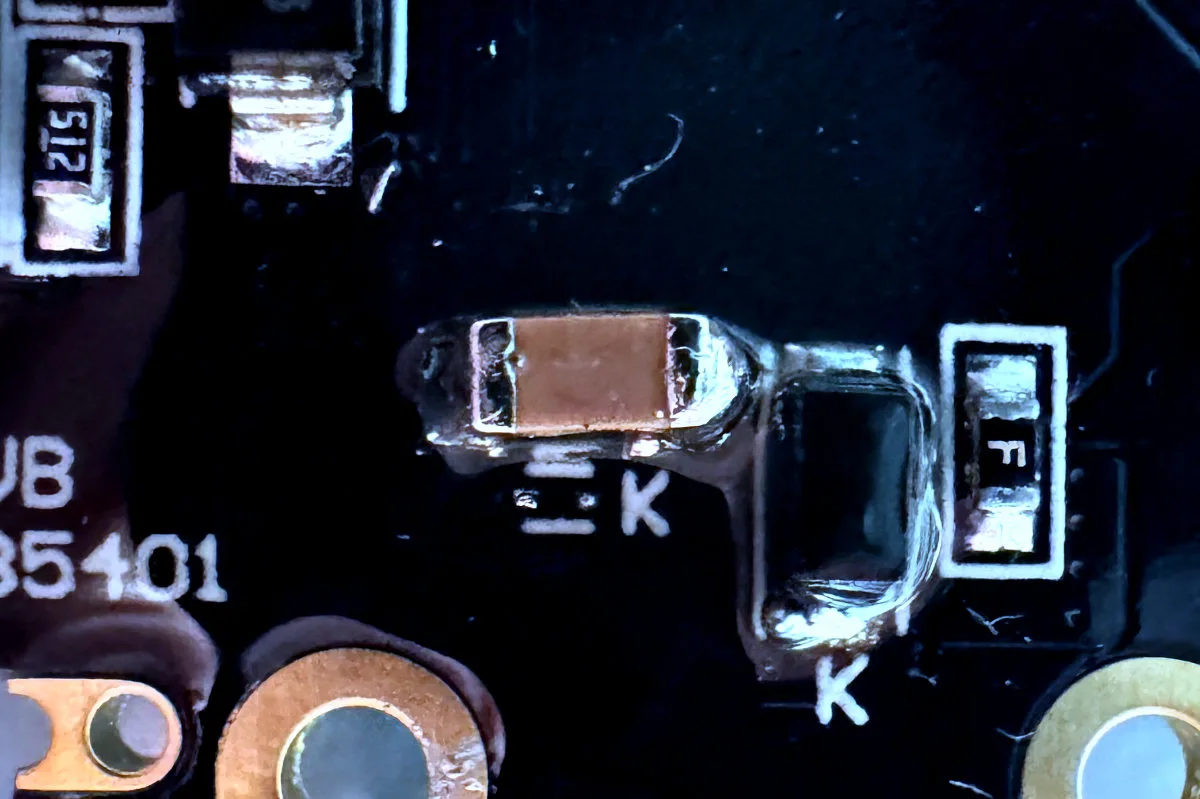
What impressed us the most was how well the TS21 did on some thermally challenging tasks, including using copper wick to remove solder from a large joint connected to the PCB’s ground plane. It was a breeze, despite the tip’s modest thermal mass, though it does take a little bit of know-how and coordination.
Keep in mind — most of this was done at the default 60 W setting, and some of it at an even lower 35 W. Yeah, a modern C210-based iron can’t not perform well, but it’s still pretty impressive to see how far hobbyist-grade tools have come. This is a serious bit of kit! Compared to traditional tip designs where there’s a mechanical interface between a heater located in the handle and a small, passive tip, newer cartridge-based systems feel and perform like stuff of the future (our Weller belonging to the former category). There’s a saying that while good tools won’t make you good at a task, bad tools will most definitely make your work hellish, and this is especially true when it comes to soldering. The TS21 is firmly in the former category, and using it doesn’t make us feel like it was holding us back in any way due to some performance limitation. It’s keeping up with professional equipment of yesteryear — and it’s a sub-$50 tool. Long-term reliability is something that can always be disputed — but when it works, the TS-21 rips. Given Miniware’s reputation, though, we doubt there’ll be issues down the road.
…it’s a shame that we don’t have the other two official TP-series cartridges, as it’d have been interesting to check them out and compare all three. However, we did manage to grab a few inexpensive third-party C210 cartridges that are more or less similar to what Miniware has on offer: a small conical and a bent conical tip. As expected, there were no issues with these — they absolutely get the job done, and while it’s hard to say if they’re better (or worse) than the originals (without having the, you know, having them on hand), it’s very clear that the TS21 isn’t too picky about the cartridges. In fact, if you’re planning to use your TS21 as your only iron, it might not be a bad idea to pick up one of JBC’s original C210 options with a larger tip (third-party manufacturers of these often focus on the more precision cartridge models — though you’ll likely be better off nabbing an iron designed to be an all-rounder in the first place).
But it’s not all perfect in TS21–land. As we spent more time with the iron, the lack of a finger guard kept increasingly bothering us — yes, we’re talking about this again. Sure, it’s not something that you’ll notice if you only work in 15-minute sessions, but holding the TS21 for longer tends to get significantly sweatier, which amplifies the looming psychological horror best described as you-know-what-might-happen-if-you-lose-your-grip.
And as to why that happens? The Miniware TS21’s metal body conducts heat pretty well, meaning that it gets warm during longer sessions — this is something that Miniware openly points out in the manual. We haven’t had it get uncomfortably hot, but the extra heat doesn’t help with sweaty palms and sweaty palms definitely don’t help with maintaining a solid grip.
But ah, lest we get called out for being the absolute worst bunch of nitpickers: we’re sure that the slimline body isn’t the result of some Jony Ivesque race to produce the smallest possible soldering iron, but rather a function-oriented decision. It’s meant to enable the TS21 to reach places where larger, bulkier irons just can’t. And, this pairs well with the built-in LEDs, so there’s some real thought being put into use cases like these. But soldering irons are tools that are often used for hours on end and we greatly value safety. Call it a bit overzealous, but if a feature prevents even a single accident that can occur over hundreds of hours of use, it’s a worthwhile one to design around.
A curious situation regarding the power rating
So, the Miniware TS21 is a 100 W iron that uses USB PD 3.0 tech to reach that rating. It’s worth noting that the default 60 W limit isn’t random: C210-series cartridges are rated at 40 W. Sure, a cartridge is little more than a bit of metal casing with a heating element inside it, so overdriving one a little won’t immediately cause issues. However, continuously driving these 60 W above their spec will lead to premature wear and a shorter lifespan of both the heating element and the tip coatings.
We’ve conducted all of our testing so far at or below the 60 W limit for this very reason, but we just had to know how much meaningful difference pushing the TS21 to its limits would make. Well, we dug through the settings, raised the power limit to 100 W, connected it back to our USB power supply, aaaand… nothing.
Well, not nothing, but rather the same 60 W power limit still seemed to have stayed in place. Huh, intriguing — and it wasn’t just our power supply giving these readouts. The TS21’s handy little bar graph also maxed out at ~60 W.
The Anker power supply that we’re using here allows users to hand-select various charging protocols on a per-port basis, so we got to fiddling with these as we initially assumed that there was something funny going on with the power negotiation. Nope: no combination seemed to have helped.
Believe us, we’ve spent around eight hours in the lab scratching our heads and trying to somehow get a “better” result. Worse yet — the TS21 already heats up so fast at 60 W that it was nigh impossible to see an obvious improvement in warm-up time at a supposed 100 W. We then resorted to a shameful technique of burying the tip into our wet sponge while holding down the 400 °C boost button and seeing whether this would cause the iron to break its 60 W pledge. Nope.
We were ready to call it a day and jot down a little note in the bugs column, but during one of our final attempts, our power supply, through what can only be described as an act of divine providence, ended up displaying a shiny 93.5 W readout for around a second before it settled down to its cozy ~60 W range. So it is negotiating properly.
The only logical conclusion here is that the TS21, due to the hardware specs of the C210-series cartridges, sticks to 60 W during normal operation but reaches its 100 W spec when trying to quickly reach its working temperature. The reason we weren’t seeing this is likely down to our PSU: it has a measurement refresh rate of ~1s, and the iron simply doesn’t spend that much time drawing the full 100 W. At least this is what we think. We’ll reach out to Miniware regarding these findings and will update the article if we get any additional info.
Update (7/14/2025) – We’ve gotten word back from Miniware that our hunch here was correct! The 100 W rating is instantaneous power, that the TS21 allows for 0.25-0.5 s at the beginning of heat-up cycles. During continuous work, the iron draws 60 W.
There was another reason we suspected power negotiation shenanigans, and it’s the fact that some places state that the TS21 actually uses PD 3.1. This’d make it (supposedly) capable of drawing up to 28 V, but we’ve never seen it request more than 20 V. The latter is in line with the PD 3.0 spec that we’ve seen mentioned on Miniware’s official AliExpress listing, and we’re inclined to believe it since our own measurements (together with voltages of up to 20 V) seem to line up.
Conclusion: verdict and alternatives
We’ve made our thoughts on the Miniware TS21 plenty clear so far — it’s a tiny iron with fantastic performance, and some noticeable drawbacks. But, at the end of the day, it’s an inexpensive tool that punches far above its weight class. When it comes to Chinese brands like Miniware, it’s often a tad difficult to actually get a single, concrete figure for the price due to different vendors (and ways they handle VAT and shipping costs), but we’ve seen these go for anywhere from $37 to $45, which is more than reasonable. Original JBC C210 cartridges go for $35 a pop — and here you’re getting an entire iron with a cartridge included for a few more. Granted, you’ll need a decent USB power brick, though you really don’t need to grab a separate one as long as you’re fine with sharing your phone or laptop’s charging brick.
To be fair, saying that the TS21 “punches above its price class” is a bit (well, more than a bit) of an understatement. It’s hard to imagine any hobbyist out there not satisfied with one of these — and we’d wholeheartedly recommend it even to professionals looking for a precision sidekick to their main station. Naturally, if you’re an industrial user, sitting in a high-volume production environment, soldering for 8 hours a day, you’ll know exactly why rugged, industrial options like the JBC DDPE Station cost as much as they do and why you need one — but if you’re not sure what that even is, and are interested in some SMT work (or you microsolder on weekends to fix your colleagues’ broken gadgets), it’s likely that you’ll get a lot more bang for your buck out of something like the TS21. It simply performs fantastically well and is a reasonably reliable tool. With our trusty Weller as a performance reference, we genuinely don’t feel like the TS21 is a worse, but simply a different, if somewhat more frail tool, best suited for a different set of soldering tasks.
The TS21 isn’t the only inexpensive iron out there that uses C210 cartridges — far from it. But it’s a strong contender from a brand with a stellar reputation. This is why it’s genuinely hard to recommend a direct alternative, unless you’re looking at JBC’s first-party tools, all of which are significantly more expensive.
Now, whether you want a C210-based system at all is a whole other story. If you’re getting your first bit of soldering kit and are interested in soldering the odd pin-header or assembling a DIY soldering kit, something more general-purpose, like Miniware’s own TS101 or the competing Pinecil v2 might be a lot better. We’ve already mentioned that, with the proper cartridge, the TS21 can act as a solid all-rounder, but when you tally up the total cost, it might not be worth it, especially if you’re not interested in SMT work at all. And that’s not to say that the TS101 doesn’t offer some excellent precision tip options (though, C210 cartridges are a better overall design than the Hakko T12-inspired designs both of these alternatives use)! If you go the TS101 route, its more ergonomic body also comes with a decently pronounced finger guard — how’s that for a nice little extra? JBC also makes a more general-purpose range of cartridges, the C245 series, and there are plenty of options based on these, too. Just avoid any suspicious, no-name listings.
But the TS21 is right at home for those already happy with the tools they’ve got, looking to expand into some finer, precision soldering and to tap into one of the best tip/cartridge catalogs for such work. While we were initially a bit surprised with the branding, Miniware made the right call with this one — it is right at home slotting little 1608 components right where they belong. For $40, you can’t go wrong.