

Update (9/7/2024) – Due to OS updates, the /boot/config.txt file is now the /boot/firmware/config.txt file. This has been changed in the article.
Most Raspberry Pi models can be overclocked to some degree. The Pi 2’s CPU could be pushed a few hundred MHz above its base 900 MHz clock, the Pi 3 could reach 1.4 GHz up from its base 1.2 GHz. The Pi 4 can be overclocked quite generously, with users pushing 2.3 GHz on some configurations. That’s more than a 50% increase to its 1.5 GHz base frequency.
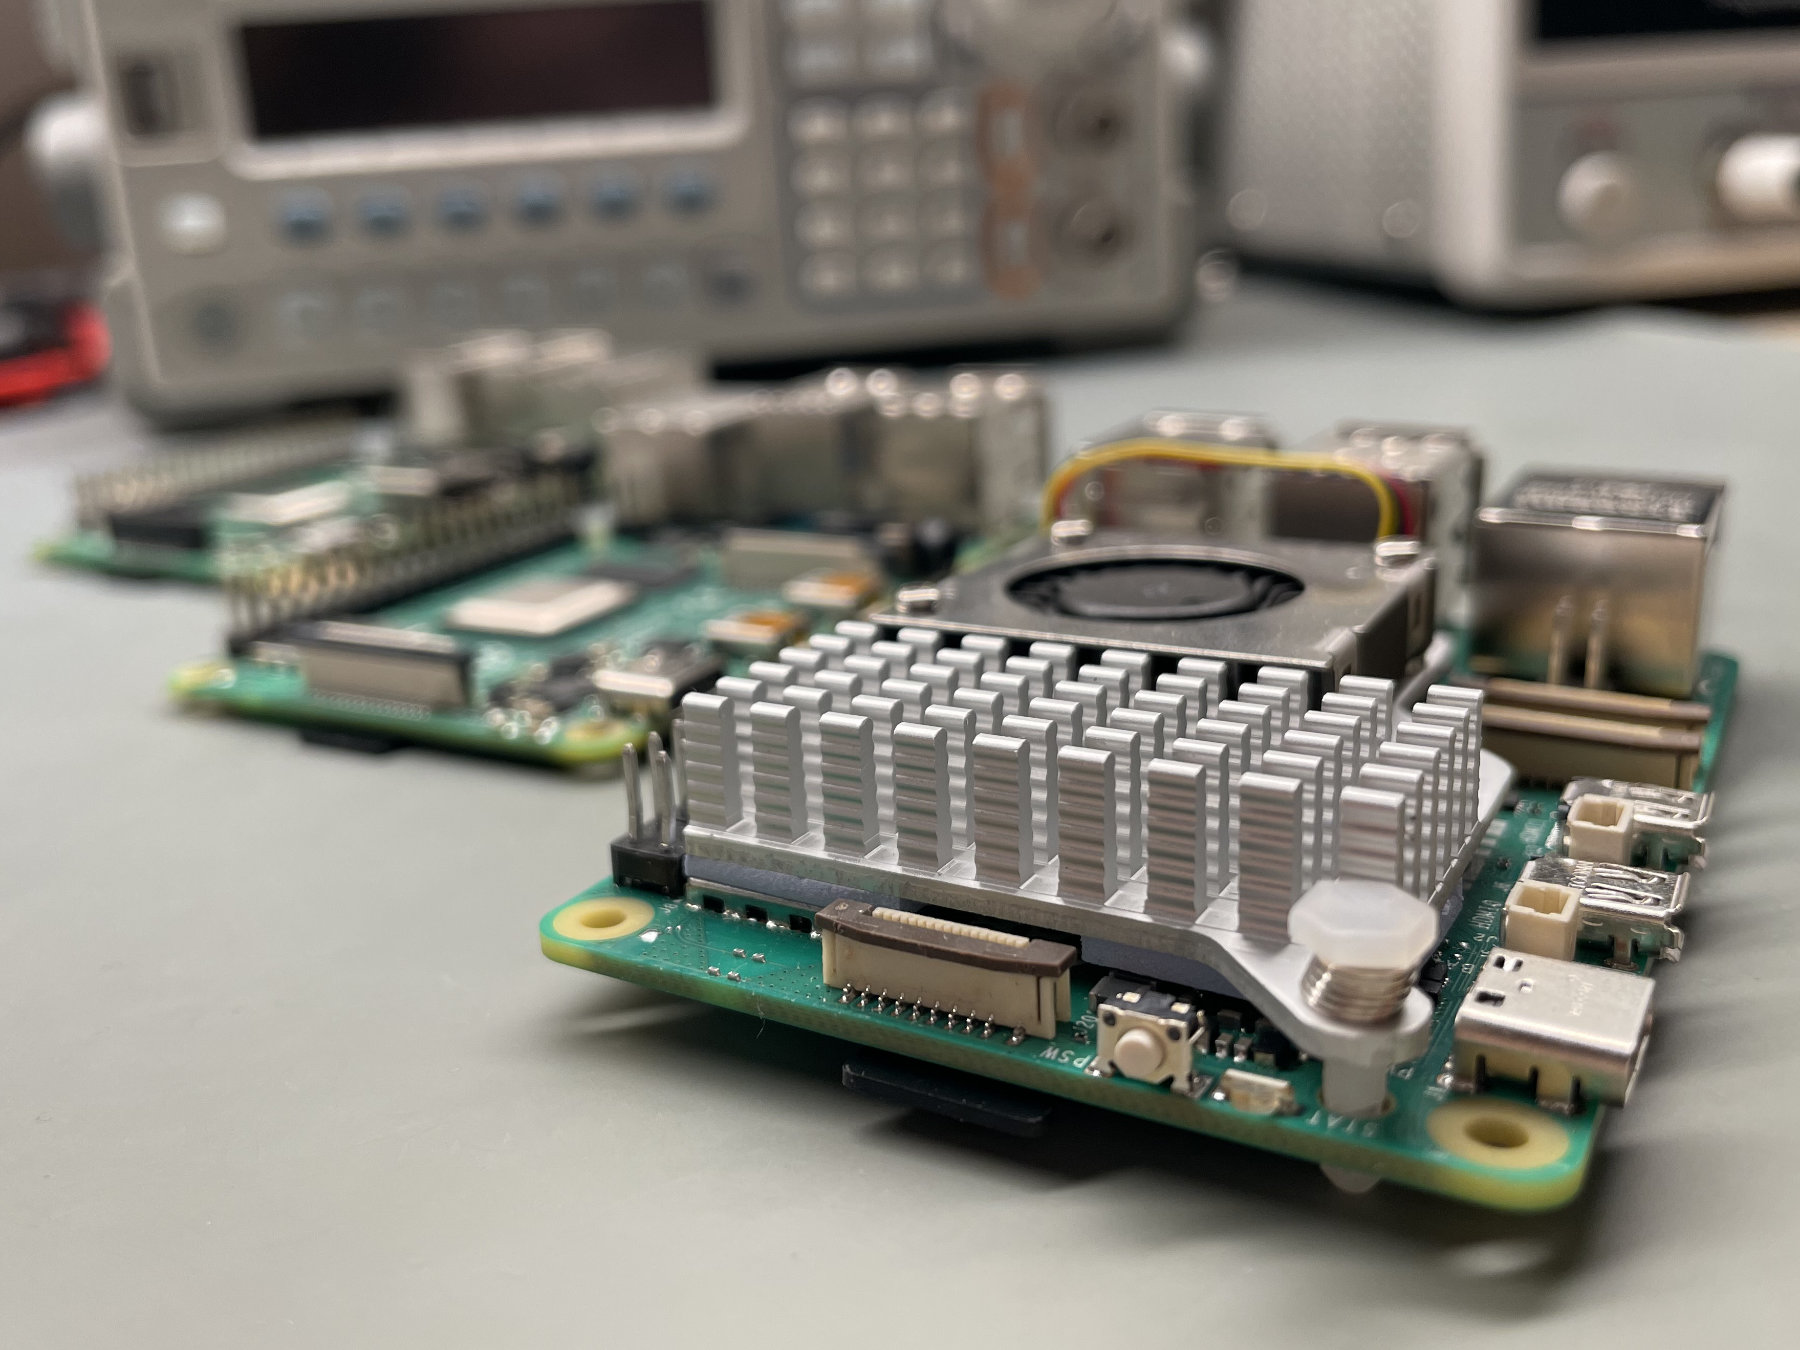
The Raspberry Pi 5 immediately outclasses its predecessors by offering a much higher 2.4 GHz base clock, which is immediately impressive. Of course, as we’ve seen in our Raspberry Pi 5 review, this comes at a cost, as the new Raspberry Pi very quickly gets quite warm during use and thus requires a robust thermal solution.
Despite this, there’s additional untapped performance in the Raspberry Pi 5. How far you can push your board is highly dependent on the silicon lottery, but looking at the early articles, the numbers we see most people cap out at are 2.8 GHz, 3.0 GHz and 3.1 GHz.

Overclocking a Raspberry Pi board isn’t limited to its CPU, though, as most VideoCore GPUs offer some level of overclocking capabilities. The VideoCore VII in the Raspberry Pi 5 can reportedly be clocked up to 1.1 GHz, which is a nice 30% boost. Of course, this also depends on silicon lottery, so not every Raspberry Pi 5’s VideoCore will be able to reach top speeds.
Since we’ve got a Raspberry Pi 5 board on hand, let’s see how far our board makes it.
Overclocking procedure
The steps to overclock the Pi 5 are quite simple, and virtually identical to the older board. The only changes required are to the /boot/firmware/config.txt file, which requires a few additional lines. You can safely edit this file on the Raspberry Pi itself, using nano or other text editor of choice.
All of the edits should be made in a section of the file labeled [all], which should be located at the end and should be empty on a fresh system installation. Don’t worry – we’ll show our finished file ready for overclocking at the end of this section.
In order to keep the system stable when overclocked, we need to ramp up the voltage to the CPU.
Traditionally, this is done by adding an over_voltage parameter to the file, which would brute-force the power regulator to deliver a higher voltage to the SoC. However, starting with the Raspberry Pi 4, all boards feature DVFS (dynamic voltage and frequency scaling), a mechanism which allows the board to regulate the SoC voltage according to resource demand, which lowers power draw and general temperatures.
While manually setting the over_voltage parameter is still a viable option, it does override DVFS settings, which is somewhat suboptimal.
Luckily, there’s a way to supply more voltage to the SoC while still keeping the dynamic scaling on – the over_voltage_delta setting. It’s used in much the same way as the older command, except the number being passed here represents the exact number of microvolts that the chip is allowed to draw. Of course, thanks to DVFS, the SoC voltage at any given moment is likely to be lower, with the peaks supplied under heavy system load.
For example, this means that over_voltage_delta=100000 would extend the possible voltage range by 0.1 V. This might be enough for some boards, but not quite for others – essentially boiling down to imperfections in the chip silicon itself.
To avoid having to guess the magic number for your board, we recommend adding over_voltage_delta=500000 to your /boot/furmware/config.txt file. This might seem dangerous at first, but you can find a detailed explanation about why it really isn’t in this article.
After this, we need to tell the Raspberry Pi the exact frequencies at which we want the CPU and GPU to run, which we do by adding the following text to the file:
arm_freq=2800
gpu_freq=800
The two numbers represent the frequencies of the CPU and the GPU, respectively, which default at 2400 MHz and 800 MHz. We’ve set these as 2800 MHz and 800 MHz (a 400 MHz boost for the CPU while keeping stock speeds for the GPU) in our snippet above, as we feel they optimally balance speed and stability for most users.
The entire /boot/firmware/config.txt file should look like:
# For more options and information see
# http://rptl.io/configtxt
# Some settings may impact device functionality. See link above for details

# Uncomment some or all of these to enable the optional hardware interfaces
#dtparam=i2c_arm=on
#dtparam=i2s=on
#dtparam=spi=on

# Enable audio (loads snd_bcm2835)
dtparam=audio=on

# Additional overlays and parameters are documented
# /boot/firmware/overlays/README

# Automatically load overlays for detected cameras
camera_auto_detect=1

# Automatically load overlays for detected DSI displays
display_auto_detect=1

# Automatically load initramfs files, if found
auto_initramfs=1

# Enable DRM VC4 V3D driver
dtoverlay=vc4-kms-v3d
max_framebuffers=2

# Don't have the firmware create an initial video= setting in cmdline.txt.
# Use the kernel's default instead.
disable_fw_kms_setup=1

# Disable compensation for displays with overscan
disable_overscan=1

# Run in 64-bit mode
arm_64bit=1

# Run as fast as firmware / board allows
arm_boost=1

[cm4]
# Enable host mode on the 2711 built-in XHCI USB controller.
# This line should be removed if the legacy DWC2 controller is required
# (e.g. for USB device mode) or if USB support is not required.
otg_mode=1

[all]
over_voltage_delta=500000
arm_freq=2800
gpu_freq=800
Naturally, some settings may vary depending on your OS version, but the general file structure should not differ much.
After you’ve saved your changes, run a sudo reboot, and you should boot into an overclocked system. Congratulations! Your Raspberry Pi 5 just got a nifty speed boost.
You can always revert back to stock frequencies by undoing the changes you’ve made to the file and rebooting again.
…in case this fails…
Don’t fret. If the system fails to boot or is extremely unstable, preventing you from reverting the changes you’ve made, there is still a simple way to recover it.
All you need to do is unplug your Raspberry Pi and take the SD card out. After that, plug it into any computer which should let you browse around and edit files in the /boot folder. Locate the config.txt file in the /firmware folder and revert any changes you’ve made.
If you want, you can also try out a milder 2600 MHz overclock before giving up, which should work on virtually every Raspberry Pi 5 board.
Remember to save your edits, safely eject the card and put it back into the Pi before trying to boot again. This should let you right back into the system, as if nothing ever happened!

Further overclocking steps
In case your system properly boots and is seemingly stable with the overclock enabled, verify it by running:
sudo cat /sys/devices/system/cpu/cpu0/cpufreq/cpuinfo_max_freq
In case of our overclock, this should return 2800000, verifying our 2.8 GHz overclock.
You can also try pushing your Raspberry Pi 5 a bit further, up to 3.0 GHz or even 3.1 GHz. Simply change the respective value in /boot/firmware/config.txt, and you’ll be set!
In case your Raspberry Pi refuses to boot with these more aggressive settings, follow the same steps we’ve outlined above in the case of overclocking failure, and revert the values back to a number which yielded stable system operation.
If your system doesn’t support these higher clocks, don’t get too miffed, as ours only made it to 2.8 GHz, refusing to boot at 2.9 GHz and above. This is what the Raspberry Pi engineering team had to tell us when asked about their expectations: “While we have heard of success at 3.0GHz, I suspect most boards won’t do that (at least reliably when stressed) …”
In case you’re interested in getting the GPU overclocked, feel free to set gpu_freq to 900 MHz, or even 1 GHz. In our tests, however, this didn’t impact the performance that much, and the 1 GHz overclock even brought down glmark2 results down a little (from 902 FPS down to 877 FPS). This is probably down to RAM speed staying the same, bottlenecking performance a little, and some things going awry in the software backend due to the higher clock, too. We’d generally advise leaving the VideoCore GPU at its stock 800 MHz.
What about performance and thermals?
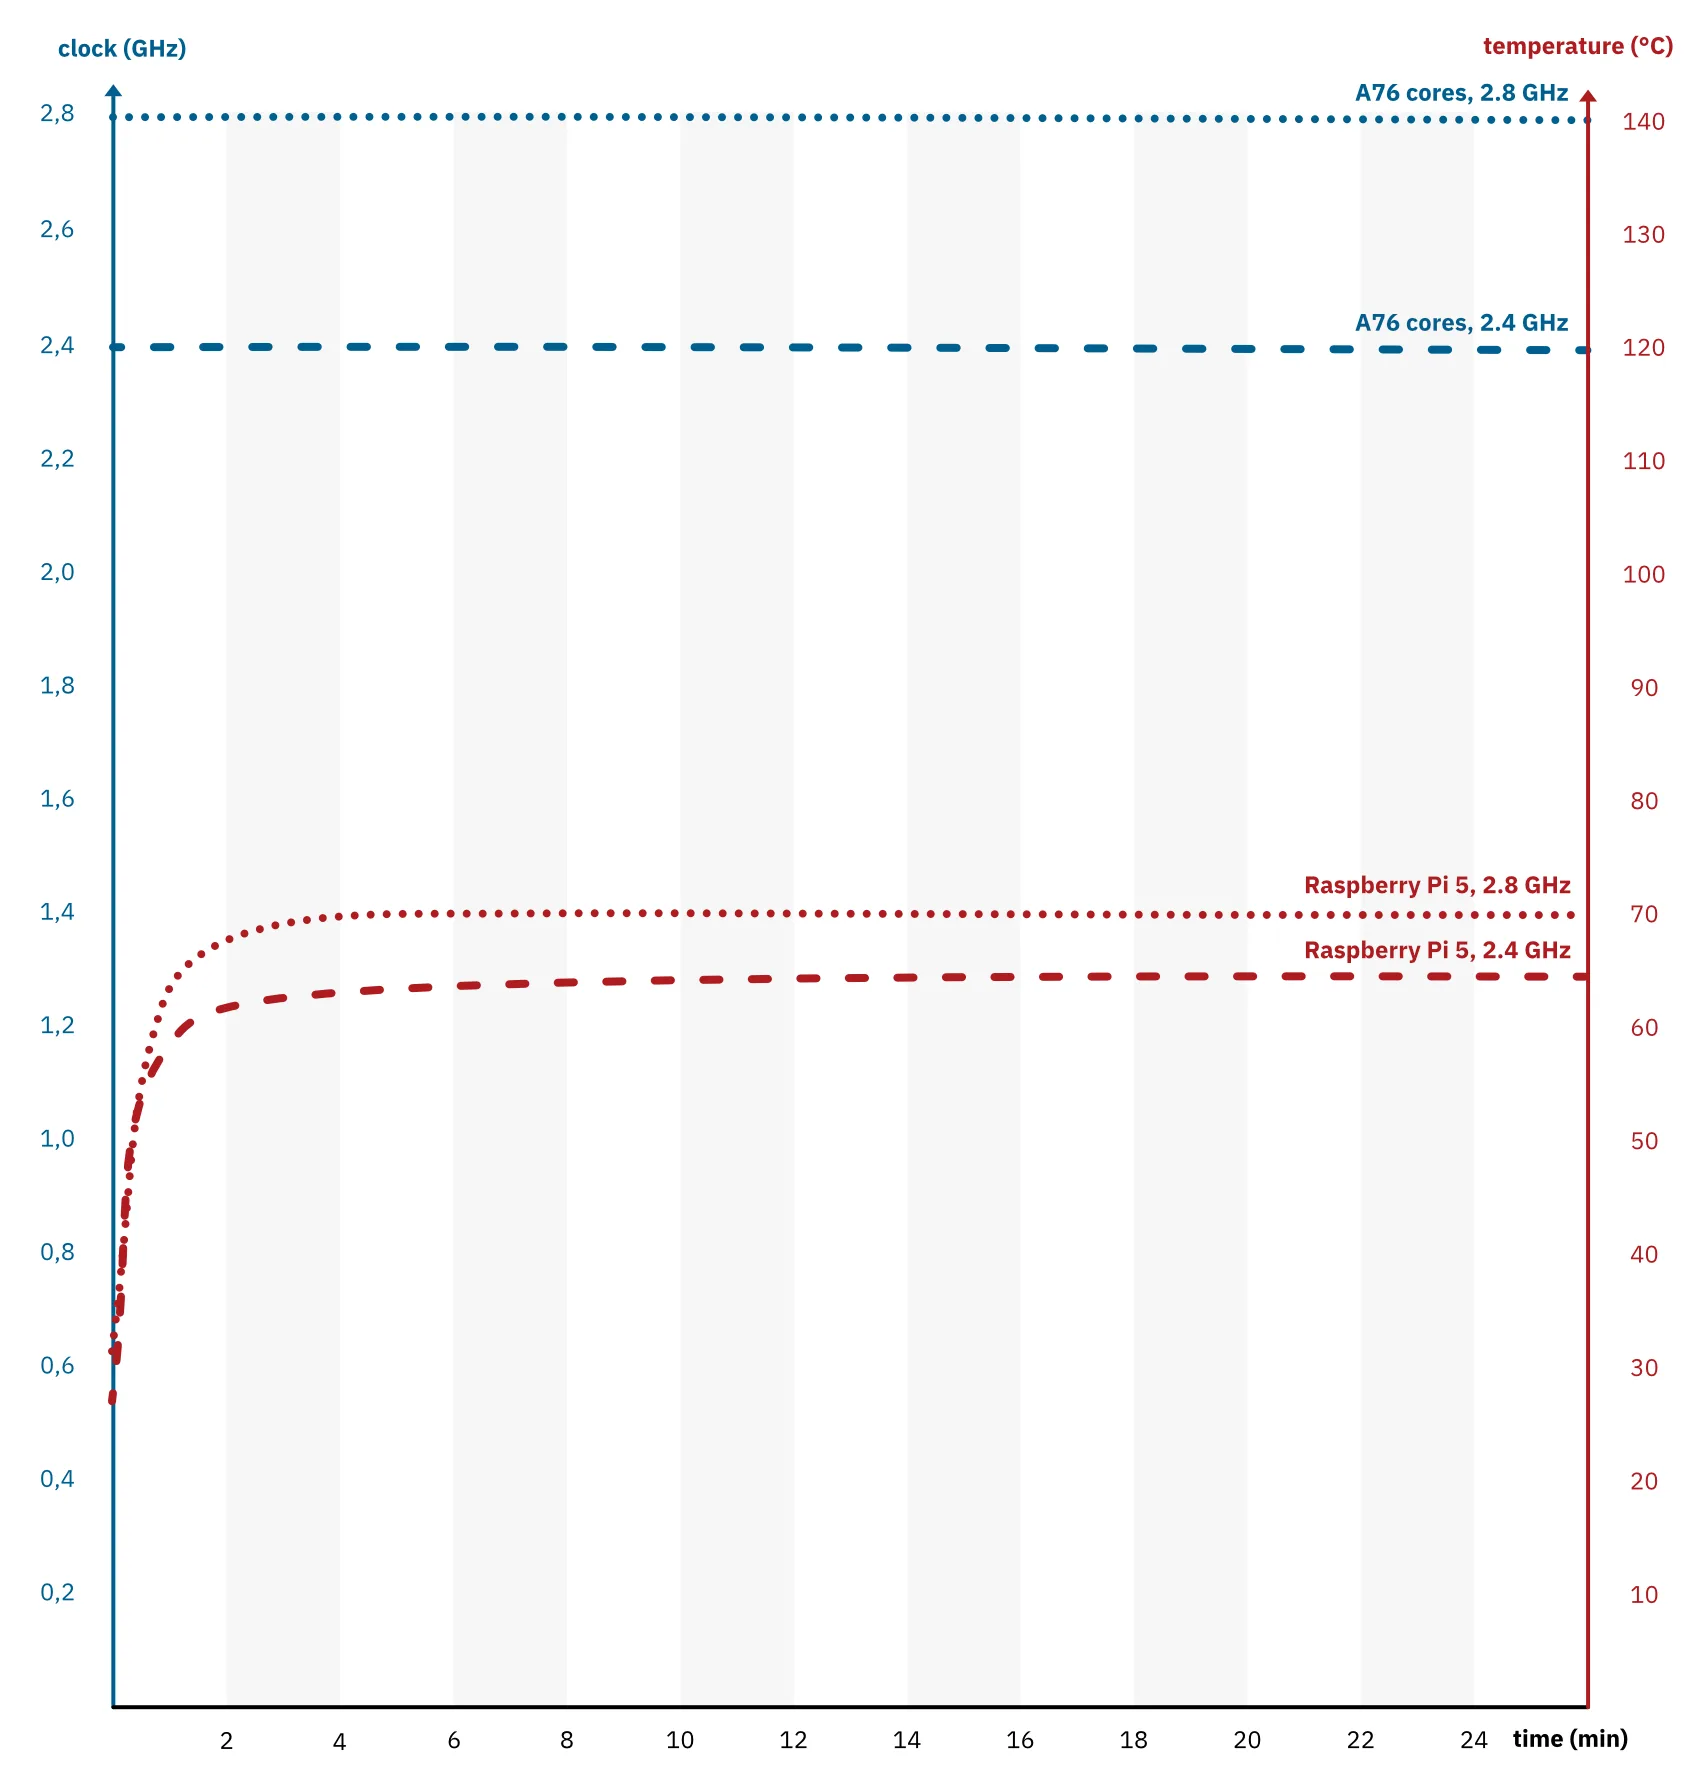
An overclocked system will naturally run hotter, so active cooling is a must for these. We’ve tested the thermals with s-tui, and were pleasantly surprised that the tiny official active cooler kept temperatures at bay with the system running at 2.8 GHz. The overclocked Raspberry Pi 5 never exceeded 68.8°C and never throttled. That’s only a few degrees more for a significant 400 MHz speed boost.
Notably, the power usage did go up, from 8.6 W to 10.5 W. Both measurements were taken with a display attached, and the Wi-Fi module off.
To see if our overclocked Raspberry Pi 5 brings any significant performance improvements to the table, let’s run the Sysbench CPU benchmark. Here we see a roughly 20% increase in performance, both single- and multi-core, which is definitely a nice improvement.
Similar improvements can be seen in OpenSSL tests too, which on ARM cores, due to ARM’s encryption accelerator design, precisely follow clock speeds. We see the same phenomenon here, with the overclocked Pi topping the encryption charts thanks to its 2.8 GHz clock.
What’s important to keep in mind, however, is that even if a system looks completely stable, it might not be. The higher you push the clocks, the more fragile the system as a whole becomes. Some backend code which rarely gets used might start failing because of the overclock, and without accidentally stumbling upon it, you’d be none the wiser. This is why we generally don’t recommend overclocking Raspberry Pi units used in any important applications where a system crash could compromise important data or services.
Conclusion
Whether you want to overclock your Raspberry Pi 5 or not is up to you. On one hand, the ~20% CPU performance bump is notable, especially for server usage. On the other hand, the two extra watts drawn and additional heat produced might be a dealbreaker for battery-powered applications.
Not every Pi will reach 3.0 GHz, and some might even fail at reaching 2.8 GHz. Most will display some degree of unpredictable behavior at times.
Overclocking a Raspberry Pi is safe and rewarding, but comes with drawbacks which should be considered on a case-to-case basis. Carefully deciding which route best suits your use case will get you the most mileage out of the provided overclocking tools.