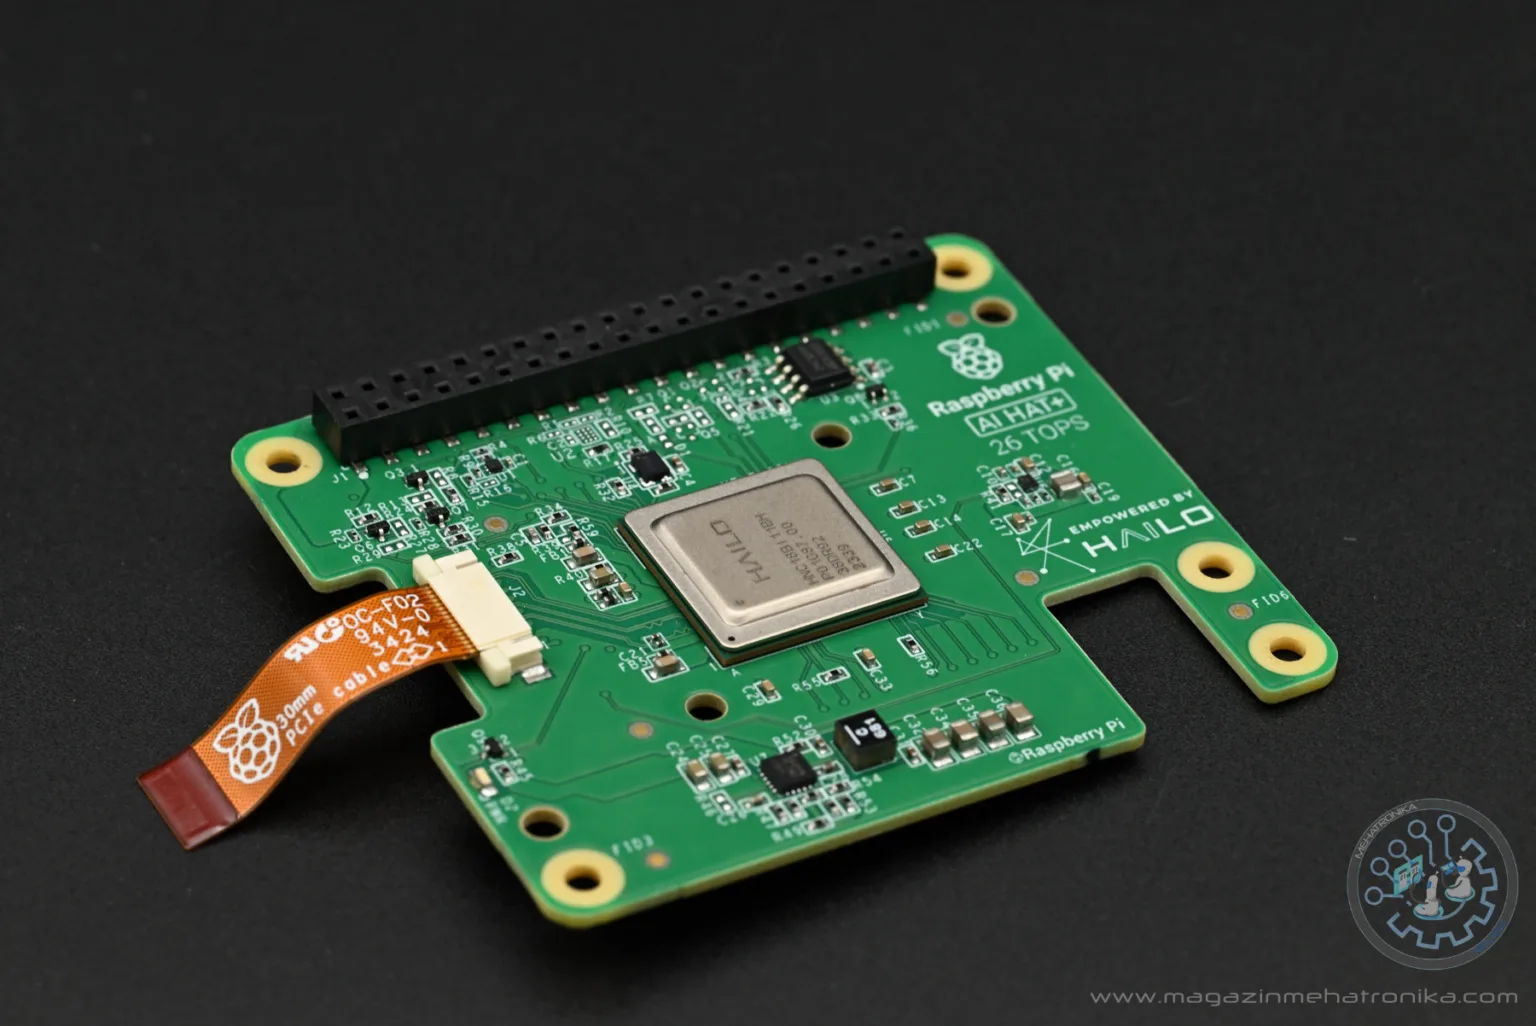
Raspberry Pi AI HAT+
The Raspberry Pi AI HAT+ refines upon the Raspberry Pi AI Kit, offering a neater package at the same price and also introducing a new, more powerful (albeit more expensive) Hailo-8 option for those wanting a bit more processing oomph.
Pros
- Affordable
- Excellent AI performance
- Two models offer a balance of price and performance
Cons
- Provided stacking GPIO header still too short
- Performance is slightly held back by the Raspberry Pi 5's PCIe implementation
- Only compatible with the Raspberry Pi 5
The Raspberry Pi AI HAT+ makes a ton of sense. In a way, it’s exactly the product we expected back when we first caught wind of something AI-related going on over at Pi Towers. The Hailo-8L is back once again, but it’s been evicted from its dedicated third-party module and now lives directly soldered onto a custom HAT+ board. And okay, there’s a surprise guest in this story too, but more on that in a second.
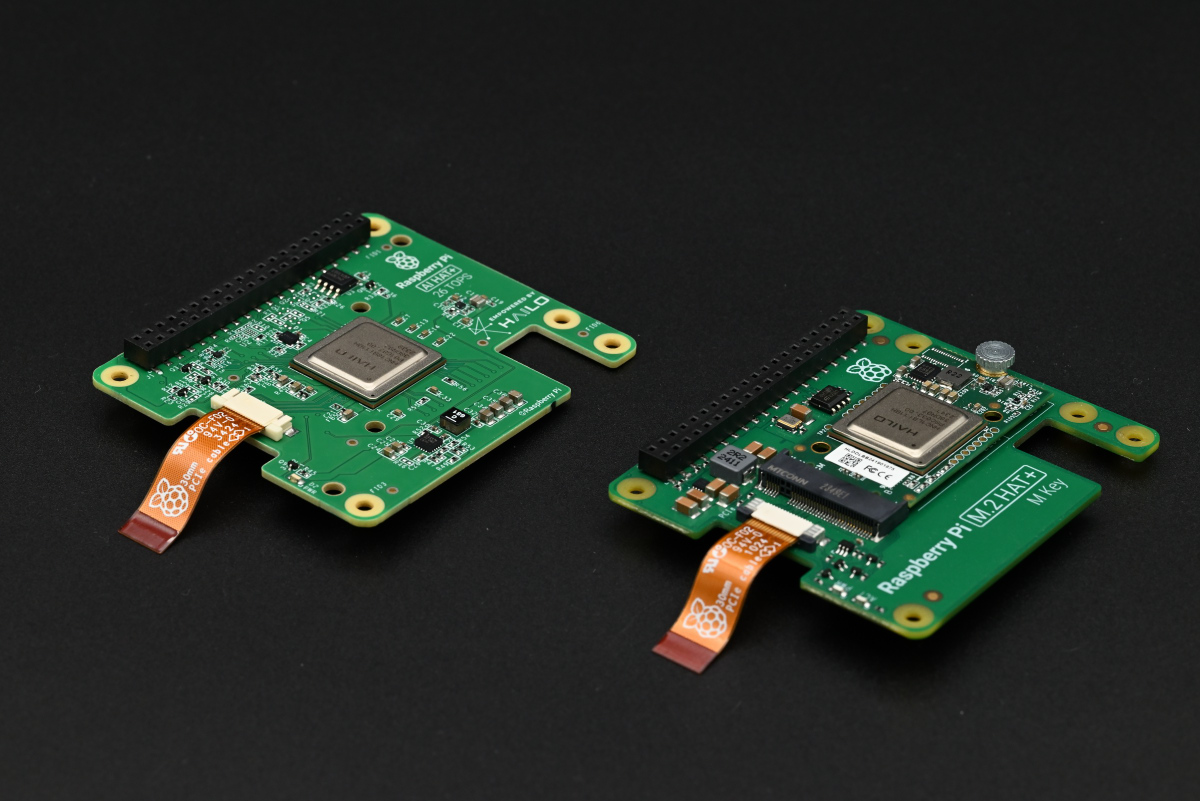
Before we kick things off, we want to gently poke you and point you towards our Raspberry Pi AI Kit review. Give it a look (if you haven’t already) since it shares a lot of common DNA with the AI HAT+. Most everything written there still applies, so we’ll try to keep certain parts of this review shorter to avoid repeating ourselves ad infinitum. In fact (and this really shouldn’t come as a surprise) — the two are so similar that the AI HAT+ is fully compatible with any projects you might have started on your AI Kit.
That’s all to say that you probably shouldn’t rush out to replace any AI Kits you might have, as there’s not a lot you’re missing out on by not upgrading. It also seems that Raspberry Pi isn’t discontinuing the older AI Kit just yet — but with the AI HAT+’s price being essentially the same, and with the official recommendation that “…new customers should [instead] purchase the Raspberry Pi AI HAT+”, it’s definitely getting eclipsed.
“But,” we hear you rightfully interject, “what’s new here — and where’s that performance increase coming from?” Well, the devil’s in the details — and there’s definitely a few noteworthy ones here (details, not devils).
As we mentioned already, the AI accelerator chip is now embedded directly onto a custom-made HAT+ board. This change isn’t just about looks. According to the folks over at Raspberry Pi, it also aids thermal dissipation since the entire PCB functions as one large heat spreader. Sure, the older AI Kit kept the temps at bay (especially after we tracked down a thermal pad that was missing from our pre-release unit), but where there’s better thermals, there’s room for more powerful hardware.
This time around, there really is more powerful hardware to be had. Next to the $70 standard model powered by the Hailo-8L (which really is more or less just a refresh of the older AI Kit), Raspberry Pi also introduced an upmarket variant of the AI HAT+ based on the “full” Hailo-8 chip (there’s the guest!) retailing for $110. Now this is the exciting stuff — and quite the step up for those needing a little more oomph!
The Hailo-8 is quite literally twice the chip the Hailo-8L is, featuring twice as much resources, thus offering up to 26 TOPS of AI performance (up from 13 TOPS). The greater chip came first, and the Hailo-8L followed as a cost-effective binned version, likely introduced to improve overall production yields. There’s some novel architectural stuff going on in these Hailo accelerators and it’s reasonable to assume that perfect dies aren’t exactly bursting out of the lithography machine.
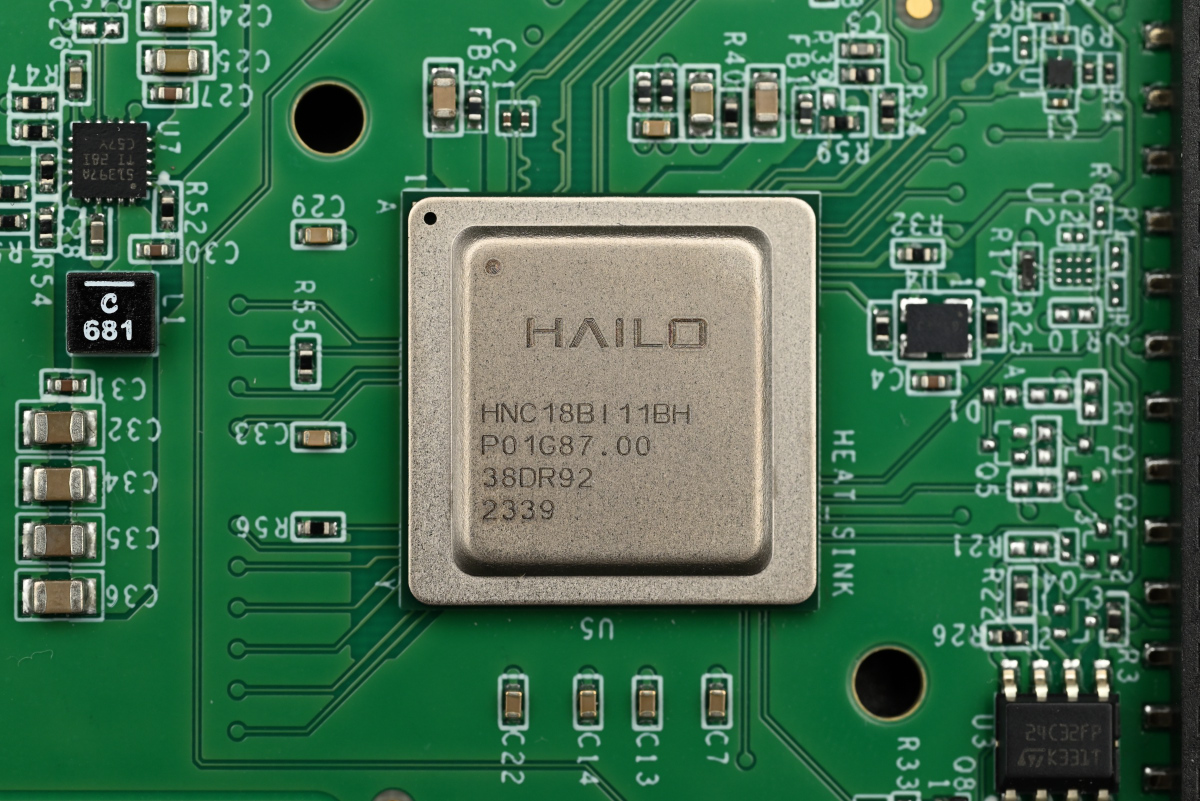
And just because Raspberry Pi didn’t offer a Hailo-8 option up until now doesn’t mean we hadn’t had the chance to mess around with the combo before. While playing around with the AI Kit a few months ago, we tracked down a spare Hailo-8 module in our lab and (after some tinkering with models using Hailo’s Dataflow compiler) got it to work in lieu of the provided Hailo-8L one. We didn’t quite manage to double the performance numbers, though — which we blamed on the Raspberry Pi 5’s PCIe speed limitations and our own clumsiness with the Hailo software suite.
So, to sum up the confusion with all the HATs and Kits: the old AI Kit is more or less being phased out and replaced by a more polished but functionally identical Hailo-8L AI HAT+, while those wanting a bit more raw compute can look into the higher-end Hailo-8 AI HAT+. There — that’s the gist of it.
Thankfully, the review unit that Raspberry Pi sent over is of the Hailo-8 type, so we get to compare our MacGyvered setup with the official hardware.
AI HAT+ setup: déjà vu?
This section is going to be covering a lot of the same things we’ve already covered in our article on the Raspberry Pi AI Kit. If you’ve just come back here after reading that article, feel free to skim through until the next section. TL; DR: installation’s still easy — the stacking header is still a bit short.
The Raspberry Pi AI HAT+ offers a very similar overall experience as its predecessor. The set-up is identical and just as straightforward. Plopping a Raspberry Pi Active Cooler on is recommended to keep the BCM2712 temps in check. After you install the stacking header onto the Raspberry Pi 5, all that’s left to do is connect the two boards using the provided PCIe ribbon cable and fasten them together using the included standoffs and screws while making sure that all of the header pins align nicely.
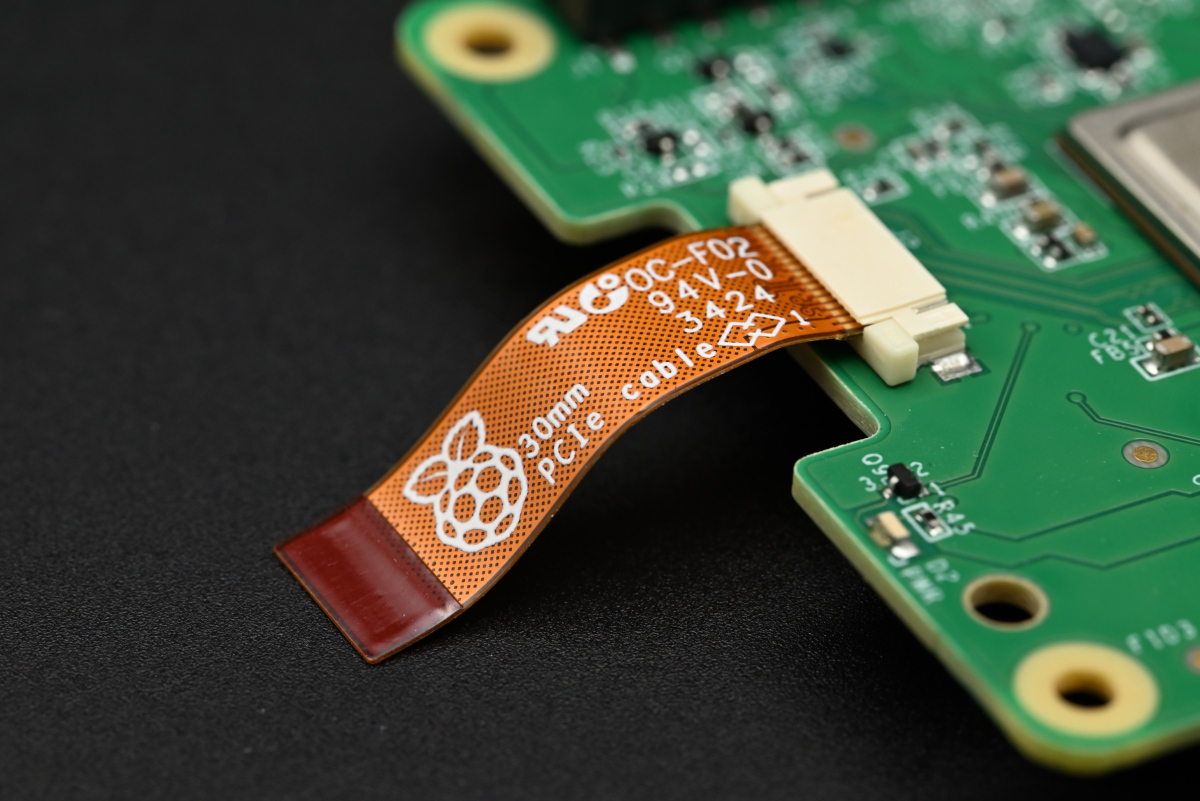
At this point you’ll likely want to grab a Raspberry Pi Camera of choice. Our personal recommendation is the Raspberry Pi Camera Module 3 as it’s quite well-rounded, but any other model should suffice. The little cutout in the AI HAT+ is the same size as the one on the AI Kit, meaning that (especially with the Active Cooler in place) it’s a tight fit. You might want to consider installing the camera module first and then mounting the AI HAT+ to avoid having to poke at the camera connector latch with a toothpick or such.
This is rather tangential: out of the eight provided screws, four were slightly longer. This isn’t mentioned anywhere in the installation guide nor have we seen it in any earlier Raspberry Pi products (let us know if you have). We chose to use these longer screws to attach the spacers to the Raspberry Pi 5 itself, while using the shorter screws for holding the HAT+ in place. Not like it matters much — but it’s a fun little observation.
Remember the stacking header we’ve just mentioned? Yep — the infamous 10 mm stacking header that will foil your GPIO usage plans makes a return. (Oh, by the way: Raspberry Pi calls it a 16 mm header, but the measurement includes the plastic female base — the pins themselves are 10 mm.) In order to provide enough clearance for the Active Cooler, the included 16 mm plastic standoffs are as short as you can go. This sadly leaves the stacking header pins sitting flush with the top of the passthrough header on the AI HAT+, barring any GPIO access.
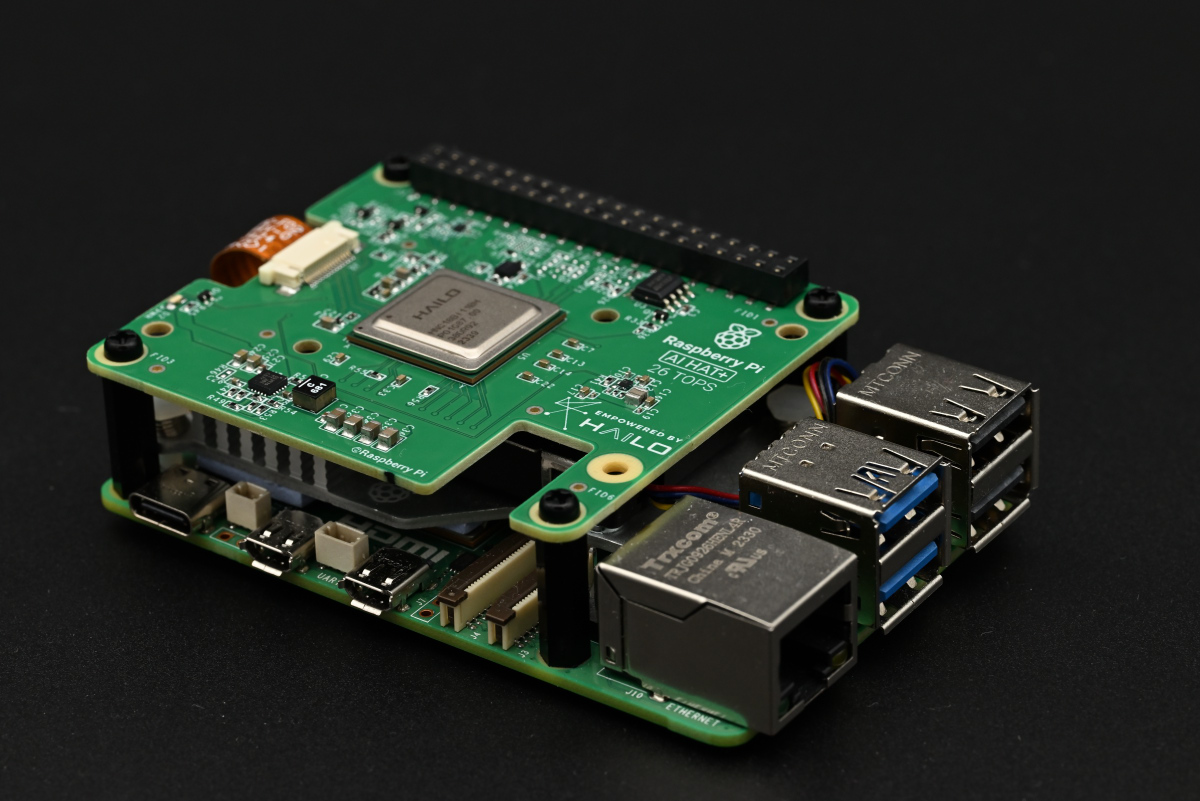
We’ll stop whining about this before something bad happens to us for nitpicking so much, but we want it on record that this exact issue was one of our biggest gripes with the M.2 HAT+ (thus spilling over into several other products like the AI Kit and the SSD Kit). Seeing it happen again on a newly developed HAT+ product is a bit of a letdown. It seems that Raspberry Pi is set in its short-header ways, so grabbing a longer one with 13.3 mm or longer pins (that would be 19.3 mm total length) is a must.
Whew, let’s get back on track. The software is simple to set up (just make sure that your OS and firmware are both up-to-date before starting). It’s also a good idea to configure your Raspberry Pi to use PCIe Gen 3 speeds. There are two ways to accomplish this: either by manually editing the /boot/firmware/config.txt file or by using the handy raspi-config utility and menu diving a little. Both of these options are well-documented in Raspberry Pi’s online docs so you should have no trouble whatsoever.
Finally, we have to grab the hailo-all package using apt. This package contains pretty much everything needed to get started with all of Raspberry Pi’s Hailo-based AI addons. Keep in mind that it’s relatively large download which might take a bit to install, so go and grab a coffee while your Raspberry Pi crunches the numbers.
hailo-all comes with a command that enables some low-level device management — hailortcli. Running it with the required arguments prints out info on the connected Hailo device (in this case that’s our Hailo-8). Interestingly, when used with the AI HAT+, the command can’t detect the device serial number, part number and product name. This initially had us a bit worried (as the AI Kit reported these), but a quick scan through Raspberry Pi’s documentation ensured us that this was expected behavior.
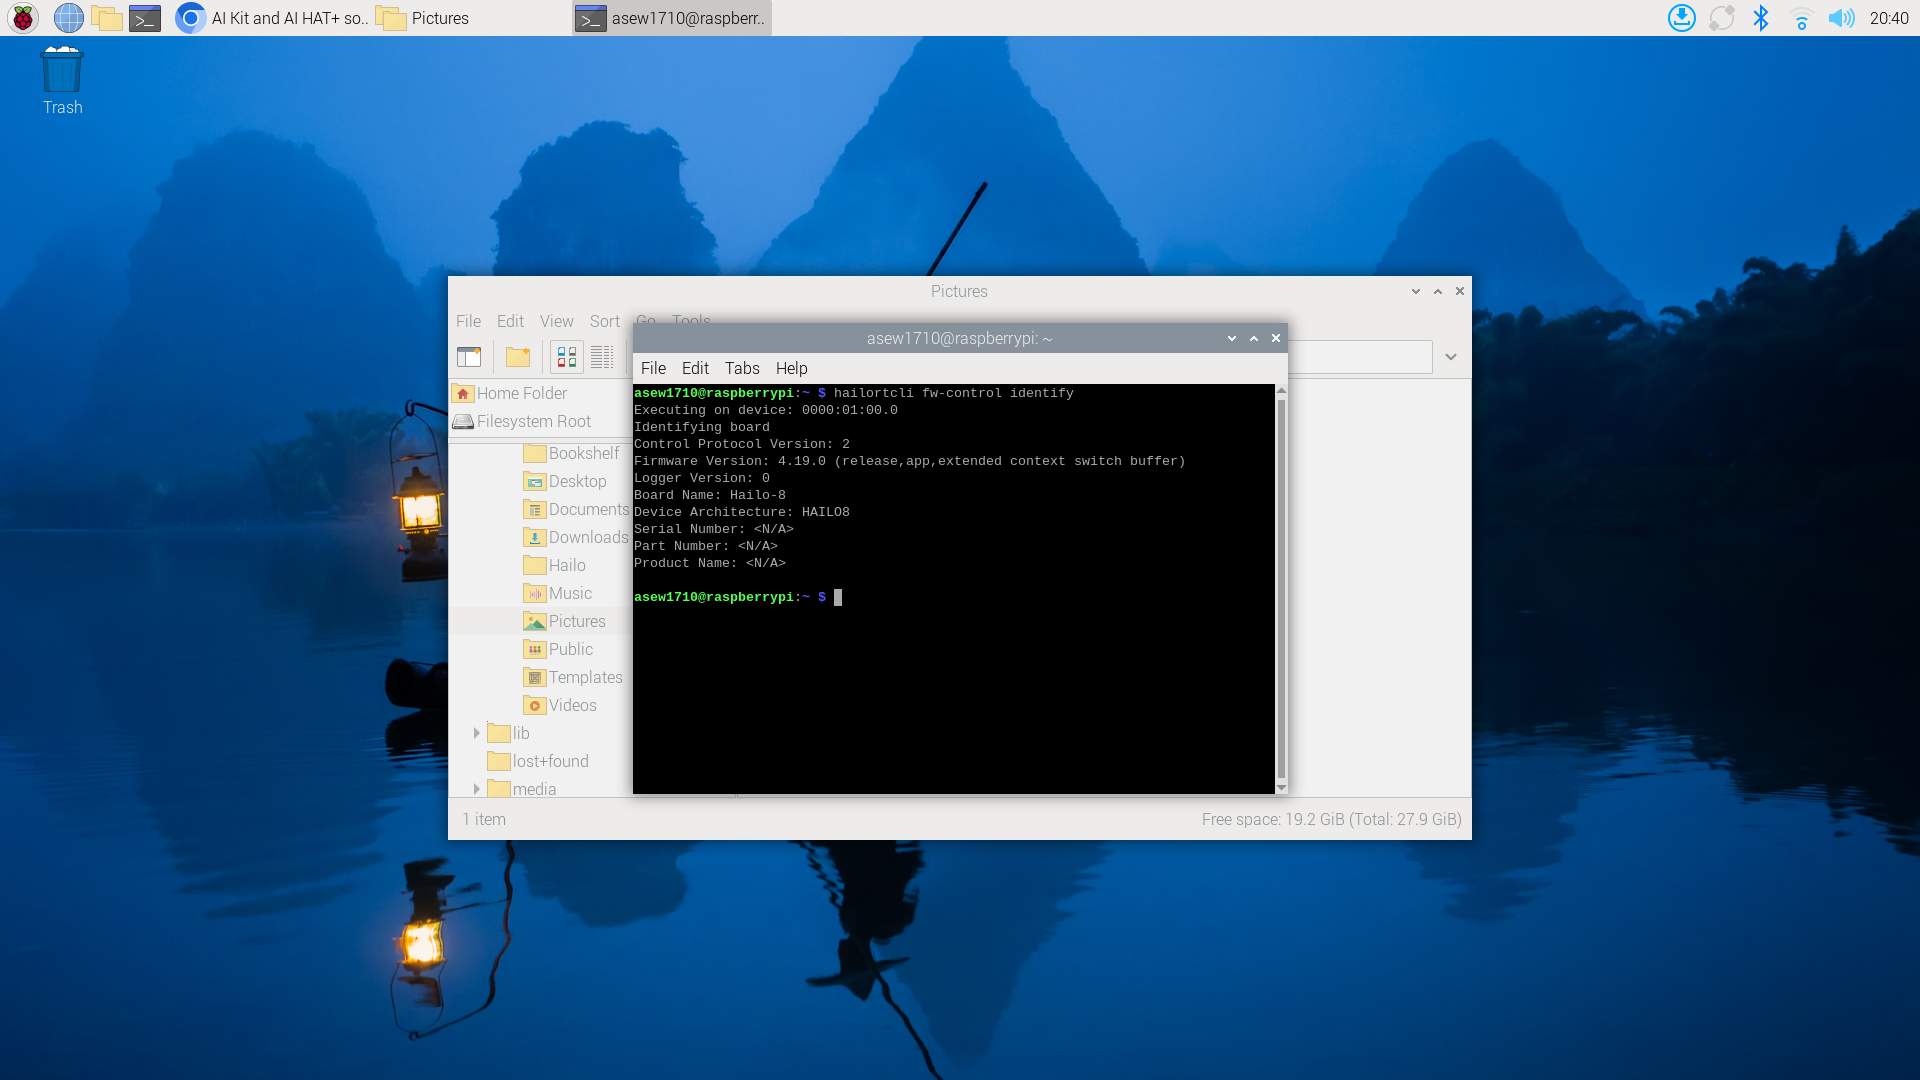
Whew, with the AI HAT+ set up, let’s actually see what the beefier Hailo-8 is capable of!
A quick Raspberry Pi AI HAT+ demo
The Raspberry Pi AI HAT+ leverages the same software stack as the AI Kit. The best place to start is still Raspberry Pi’s own rpicam-apps suite of camera apps. The suite also offers ready-made tools for creating your own vision applications which function through a system of stages.
These stages work a lot like filters on a smartphone camera app. They can be really simple, just distorting the image a bit or changing up the color mapping — but they can also contain sophisticated logic or utilize AI models to process image streams and collect data.
If you don’t have rpicam-apps on your system, it’s pretty easy to install it using apt. All of the required post-processing stages for the Hailo-8 (and Hailo-8L) should already be installed as part of the hailo-all package. Luckily, since we used the same Raspberry Pi 5 unit in our Raspberry Pi AI Camera review, we had all of the required software ready to go.
Let’s try some of the provided demos. As per Raspberry Pi’s documentation, we’ll be using the basic rpicam-hello app to see the models running in real time. It’s a rather simple app, only showing a live preview of whatever the camera with the selected post-processing stages applied.
Let’s run the YOLOv6 object detection model. To do so, just run:
rpicam-hello -t 0 –post-process-file ~/rpicam-apps/assets/hailo_yolov6_inference.json
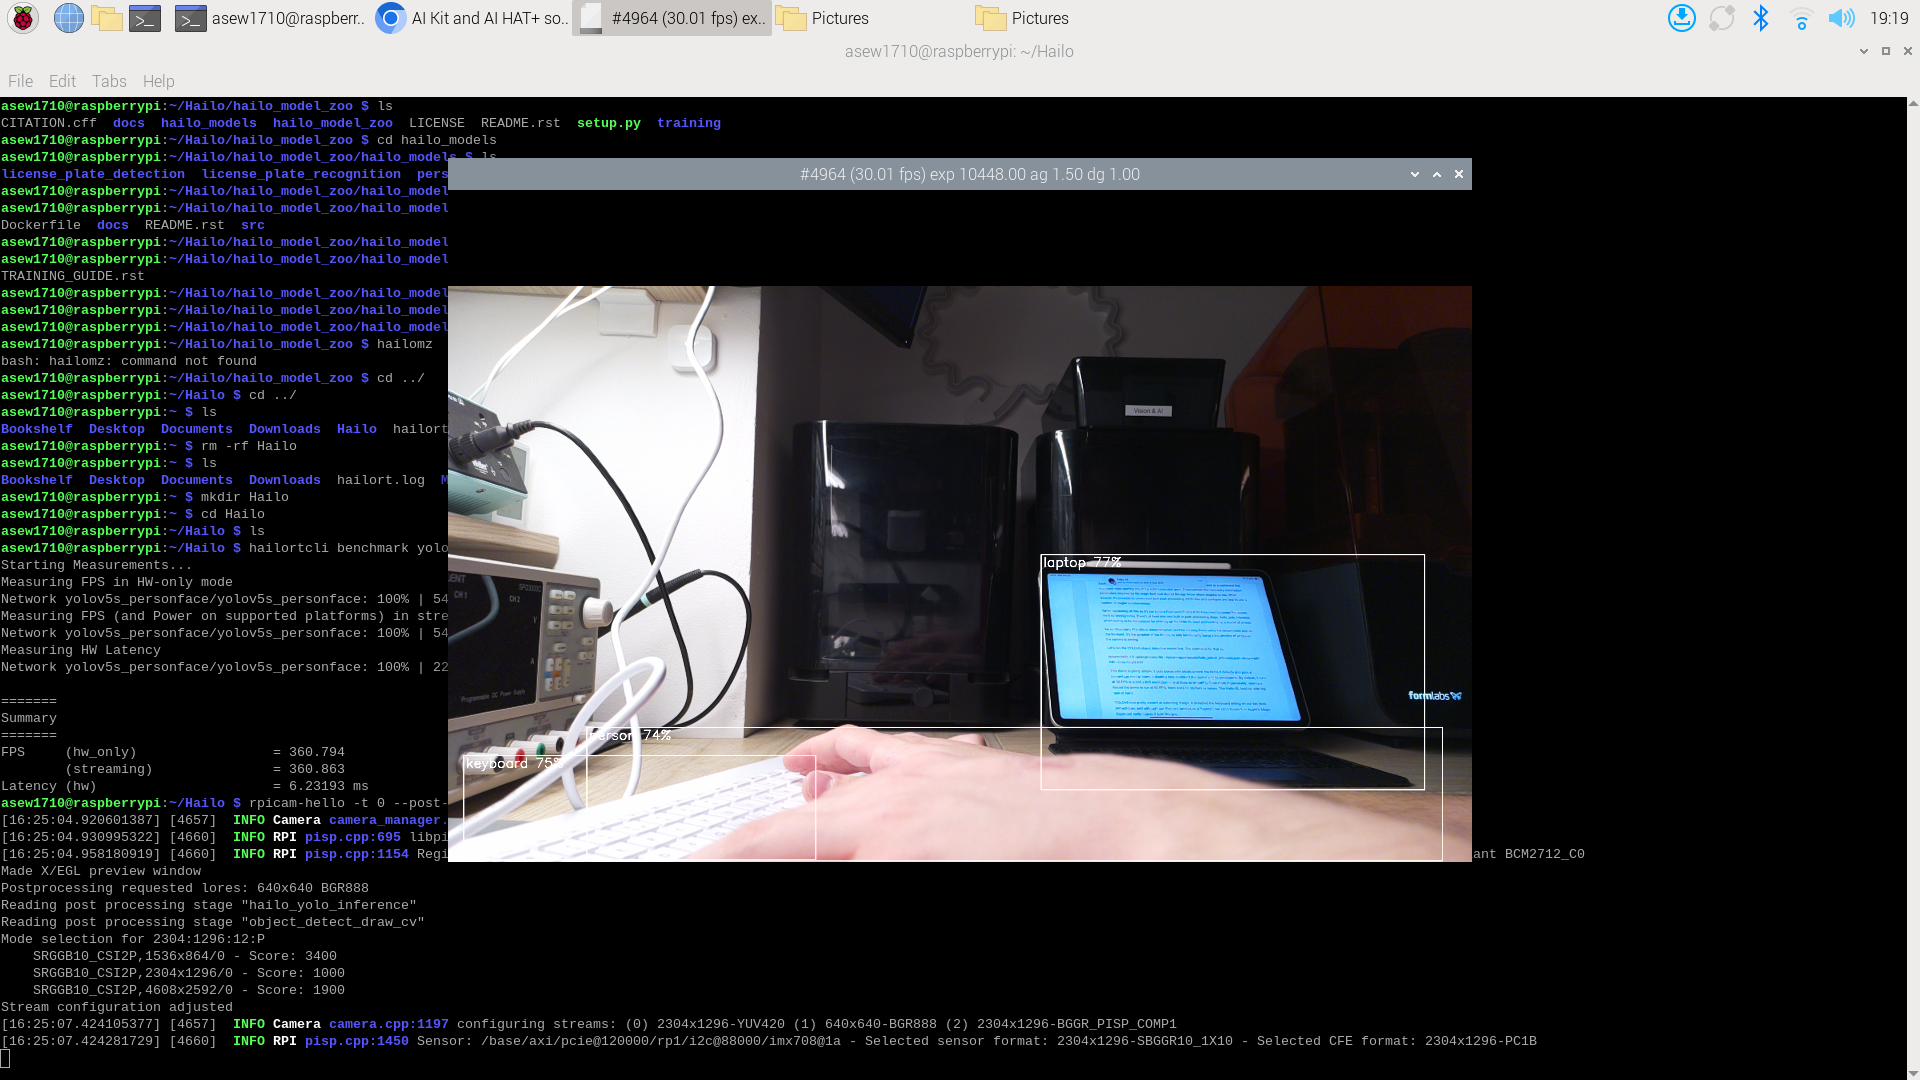
We’ve seen this model run before and — to the naked eye — there’s no discernible difference between the Hailo-8L and the Hailo-8. It’s smooth and responsive, and at its native 30 FPS it doesn’t seem to put too much strain on either accelerator.
There’s quite a few other demos that come bundled. The YOLOv5-based image segmentation is quite impressive. There’s also a lot of stuff to be found on Hailo’s purpose-made GitHub repository that’s all about the Hailo and Raspberry Pi 5 integration.
Next steps
Running demos is admittedly fun, but there’s limited utility if that’s all your fancy AI accelerator can do. Thankfully, there are several paths you can take to start creating your own AI-enabled projects.
Perhaps the most straightforward option is digging deeper into the capabilities of rpicam-apps. It’s possible to create custom stages which expands the possibilities quite a bit, although it does require a bit more work recompiling the entire rpicam-apps package in order to actually use them.
It’s also possible to create fully custom rpicam-apps apps which allows for even greater flexibility (especially when used together with custom stages). It’s a bit involved, but Raspberry Pi has documentation on getting started with this.
Another option is digging into the Picamera2 library, Raspberry Pi’s official python camera framework. The Hailo line of accelerators offer deep integration with the library’s, so there’s quite a lot you can achieve if you’re willing to dig a little deeper into the documentation and figure out how stuff works.
Hailo’s Dataflow compiler is also available for free. It lets you take any AI model and quantize, optimize and compile it into a .hef file that the Hailo-8 and Hailo-8L natively run. Doing so requires a pretty beefy computer (and an x86 one at that — so you’ll need more than just a Raspberry Pi if this is something you’re interested in), but there’s a detailed guide on GitHub covering the procedure.
There’s also the Hailo Model Zoo, a curated collection of ready-to-train AI models. It’s pretty extensive and should offer a great starting point for fully custom projects.
Benchmarking the AI HAT+
Mentioning the Hailo Model Zoo was a great segue into this section, as this time around we’ll be using several models grabbed from the Zoo to benchmark the performance of both the Hailo-8 and the Hailo-8L.
The Hailo-8 under test is the one found on our AI HAT+ unless otherwise stated, while the Hailo-8L (module) comes from our copy of the Raspberry Pi AI Kit.
The testing procedure was quite simple. In order to minimize any frontend effects on the model performance, we used the hailortcli benchmark command alongside hailortcli run to obtain purely synthetic framerate numbers. And there’s some pretty interesting results! However, in order to make any sense of them, we first have to dig a little into the nitty-gritty into the architecture of the Hailo chips.
Unlike traditional, general purpose processing systems which typically feature monolithic resource banks, the unique architecture in the Hailo-8 and Hailo-8L breaks its resource down into tiny chunks by using a flexible bus fabric that can map specific layers of a neural network directly to the hardware. According to Hailo, this enables them to step away from a standard ISA-based approach which requires a significant amount of energy to fetch and decode the required instructions, instead focusing on routing data to critical compute resources which can process it at a very low level. This is all made possible by a cleverly designed hardware and software combination.
The Hailo Dataflow compiler is also part of the aforementioned software. It’s essentially got one job — taking any custom AI model, breaking it down and optimizing it to be Hailo-friendly, and then carefully mapping the Hailo’s hardware resources, creating a custom hardware-based pipeline which maximizes data throughput and energy efficiency. All of the output nitty-gritty is stored in a .hef file which can then be sent off to a Hailo device.
What’s going on inside a “loaded up” accelerator is very succinctly represented in the following graphic from Hailo (though, it’s likely somewhat abstracted in design).
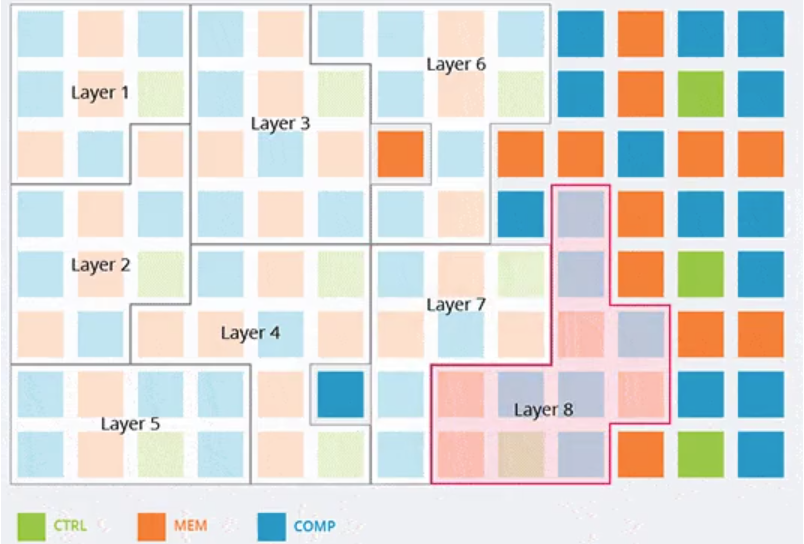
Once an input tensor (most likely an image) makes its way into a Hailo device, it enters the pipeline and passes through the first layer. As soon as the first layer finishes computing the last row of the image, it’s ready to start on the next frame. The second layer is ready to compute as soon as it receives data passed through the first — and so on until all of the layers have processed the input data.
This works without any hiccups when the whole model can fit onto the accelerator, but as neither the Hailo-8 nor the Hailo-8L have unlimited resources at their disposal, there’s a limit to how many layers (and how complex of layers) can fit at a time. This requires heftier models to be split up into separate contexts which get loaded up in succession as input tensors make their way through the pipeline. After an input tensor makes its way through all of the layers in the first context, the intermediate data gets sent back to the host device while a new context is loaded onto the accelerator. The intermediate data then passes through the second set of layers — and this repeats as many times as there are contexts.
This naturally slows everything down quite a bit as there’s a lot switching overhead brought into the equation. Most importantly, it breaks down the processing pipeline, processing frames one-by-one instead of nicely queueing them up across various layers.
We won’t claim to know all of the minute details behind the way this works, so there’s likely some optimization taking place — the end implementation is (hopefully) a little more elegant than the rough process we described. Nevertheless, context switching overhead is something accounted for and is the very reason that the Hailo-8 and Hailo-8L offer batch processing capabilities. Instead of sending just one frame down a context, it’s possible to push a longer stream through, hold all of the intermediate data and rinse and repeat as needed. This significantly cuts down context switching (thus improving the framerate), but increases overall end-to-end processing latency.
Oh — and it’s probably clear now that batch size has little to no (positive) effect on models which can fit the chips without the need for multiple contexts — there’s no overhead to cut down on, but there’s definitely extra latency to be had.
Alright, that should explain it well enough — hopefully. Let’s get the numbers in! We’ve selected seven AI models from the Hailo Model Zoo for our tests, and we’ll be running them both on the Hailo-8 and the Hailo-8L, as well as using single batches and eight-frame batches. We’ll also be keeping an eye on the power consumption throughout the tests.
Naturally, all tests were done with the PCIe lane running at Gen 3 speeds on the Raspberry Pi 5.
While Hailo’s first-party AI accelerator modules come equipped with a handy power measurement system, the AI HAT+ doesn’t support the feature, which is why we decided to resort to our standard at-the-wall power measurement. Cue the standard “switch-mode power PSUs are around 90% efficient” spiel — and also account for the fact that a mostly idle Raspberry Pi (as it is during these AI tests; the Hailo chip is doing all the work) draws about 3 watts.
Let’s start by saying the obvious: both of these chips are mighty fast, but the Hailo-8’s 26 TOPS are truly impressive. We might be raving about this a little too much, but come on — a Raspberry Pi pushing out more than 2500 FPS on any vision AI task is simply awesome to see.
But there are also some intriguing numbers here once you take a closer look. The Hailo-8 should deliver around twice the performance of the Hailo-8L given that it’s packing twice the silicon and is rated at twice the TOPS — but that’s pretty much never the case. Worse yet, the performance gap between the two is pretty inconsistent, so what exactly is going on here? Seems we have to dig a little bit deeper.
Let’s first bring our attention to the “…batch size has little to no (positive) effect on models which can fit the chips without the need for multiple contexts” line from a second ago. It’s clear that the Hailo-8 seemingly can fit all of the models in a single context except vit_base_bn, which is the only model exhibiting any performance difference between the two batch sizes (and mind you, the eight-frame batches essentially cut down the context switching by a factor of eight, leading to the huge framerate boost).
The Hailo-8L, having less resources at its disposal, has to juggle with contexts a lot more, leading to many of the models exhibiting significantly degraded performance. Once batch sizes gets bumped up, performance picks up significantly and at times even reaches ~50% of the Hailo-8’s results. The efficientnet-m benchmark is the best example of this — just goes to show how much of a performance hit context switching can cause.
Here’s the power consumption comparison. These were all obtained with single-frame batches, and were calculated from the raw power measurements obtained at the wall taking into account the considerations outlined above. The Hailo-8L is definitely the less power hungry of the two, but we feel that the performance difference will make the Hailo-8 a more enticing choice for quite a few people. However, it’s worth noting that in terms of power efficiency — FPS per watt — the Hailo-8 actually has a slight edge.
This would be the end of our little benchmark journey and we’d all be happy with the results, but a little nagging voice in our head just had to convince us to check our results against some of Hailo’s own numbers on the Hailo-8. You know, just to make sure we did everything right. And everything did start off fine and dandy, the numbers were lining up, we got all ready to call it a day and then —
Oh.
We should be getting double the figures for some of these tests.
Oh no.
Well, back to the theory board — there’s obviously something weird going on here. We initially suspected some software-related issues, but after a little bit we started suspecting that the Raspberry Pi 5’s single PCIe Gen 3 lane was the bottleneck. But how could this be when our tests never showed transfer data rates faster than some 2 Gbps? Just what was bogging down the PCIe lane?
In order to test our theory, we first had to test the Hailo-8 on a system that had a bit more PCIe lanes on offer. One of the only ARM boards we had on hand that fit the bill was the Orange Pi 5 Plus (we went for an ARM system so the software stack would stay mostly the same). The Orange Pi’s PCIe Gen 3×4 M.2 slot seemed perfect for the task.
Admittedly, we had to cheat a little for this. The Raspberry Pi AI HAT+ is pretty much only compatible with the Raspberry Pi 5, so to run this test we used a standalone Hailo-8 module that we had sitting around in the lab (and yes, it’s the same one we used in the AI Kit review). This really shouldn’t make a difference, but we’re putting this as a little disclaimer on the extremely unlikely off chance that the Hailo-8 chips found on the AI HAT+ are somehow a bit different.
Well, wouldn’t you know it? That’s a significant performance boost, all from a faster PCIe bus. Our working theory — and take this with a grain of salt — is that it’s all due to context switching. It’s likely that it’s not just intermediate data that gets sent back and forth but also chunks of the compiled .hef file to allow for context loading. If this has to happen thousands of times every second it can quickly add up and saturate the bus.
The faster the PCIe bus, the faster the switch can happen, and the smaller the overall performance penalty. Even a super-fast bus won’t fully negate the impact, and the narrow single-lane PCIe bus on the Raspberry Pi 5 certainly won’t help much.
There — the Raspberry Pi 5 itself was the real bottleneck all along. This likely won’t matter too much for most users, as the Raspberry Pi hardware and software ecosystem more than makes up for the chunk of untapped performance left in the Hailo-8.
Let’s also run the Hailo-8L on the faster PCIe Gen 3×4 bus and see what results we get. If our theory is right, we should see a difference across even more tests — and that’s exactly the case.
Look at that — the benchmarks are suddenly a lot closer to that “double the chip” figure as well!
Just for fun, let’s wrap things up by checking the speeds of both of these accelerators when running on a single PCIe Gen 2 lane.
You likely don’t want to actually use these running at PCIe Gen 2 speeds — the official docs start by telling you to switch your Pi over to Gen 3 speeds — but it’s interesting to see how the simpler models’ performance really doesn’t degrade much just because everything can neatly fit on the Hailo chips in one context.
Verdict: Wh-AI the HAT+?
For $70 and $110 respectively, both the 13 TOPS and the 26 TOPS version of the Raspberry Pi AI HAT+ offer a great entry point into the world of AI while (and this is especially true of the latter model) also offering enough power to keep more serious projects rolling. Well integrated into the best-supported SBC platform in the world, buying into the Hailo series of accelerators is almost a no-brainer now — even more so than a few months ago when we checked the Raspberry Pi AI Kit out.
Back then, software support was significantly less mature, but, as we predicted, that’s also been rapidly changing. Right now, we’d feel pretty comfortable recommending the AI HAT+ to an AI novice — though experience with the Raspberry Pi and edge computing in general is going to help a lot.
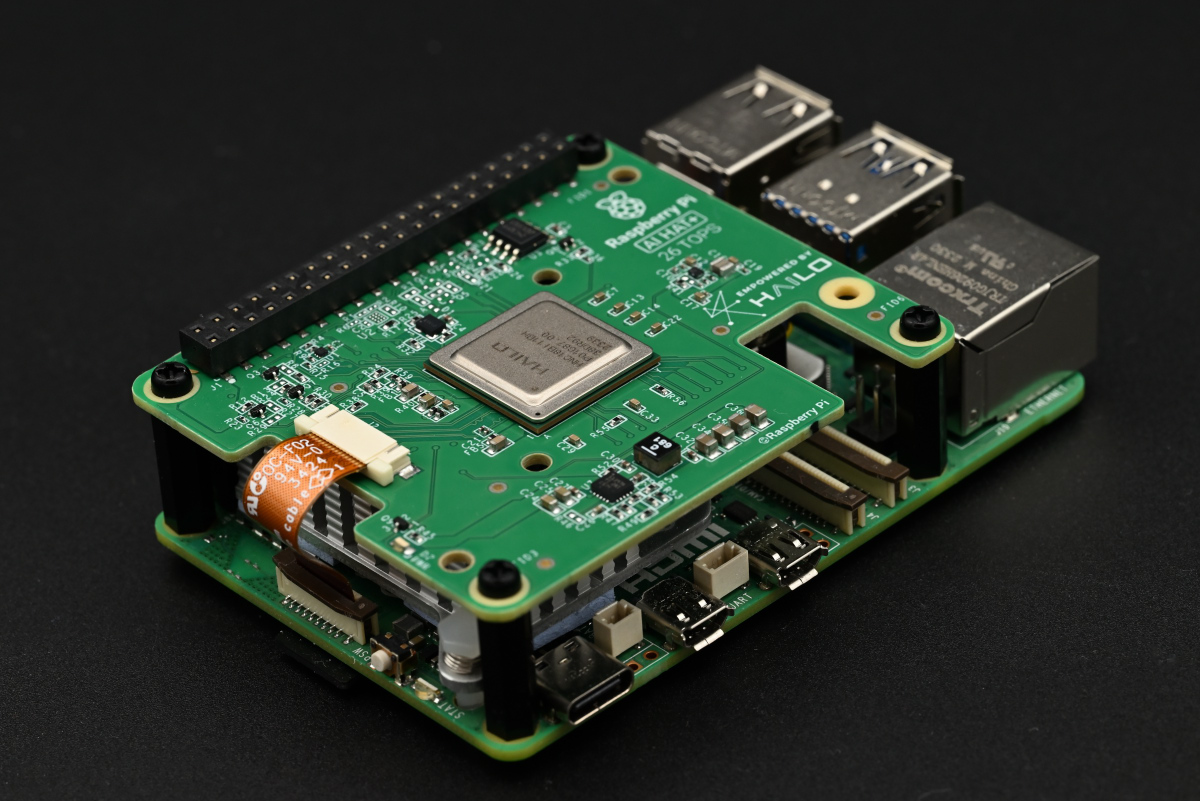
The lesser version of the Raspberry Pi AI HAT+ is more or less a streamlined replacement of the AI Kit. It’s got the same features and packs the exact same AI accelerator, so there’s no real reason to upgrade if you’ve got the former and are happy with its performance.
In a roundabout way, the AI Kit is more flexible as you can take the Hailo-8L module out and use it on other devices — and you can also use the included Raspberry Pi M.2 HAT+ with other M.2 accessories.
On the other hand, the 26 TOPS version of the AI HAT+ is a beast. Although held back a little by the inherent design of the Raspberry Pi 5 and its singular PCIe lane, it’s still as good as AI gets on the platform — and it packs a serious punch. Its higher asking price might put away some people, but it’s well worth it in our opinion — and it’s even worth it for those looking to upgrade from a Hailo-8L based system.
And yet again, remember to bring your own longer stacking header in case you plan on using the GPIO.


