

Raspberry Pi SSD Kit
Raspberry Pi's two SSDs are a good option for those looking to get a fully-compatible NVMe SSD for their Raspberry Pi 5. Fairly priced and guaranteed to work, it also comes in kit form to get beginners up-and-running in no time.
Pros
- Simple to set up
- Good performance
Cons
- Cheaper options exist
- No 1 TB option
- The provided stacking header blocks GPIO access
Welcome back to the second part of our mini-series on Raspberry Pi’s new first-party storage offerings. Previously, we covered the SD card lineup in detail, which we found to offer excellent value and reliable performance on Raspberry Pi computers. If you haven’t read part one yet, we highly recommend you do so first as it provides some context which will be useful as you read on.
So, the SD card solution just didn’t appeal to you enough? You need the speed only SSDs can provide? Fair enough, we’ve already covered some of the pros and cons of these in the previous part. Though SSDs have been around forever in the consumer (and even industrial) computing world, SBCs were rather slow to catch on, oftentimes due to the scarcity of PCIe ports, lack of driver silicon in their SoCs or simply the lack of board space.
But this all started changing in late 2019 with the release of some of the first Intel-based SBCs with NVMe SSD support, closely followed by the first ARM-based options sporting the Rockchip RK3399. And sure, with a Raspberry Pi Compute Module 4 and its matching carrier board (and a PCIe-to-M.2 adapter on hand) you could get an NVMe drive up and running on official Raspberry Pi hardware, but it was a bothersome procedure. This would also leave you with quite a large and unwieldy end product. The scarcity of Compute Modules (and Raspberry Pi products in general) during the pandemic period was not exactly helpful either.
What we’re really talking about is NVMe support baked right into the system, implemented in a more or less plug-and-play way. By early 2023, with the Rockchip RK3588 becoming a mainstream SoC in the SBC world, this became standard on a number of popular boards. The associated M.2 connectors were becoming pretty ubiquitous. For some, this added storage flexibility was the deciding feature that made them step away from the Raspberry Pi ecosystem – at the time still reliant on SD cards and (to a lesser extent) USB booting – and explore options from brands like Orange Pi and Radxa.
Enter Raspberry Pi 5. With better performance, more RAM (up to 16 GB now!) and, most importantly for us today, an exposed PCIe lane ready to face the world, it quickly became the definitive Raspberry Pi model.
Limited board space (and likely an attempt to keep the form factor as similar to its predecessors as possible) did bring about a small compromise in the PCIe implementation. Instead of an M.2 slot or even a more traditional PCIe interface, Raspberry Pi 5 features a custom ZIF ribbon connector located where the DSI connector used to be on older Raspberry Pi units. An adapter is required to connect M.2 accessories. Raspberry Pi’s first-party option is the M.2 HAT+. It’s a rather simple HAT+ which provides a single M.2 slot – no surprises here, it’s all right there in the name. Some third-party options feature built-in PCIe switches to split the available bandwidth across multiple M.2 slots which can be handy, especially if you’re planning to run something like a Hailo-8L M.2 AI accelerator module in tandem with an SSD. However, it’s precisely that bandwidth splitting part that’s a little problematic and that could (scratch that – likely will) lead to less-than-optimal performance across the board.
At the end of the day, grabbing either one of these adapter boards has you ready for setting foot into the wonderful world of SSDs. You just need to get the – you know – actual SSD itself. This is where Raspberry Pi hopes to entice you with its new first-party SSD offerings. Coming in at $30 for the 256 GB model and $45 for the 512 GB model the main claim to fame here is guaranteed compatibility with the Raspberry Pi 5. Both versions are also available in kit form, bundling together the Raspberry Pi M.2 HAT+ for $10 more.
But are these any good?
Setting up the Raspberry Pi SSD Kit
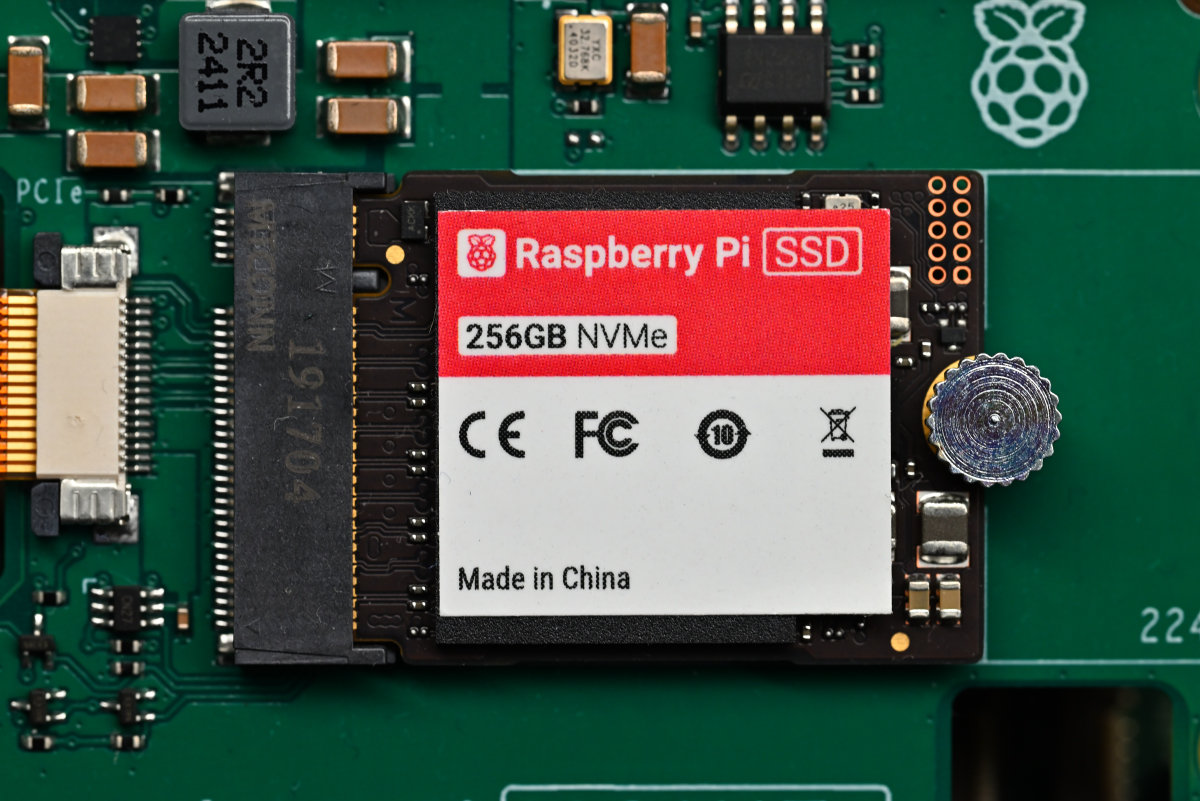
Today, we’ve got the 256 GB version of the Raspberry Pi SSD kit with us in the lab. The retail packaging is what we’ve grown to expect from Raspberry Pi, though we can’t comment too much on how these SSDs ship when bought standalone (if the SD cards are any indicator, it’s likely just a simple ESD baggie). Opening the box up reveals its contents: a little bag of screws and standoffs for mounting the HAT+, a stacking header (oh no…), the M.2 HAT+ itself, and finally, the SSD.
If you’ve been following our recent escapades with the Raspberry Pi AI Kit and AI HAT+, you should know the drill by now (and you should also know why we went oh no at the mention of the stacking header). As with any HAT+, we always recommend first installing some sort of cooling solution. All HAT+’s restrict airflow coming from the top, so the official Raspberry Pi Active Cooler, with its blower fan design and a low-profile heatsink, is actually quite adept at keeping temps down while being sandwiched between other hardware.
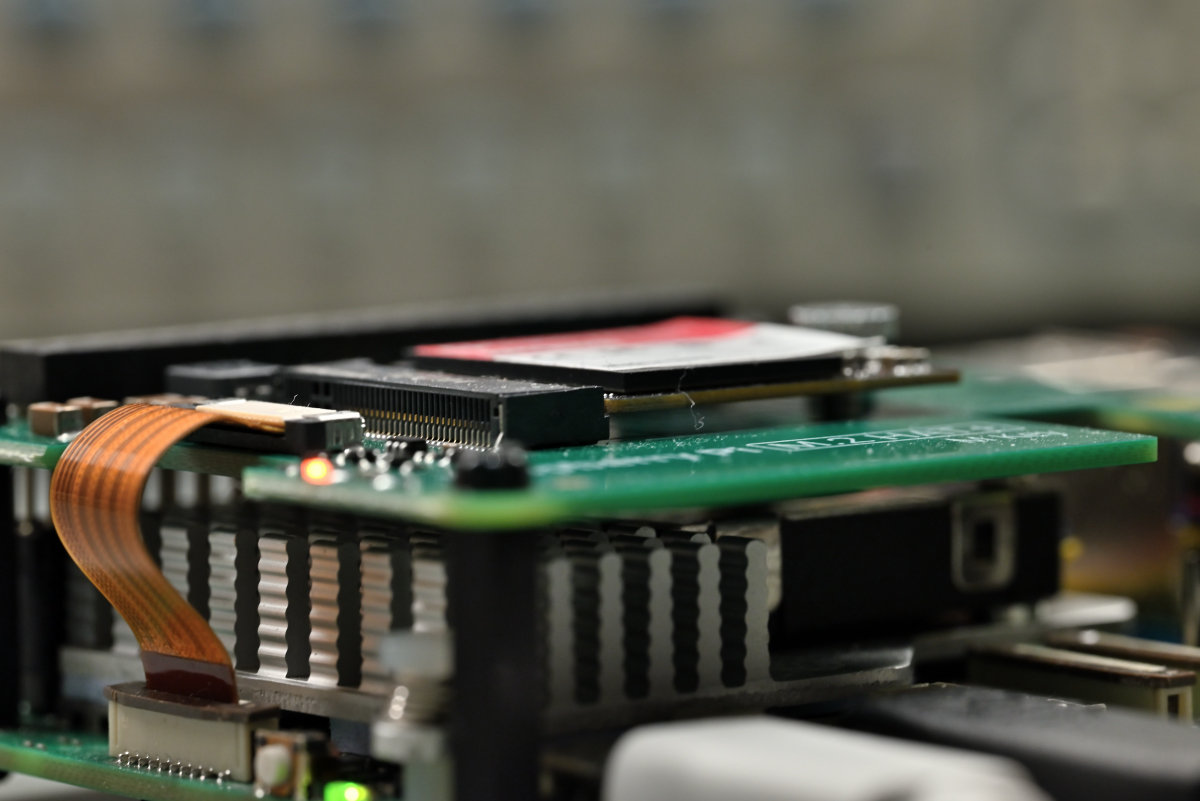
With that out of the way, it’s time to install the M.2 HAT+. Snap the included stacking header on your Raspberry Pi’s GPIO pins, unstick the little PCIe ribbon cable from the HAT+’s back and slot it into its designated connector on the Pi. Finally, stack the two boards together, making sure to align the stacking header’s extended pins with the HAT+’s passthrough connector and tighten everything together using the included standoffs and screws.
Our review unit was a pre-release version, and the SSD wasn’t pre-installed in the M.2 slot. After digging around online to check whether this was still the case with retail hardware, it seems that it’s not. Your SSD should ship already fastened in place, meaning there are no extra steps!
Deep breath in now. Ready to hear us whine about the same thing a third time? Here goes nothing! That annoyingly short 10 mm (or 16 mm, if you count the plastic base) stacking header is back for round three, and just like before its pins sit flush with the HAT+’s passthrough connector, effectively taking away any GPIO access. Gah! We aren’t too surprised – at the end of the day, it’s the same Raspberry Pi M.2 HAT+ that was included in the AI Kit back in the day. It’s just a tiny bit of a bummer every time it happens. How great it would’ve been if a 13.3 mm header had been included instead…
Sure, a longer pin header would likely have cost a tad more to include. Raspberry Pi products have tiny profit margins and penny-pinching is understandable. It helps ensure best possible pricing. But please, these computers have always been all about their hackability and open access to the hardware. We guess it’s just a tad weird seeing the design team so easily let go of as core of a feature as GPIO access. Even if the few extra cents were eventually to show up in the end-user pricing, we wouldn’t have minded shelling them out. In the meantime, just make sure to source your own appropriately-sized header if you’re planning on using the GPIO.
Whew. That’s enough on that – mulling over it for the third time in a row isn’t the most fun read either, is it?
Once you’re done installing the hardware, there are a few steps to be done in software. The easiest way to set everything up is to initially boot your Raspberry Pi using an SD card. The Raspberry Pi 5 runs its PCIe lane at Gen 2 speeds by default. That’s nice, but there’s still untapped performance. By tweaking Raspberry Pi OS’ /boot/firmware/config.txt file to include dtparam=pciex1_gen=3, it’s possible to force the lane to operate at Gen 3 speeds, bringing the maximum transfer rate up from 500 MB/s to 1 GB/s. Neat!
If you want to boot your OS off of your newly connected SSD instead of the SD card, you have to copy your existing installation using the SD Card Copier utility that comes bundled with Raspberry Pi OS (or you can just use the dd command straight from the CLI). Alternatively, you can use the Raspberry Pi Imager to flash a brand-new installation of Raspberry Pi OS (or other OS of your choice) onto the SSD. Finally, it’s also important to tell the Raspberry Pi’s bootloader to consider the attached NVMe drive in the boot order, which can either be done using the raspi-config utility, or manually, by running sudo rpi-eeprom-config –edit, and adding a few lines to the file that pops up.
Keep in mind that the custom PCIe settings from the previous step won’t carry over, so you’ll have to redo the procedure once you make the switch (or just wait until you boot from SSD and then fiddle with the config files – this probably makes a little more sense).
You should now be all set for a reboot. With a little luck, your system should now boot from your SSD, letting you take your SD card out (which, admittedly, still feels a little weird – old habits die hard). All done!
Benchmarking the Raspberry Pi SSD
Official specs-wise, the 256 GB and 512 GB versions of the Raspberry Pi SSD differ a little, with the larger unit being some ~30% faster across the board. This is a common phenomenon. Larger capacity drives generally tend to have more flash chips. This alone speeds them up quite a bit, as it provides more access bandwidth to the storage silicon due to increased parallelism. Add to that larger cache sizes and a tuned-up storage controller and we’ve got our answer.
Unfortunately, we only have the smaller of the two drives – as fun as it’d be to compare them against each other. However, we do have some other SSDs that we’ve uses with SBCs around the lab before. Some of our favorites for this are Kingston’s NV1 and NV2 series, as they’re easy to find, are rather cheap and have never caused compatibility issues. Being the faster of the two, we’ve selected a 256 GB NV2 drive for this comparison.
We’ve also dug up some other random SSDs lying around the lab. There’s this neat 256 GB Samsung PM991a SSD we found, as well as a 256 GB Kioxia KBG40ZNS256G (total word salad, we know). Finally, we also threw in a 128 GB KingSpec NE2242 we had lying in an Edatec ED-HMI3020-070C HMI unit.
All of the SSDs we’ve chosen can be found for $25-$35, though keep in mind that regional pricing can vary a bit. Multiple other manufacturers also offer options cheaper than this, or have 512 GB drives in this price range.
This time around, we have to move the OS back onto an SD card to avoid having to flash the OS image over and over again to a bunch of SSDs (talk about coming full circle). We’ll also revisit fio, and use the same approach we did in part one – tweaking the sd_bench.fio file to once again point at an external drive.
We’ve kept the default test settings, with 4 MB blocks for sequential and 4 kB blocks for random tests.
The performance of the Raspberry Pi SSD is on par with most other options. Keep in mind that most of these drives are being held back by the Raspberry Pi’s single PCIe lane. Their performance on other systems can get quite a bit better, and yes, this grouping includes even the Raspberry Pi SSD with its PCIe Gen 3×4 interface.
The two outliers here are the KingSpec and Kingston drives, which both report suspiciously low random read scores. Why some drives have no troubles at all with the random read test is also a bit of a mystery – and we don’t like mysteries over here, so let’s dig around a bit more and try to piece together a theory or two.
For starters, sequential and random don’t quite mean what you’d expect when it comes to SSDs (and most modern flash-based storage in general). Unlike platter-based media which has to account for seek time between two random reads, flash-based storage doesn’t waste any time physically finding the data. However, things also aren’t as straightforward as they may seem.
As much as it tries to pass as true random access storage, flash simply isn’t – though some types of flash are closer to this goal than other. Nowadays, everything from USB drives to SD cards and eMMCs to – you guessed it – SSDs uses NAND flash. Compared to older and more expensive NOR flash, NAND flash has much less granular control over its internal structure, requiring even more magic to happen in its flash translation layer.
Flash translation layer? What’s going on here? Why can’t we just write data normally?
Each SSD is split hierarchically into pages, blocks and banks. Pages are usually 4 kB or more in size, though sometimes can be as small as 512 bytes. Once data is written to a page, no subsequent writes can be performed, no matter if the entire page got filled during the initial write or just a couple of its bits. In order to change any data, it’s necessary to delete the entire page and then repopulate it again in a single write.
…which wouldn’t be so bad if SSD could actually delete things on a page level. Instead, SSDs delete things on a block level. As a block contains multiple pages, it means that in order to change even a single bit of data, an SSD has to first relocate all of the pages in a block to a temporary safe location (or some sort of cache, assuming the data can fit and that there’s separate cache in the first place), after which it can wipe the entire block and only then put the data back, applying the required changes in the process.
Most SSDs optimize this step a bit by making that temporary safe location a bit more permanent, immediately creating an updated copy of the required pages and changing the pointers to now point at the new location. This, of course, assumes there is enough space to do so.
…which wouldn’t be so bad if blocks weren’t sorted into banks which the SSD can access in a parallel fashion, thus significantly speeding up operations. Think of it as a little self-contained RAID setup, which by itself is great – but once you realize that a single file might be split across multiple blocks across the SSD, potentially requiring tens of hundreds of blocks to go through the copying and wiping procedure.
Altogether, this phenomenon is called write amplification, and it’s a serious issue that affects both performance and an SSD’s lifespan. Multiple other algorithms try to mitigate this by performing wear leveling, caching and garbage collection (think of it like defragmentation on a per-page basis, wiping pages that haven’t been completely filled and recoalescing their data in more tightly-packed ones). SSDs are also over-provisioned at the factory (that’s why all flash media comes with that “actual formatted capacity less” note), leaving some breathing space for all of the page and block juggling.
All this and then some is handled by the aforementioned flash translation layer completely autonomously and rather opaquely. Your computer sends in the standardized commands and the data, and the SSD does the rest – the former having no real control over what actually goes on inside the storage silicon itself.
Going back to our low random read scores – it could be that the Raspberry Pi doesn’t want to play along nicely with certain drives. This was especially common in the early days of Raspberry Pi 5. It could also be that the flash translation layer of these two drives manages to cache writes a lot more successfully than reads, leading to the performance disparity. And as to why exactly – it’s a bit out of the scope of this review. If you’ve got any findings of your own, please write back to us.
Before we move on, with all this in mind, it could be fun little exercise to revisit the SD card performance graphs back in part one. Being flash-based as well, a lot of the write amplification-related things said here also apply. These insights should let you fully understand why A2-rated cards manage to eke out extra performance by having more caching tricks up their sleeves, why sequential and random operations show such a performance difference and why command queuing really starts helping only when block sizes get small (and especially so when it comes to sequential operations).
Just for fun, we also set our Raspberry Pi 5 to use PCIe Gen 2 speeds. This left a huge dent in the performance department, but can provide a bit more system stability (after all, the Raspberry Pi 5’s PCIe lane is officially rated for Gen 2 speeds). We’ve never run into any issues with any of the PCIe accessories we’ve tried, but it’s nice to have a safety net just in case.
Conclusion
Raspberry Pi’s SSD, and by extension, the official Raspberry Pi SSD Kit don’t offer any groundbreaking features not available elsewhere. It doesn’t need to be. However, these drives are designed to just work with the Raspberry Pi 5. No software issues, no fuss. It’s as plug-and-play as it gets.
The pricing is pretty fair, with a lot of name-brand alternatives we’ve tested retailing around the mark. Cheaper alternatives also exist (which might matter if you’re buying in bulk), but again, there’s always the risk of running into that one whammy combination that just doesn’t work. Finally, 2230-sized (or 2242-sized) drives are a bit rarer of a find than their 2280-sized counterparts. Your neighborhood tech retailer might not always have them on hand – and Raspberry Pi releasing their own drive should at least make them a little more commonplace.
If you’re a seasoned SBC user, you’ll likely have a stack of compatible SSDs at home or a tried-and-tested option you’ve been using for a while. If this describes you, you’re likely not the in the target demographic. But if you’re grabbing the first-ever SSD for your Raspberry Pi, it’s definitely worth checking out the first-party option – if only to cut back on any potential compatibility headaches.