

Raspberry Pi 500+
The Raspberry Pi 500+ seems like a product born out of love for the keyboard computers of the old, bringing the best that Raspberry Pi has to offer into an attractive, albeit expensive product. It might not be the perfect low-cost tinkering machine that the 'regular' Raspberry Pi 5 is, but it retains many of its lineage's unique qualities and offers a desktop experience unmatched in the world of Raspberry Pi.
Pros
- Wonderful mechanical keyboard
- Plenty of RAM
- Comes with a built-in SSD
- Reliable performance
Cons
- Expensive for a Raspberry Pi — and twice as pricey as a Pi 500!
- Somewhat awkward GPIO access
- No MIPI connectors
Ever since Raspberry Pi 5’s 2023 debut, it’s been the go-to single-board computer (SBC) for most projects you might want to do. It’s a mean little server machine, great for tinkering with code, AI, and hardware. If you can think it, someone’s likely made it with a Pi at heart: from fully automated climate-controlled Pi-powered greenhouses and retro gaming rigs to media servers and 3D printer controllers. The company’s SoM-style Compute Modules have even made their way into industrial rack-mount gear and various commercial consumer products. Raspberries are everywhere you look.
But there’s one market that Raspberry Pi’s been rather keen on conquering for quite a few years now: lightweight home and office desktops. We still vividly remember Raspberry Pi 4’s marketing back in 2019, touting its capabilities as a home computer. And yes, it was a huge step in the right direction, adopting 4K support and dual-display capabilities alongside a much more modern processor design and — at the time — ample memory. But it wasn’t the be-all and end-all of home computing. Definitely wasn’t.
Then came Raspberry Pi 400. It’s a simple concept: model-number-times-a-hundred means Pi-meets-keyboard. Obviously tailored for desktop usage, it’s much like a ZX Spectrum or Commodore 64 of yore: an all-in-one keyboard with all your ports and buttons and brains. Plug in a mouse, monitor, and PSU brick, and you’re ready to roll. Now, obviously, the issue with the Raspberry Pi 400 is that it’s a Raspberry Pi 4 at heart. And with the much better Raspberry Pi 5 out on store shelves, who’d want those scruffy Cortex-A72 cores and no built-in PCIe connector?
…which is why the clever folks over at Pi Towers came up with the Raspberry Pi 500. Using our handy formula from the last paragraph, can you guess what it is? If you guessed that it’s a Raspberry Pi 5 chucked inside a nice keyboard case… good job! You’ve been following along. The Raspberry Pi 5’s much nicer Arm Cortex-A76–based processor does wonders for the desktop experience, making the Raspberry Pi 500 quite a capable (and lovely) little machine for light office work or simply scouring the interwebs. But it wasn’t without faults either. Packed with 8 GB of RAM — the most a Raspberry Pi 5–based system could ship with in December 2024, when the Pi 500 hit the shelves — it didn’t take long for the 16 GB Raspberry Pi 5 model to overshadow it in January 2025. It also, surprisingly, lacked an internal M.2 connector or any way to connect PCIe devices, which was such an obvious feature to include. We’d been booting Pi 5s off of NVMe drives for over a year by that point…
Well, the all-new Raspberry Pi 500+ is here! It seemingly tackles pretty much every issue that the Pi 500 had and then some. At $200, it’s not cheap for a Pi — but then again, it’s not terribly expensive for a desktop machine, and it comes with a mechanical keyboard and RGB lights baked right in. Gosh! Surprising, to say the least. But alas — let’s not get blinded by the glimmering lights and clicky buttons, and instead dig into what makes this little all-in-one computer tick.
Before that, however, we’d like to take a moment to thank Raspberry Pi for providing us with a review unit. As always, all opinions stated here are strictly our own.
Unboxing and first impressions
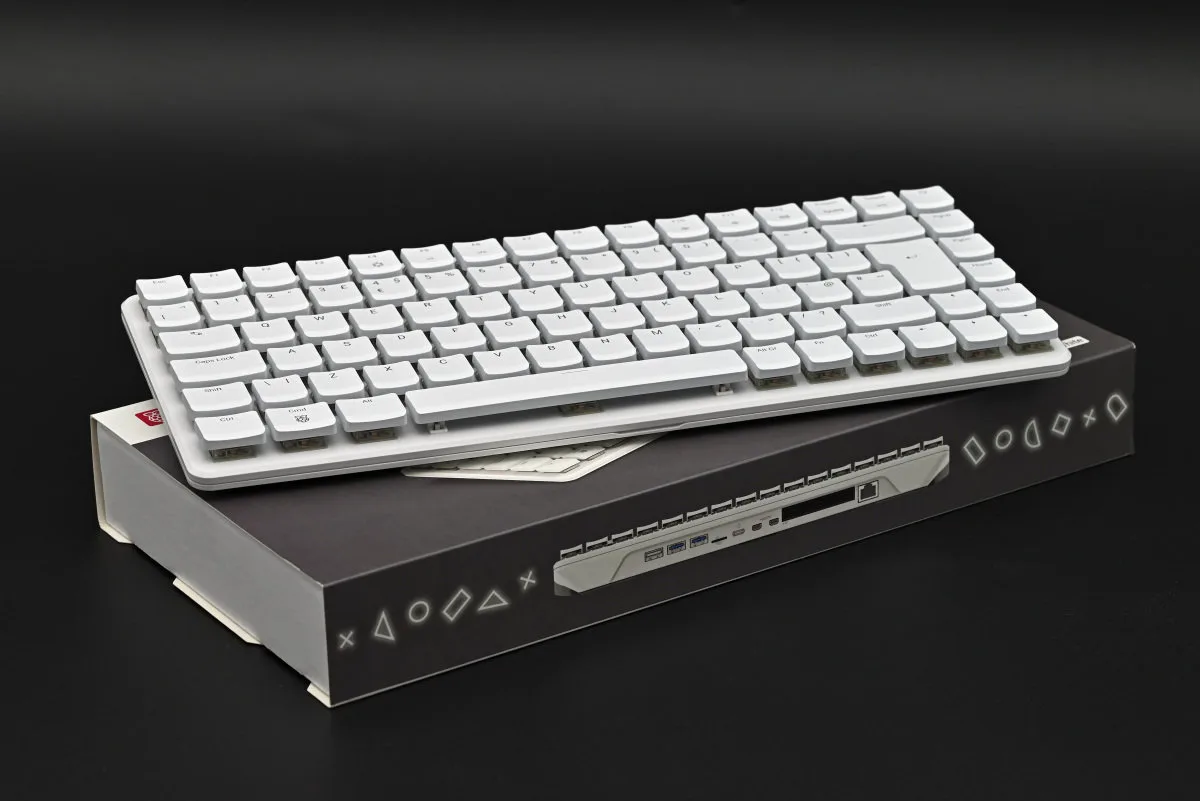
Raspberry Pi makes quality stuff, but it always has this maker-y, hacker-y air about it. We mean this in the most positive way — it’s a wonderfully whimsical approach to design, and it’s one we’ve come to expect from the company. You can, then, imagine our surprise when, upon opening the Pi 500+’s box, we were met with a meticulously sleek bit of kit. Its all-white chassis pairs wonderfully with the smooth keyboard plate and almost glossy keycaps, with tack-sharp labels. Compared to all the older all-in-ones, the new model immediately feels much more special.
Picking the Raspberry Pi 500+ up reveals a healthy amount of heft. Despite retaining the plastic construction, it’s 60% heavier than the ‘regular’ Pi 500, coming in at just over 600 g. This contributes to the premium feel of the unit. We suspect that this extra heft comes chiefly from the mechanical switches and the bulkier case. Extra heft aside, the new unit also feels a lot sturdier, thanks to a more solid construction that doesn’t solely rely on plastic clips anymore, instead featuring five screws that go a long way in ensuring that there’s minimal flex to the chassis.
The Raspberry Pi 500+ still has that cheese wedge look going on. All of its compute guts live within a thicker part of the chassis that runs along the back, serving double duty by holding the keyboard at an ergonomic angle. It’s a neat design that’s remained virtually unchanged since the original Raspberry Pi 400, and for good reason — it works.
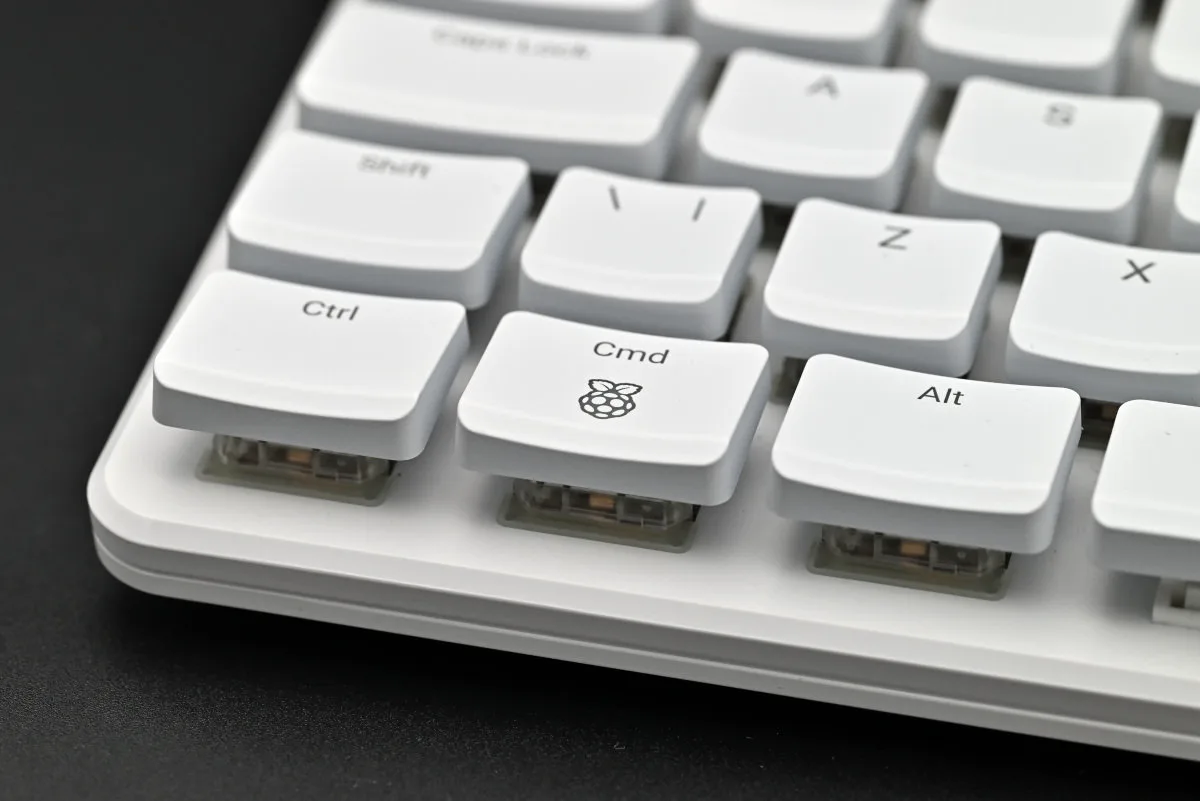
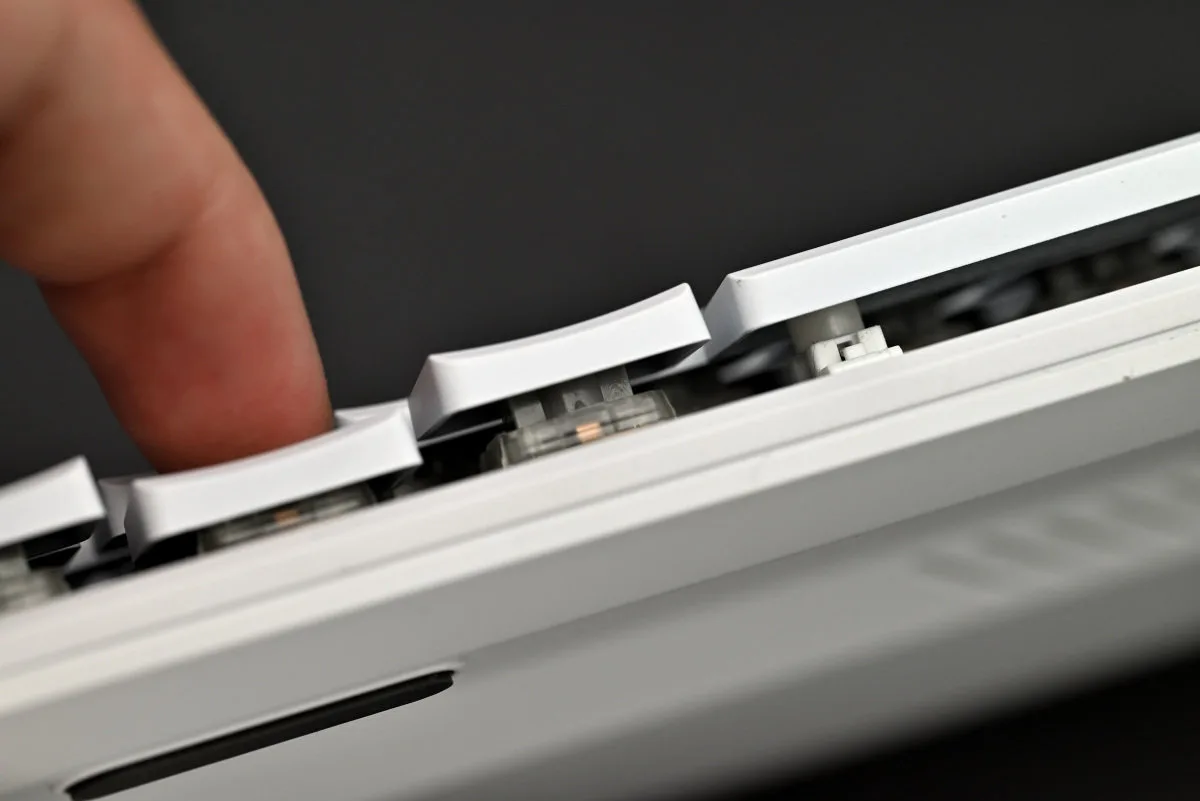
Of course, you can’t mention a mechanical keyboard and not expect us to go click-click-clack at it even before plugging it in — and, woah. This feels nice. Raspberry Pi’s previous keyboards were all membrane-based. That’s not to say that these can’t be quite nice — Apple’s modern Magic Keyboards being a great example — but Raspberry’s offerings always felt a tad mushy to us, with the non-plus Raspberry Pi 500 being the mushiest by far. We’ll accept that this might be personal preference, but we like some tactile feedback. And boy, is there loads of it on the Pi 500+! The Gateron KS-33 Blue switches are very clicky, albeit a tad on the heavier side, with a 65 g actuation force. We’ll be exploring the keyboard in a bit more depth shortly.
Sadly, there is no power supply or HDMI cables included, though Raspberry Pi does offer a more complete Desktop Kit for $20 extra which includes a Raspberry Pi–branded mouse, a 27 W power supply, a micro HDMI-to-HDMI cable and a copy of the latest edition of the Raspberry Pi Beginner’s Guide.
Raspberry Pi 500+ specs
| Specs | Raspberry Pi 500+ | Raspberry Pi 500 |
|---|---|---|
| CPU | Quad-core 2.4 GHz Arm Cortex-A76 | Quad-core 2.4 GHz Arm Cortex-A76 |
| GPU | 800 MHz VideoCore VII GPU | 800 MHz VideoCore VII GPU |
| Memory | 16 GB 2133 MHz LPDDR4X | 8 GB 2133 MHz LPDDR4X |
| Display | 2 x 4K60 microHDMI | 2 x 4K60 microHDMI |
| Ethernet | 1 x Gigabit Ethernet port | 1 x Gigabit Ethernet port |
| Wireless | Dual-band 802.11ac Wi-Fi; Bluetooth 5.0 with BLE support | Dual-band 802.11ac Wi-Fi; Bluetooth 5.0 with BLE support |
| Storage | M.2 M-key NVMe SSD slot (PCIe Gen 2/3 x1) with pre-installed 256 GB SSD; SD card slot | SD card slot with pre-installed 32 GB SD card |
| USB | 2 x USB 3.2 Gen 1; 1 x USB 2.0 | 2 x USB 3.2 Gen 1; 1 x USB 2.0 |
| Keyboard | 84-, 85-, or 88-key clicky mechanical keyboard with RGB backlights | 78-, 79-, or 83-key membrane keyboard |
| Other IO | 40-pin GPIO, debug port, RTC battery connector | 40-pin GPIO, debug port, RTC battery connector |
| Power | USB-C (5 V/5 A) | USB-C (5 V/5 A) |
At the heart of the Raspberry Pi 500+ lies a modified 16 GB Raspberry Pi 5. It’s got the same 2.4 GHz quad-core Arm Cortex-A76–based BCM2712 SoC we know and love, meaning that performance won’t differ all that much. The step up to 16 GB of LPDDR4X memory (running at 2133 MHz) is a nice choice, bringing the highest-end desktop Pi in line with its standalone counterpart — finally!
There’s one major hardware upgrade under the hood: the Pi 500+ has a built-in M.2 NVMe SSD slot, and it comes with an SSD pre-installed, making it the first Raspberry Pi product that ships with one. The Raspberry Pi 5 does feature a PCIe slot, but it’s exposed through a custom ZIF connector and requires an M.2 HAT+ in order to be used with M.2 devices. On the other hand, the ‘regular’ Raspberry Pi 500 forgoes having any PCIe connectivity, despite having a set of unpopulated pads for an M.2 connector on its PCB. Argh — being limited to SD cards was definitely a letdown for a machine designed as a desktop computer, so we’re more than glad that the Raspberry Pi 500+ tackles this.
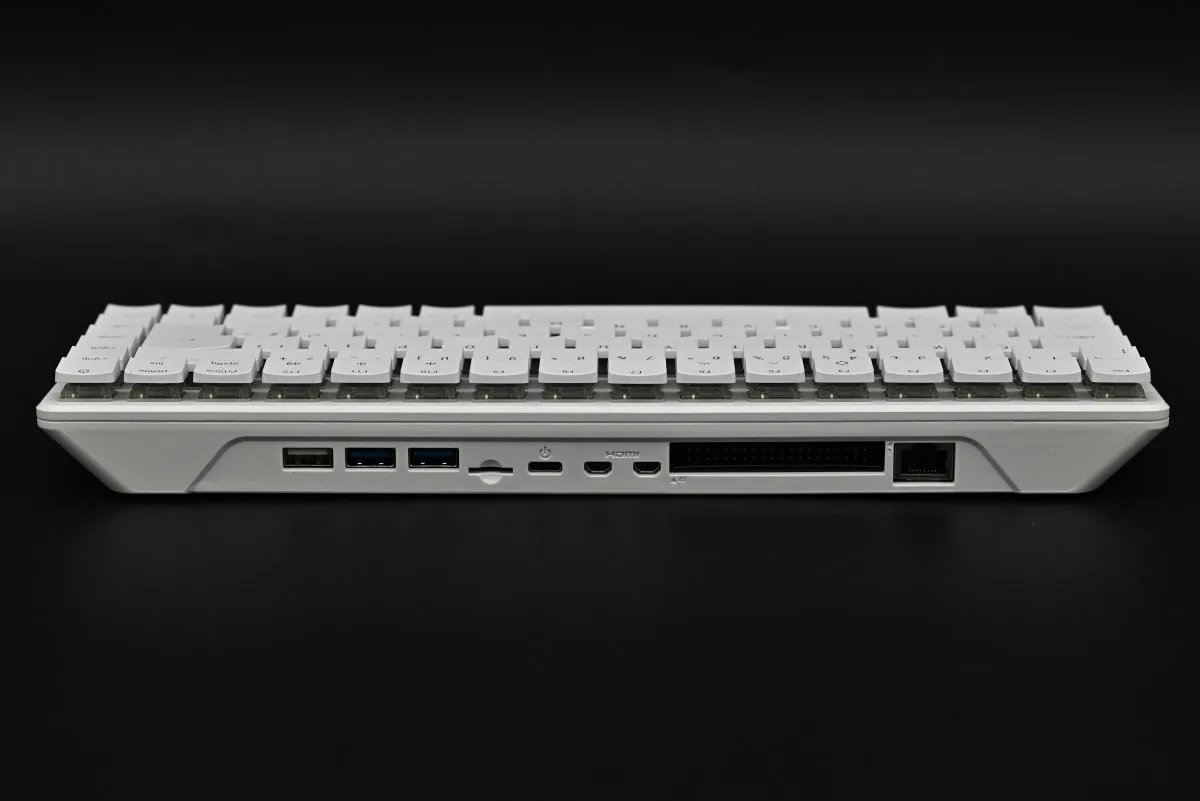
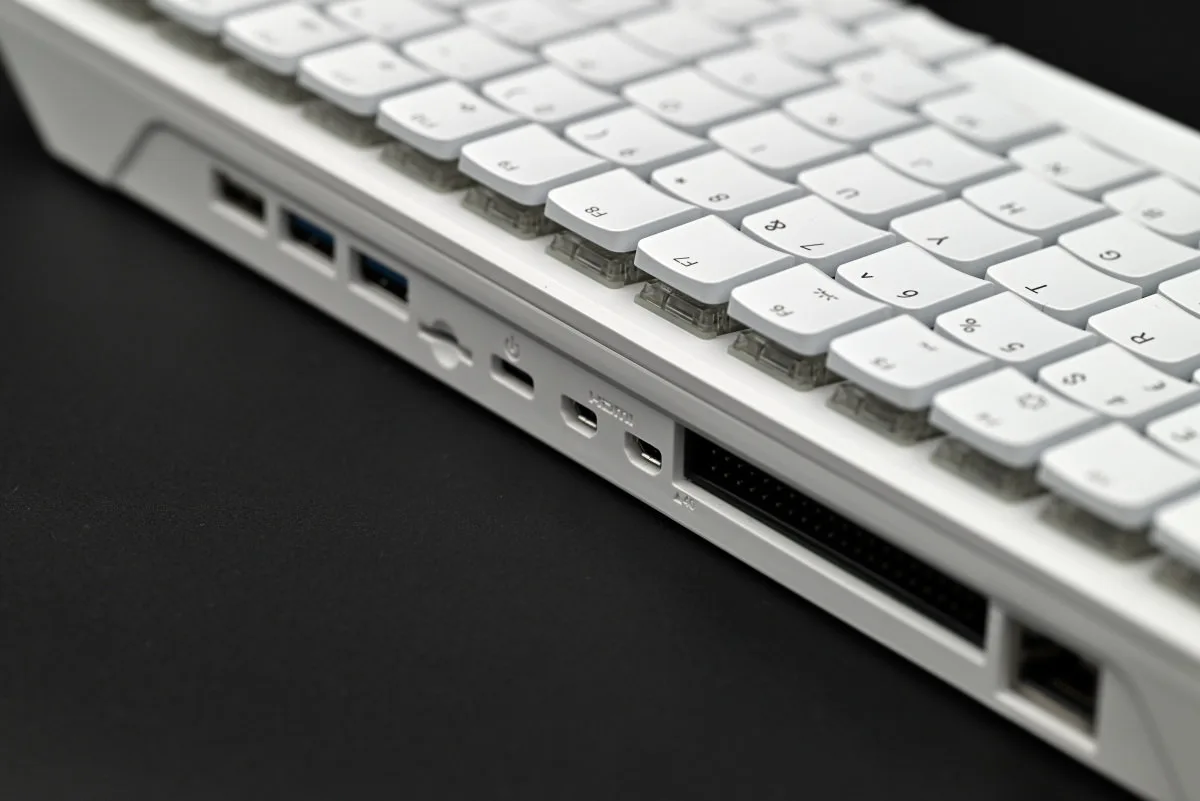
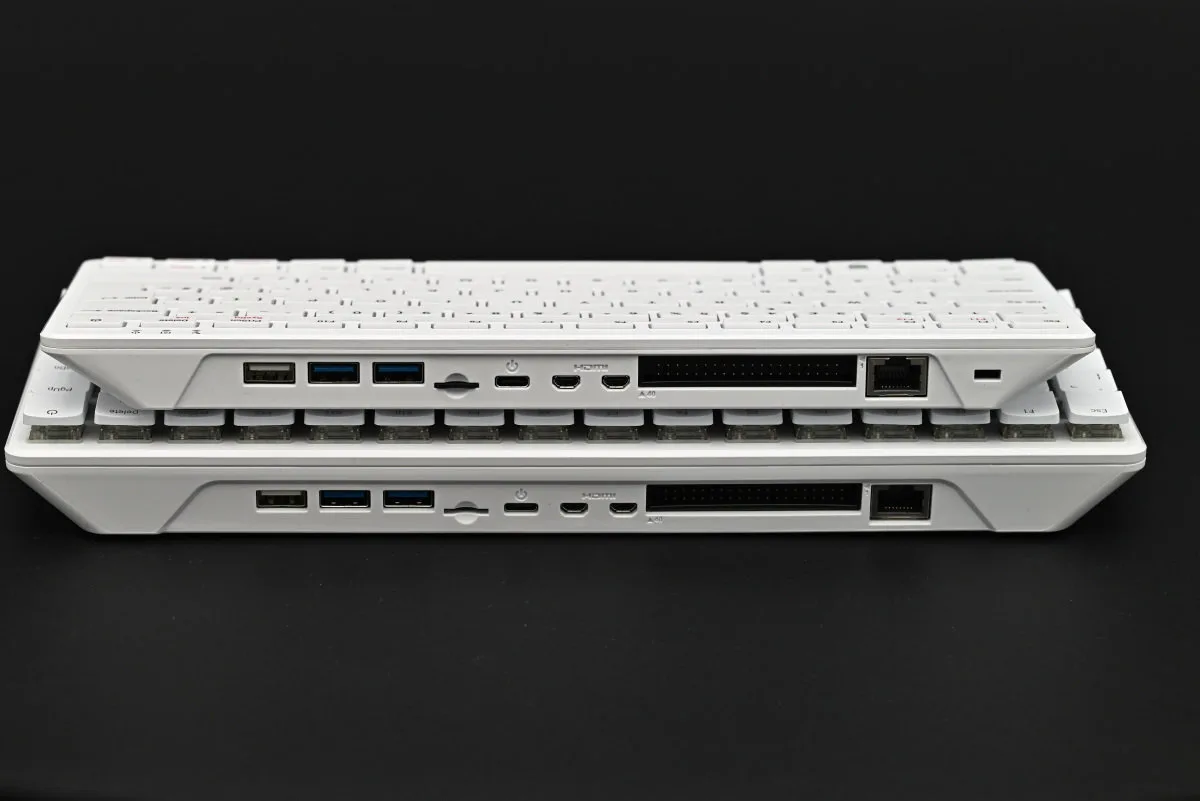
Raspberry Pi’s all-in-ones place all of their IO on the backside, and the Pi 500+ is no exception. Starting from the left-hand side, we’ve got a single USB 2.0 and two USB 3.2 Gen 1 ports, an SD card slot, a USB-C power connector (in order to work reliably, the Pi 500+ requires a 5 V/5 A power brick, though we’ve had luck with 3 A rated ones too), two mini HDMI ports, a 40-pin general-purpose input/output (GPIO) header and an Ethernet port. All of these ports share specs with their Raspberry Pi 5 counterparts: both HDMI ports still support 4K60 output, and the Ethernet port keeps to the same gigabit standard. With 2.5 Gbps Ethernet becoming more and more prominent even in consumer gear, with ever-increasing download sizes and websites keen to shove exceeding amounts of bloat in your face, maybe this could have been the perfect opportunity for Raspberry Pi to up the specs a little, though it’s understandable why this didn’t happen. Such a change would have spent a lot of engineering effort on something that might not even matter to most people eyeing a device like this.
As a side note on the GPIO header: we’ve always found its inclusion on the Raspberry Pi 400, 500 and now the 500+ somewhat curious. Sure, the beloved 40-pin header has effectively become emblematic of Raspberry Pi, and SBCs in general, and its presence is more than welcome as it facilitates virtually endless tinkering, but it just feels like a keyboard-shaped all-in-one might not be the most convenient choice for such. You obviously can’t connect HATs normally (or at least not without a breakout cable/board) due to the header’s awkward placement. While connecting your own custom hardware is rather easy, messing with the GPIO without knowing what you’re doing can cause permanent damage to the board which is stomachable enough when it comes to a $50 2 GB Raspberry Pi 5 model, but less so when it comes to a $200 Pi 500+.
And that’s kind of it when it comes to the Raspberry Pi 500+’s IO! The Pi 500+ is designed to look neat on a desk, and having all the ports situated on the back, with the other sides nice and clean, definitely helps avoid the cable hell that many other Raspberry Pi boards are prone to causing.
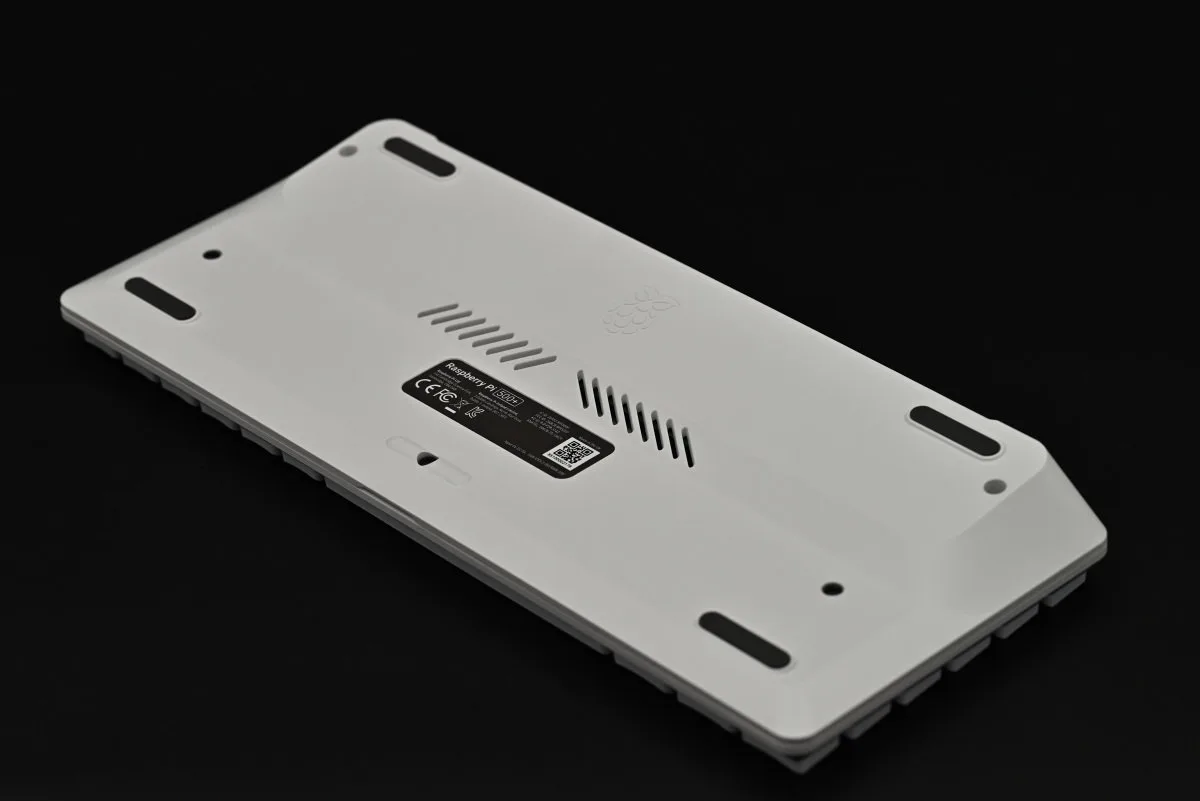
The Raspberry Pi 500+’s bottom plate is similarly simple, with four rubber feet that prevent the computer from sliding all over the place as you go tap tap, and a pair of vents on the back that provide some airflow to and from the heatsink.
Now, the front is where things get rather interesting…
The Raspberry Pi 500+ keyboard
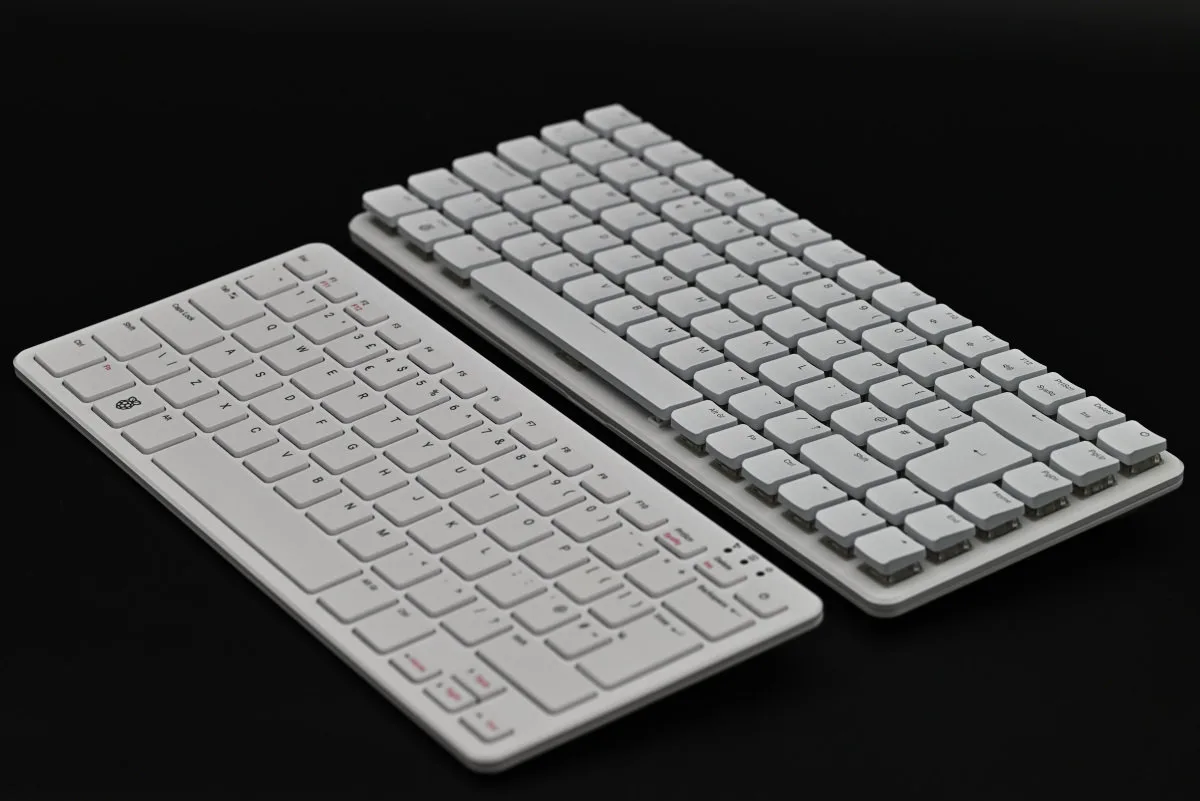
Okay, so, the Raspberry Pi 500+ has hands-down the nicest keyboard that Raspberry Pi’s ever made, standalone or built-into one of these all-in-ones. Sure, it’s no high-end custom-built gaming beast with optical switches, but we’re willing to bet that it’s still a far cry above what most people are used to working on. Raspberry Pi went with a modified 75% design, which does away with the numpad and some less-used keys, but adds a dedicated power key and retains a proper set of arrow keys and the page up, page down, home and end keys — basically a step away from TKL. We endorse the compromise between size and functionality here, despite our love for the humble numpad. It’s a productivity beast, but a numpad-equipped Raspberry Pi all-in-one likely would’ve been a bit too much to handle.
The Gateron KS-33 Blue switches are a good fit for the system. They’re low-profile, but offer a decent amount of pre-travel (1.7 mm as per Gateron), which helps with accuracy, while retaining the relatively shallow 3 mm total travel distance, making them quite responsive and comfortable for fast typing.
With that being said, these are clicky switches with a click leaf design that certainly doesn’t hold back on the clicky part. They are loud and proud on the way down, with perceptible tactile rebound on the way up. They feel pretty great and sound lovely (to the typist, at least), but are guaranteed to get attention from people around you (and, spoiler alert, it might not always be positive, especially if said people are trying to sleep).
We want to make a point of defending clicky switches, as they’ve recently been gaining some ill-deserved reputation as somehow obnoxious and inferior to all the creamy and thocky offerings of TikTok fame. In the vast Hadean expanses of over-lubed switches and boards stuffed with more foam than a well-insulated attic, a proudly clicky board is actually… refreshing. Weirdly poetic, we’re aware, but we just like how the Raspberry Pi 500+’s switches feel and sound, okay?

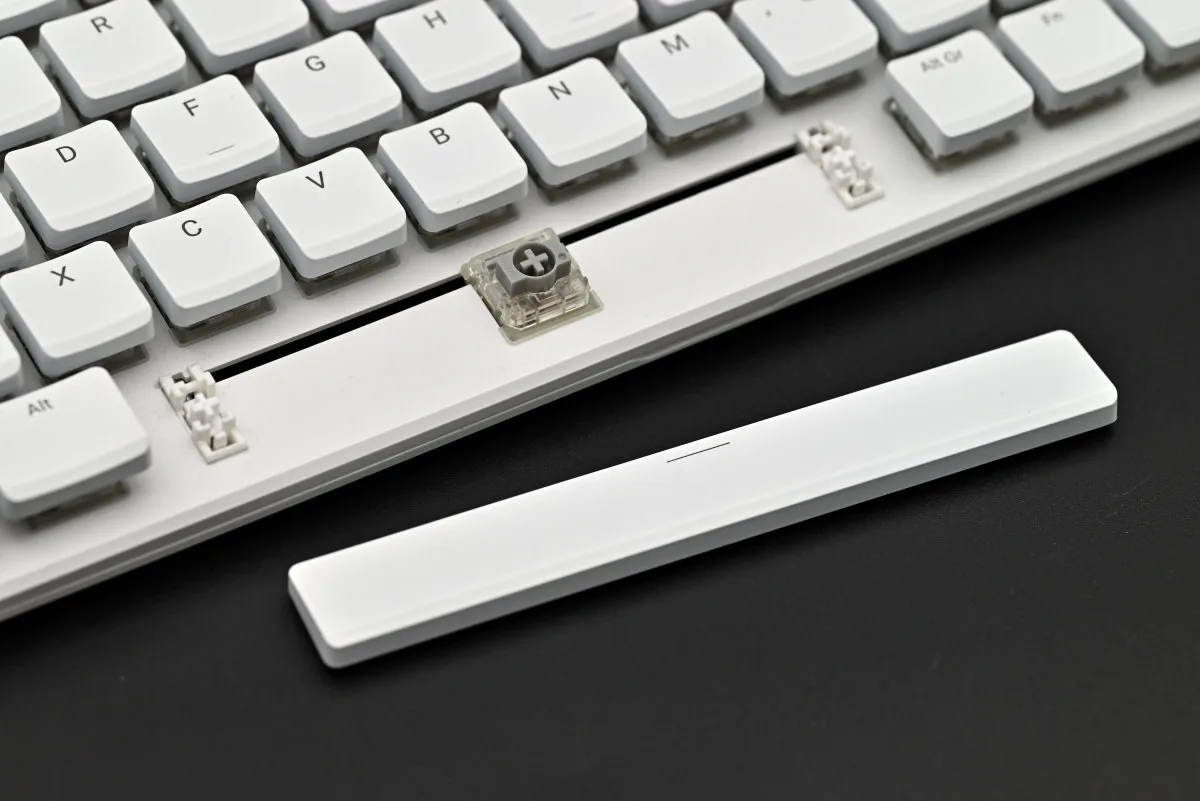
The Pi 500+’s stock keycaps don’t disappoint either. The key labels are much crisper than the pad-printed labels found on the Pi 500. While we initially assumed that these were double-shot ABS keys (the standard for backlit keys) due to the quality feel and look, it seems that these are actually single-shot keys made of a transparent material, cleverly coated with a layer of opaque white spray-on paint with the labels masked during application. This achieves a very similar effect a proper dual-shot key, though long-term durability remains to be seen.

These new keycaps also have a very unique (and as far as we can tell, custom!) side profile: starting with an elegant front bevel (à la HP-15C), the caps prominently slope backwards after a “peak”, in order to compensate for the chassis’ forward slope, offering a flat typing surface on each key. The caps’ front profile is ever-so-slightly U-shaped, arguably helping in hitting the right key, especially when touch typing.

As with all mechanical keyboards worth their salt, larger keys are stabilized. In our review unit, which came with a British layout, it’s the space, return and backspace keys, but the exact stabilizer setup will vary from region to region (e.g., the US model has an extra stabilizer on the bigger left shift key). These do an excellent job, and there’s practically no binding, even when larger keys are hit right on the edge, save for maybe the tiniest bit that we noticed in the upper-right corner of the return key. We do have to note that our Raspberry Pi 500+ comes from a pre-release batch: we were warned that the return key switch placement is somewhat different on these early units, something fixed in retail models to ensure compatibility with standard keycaps. While we have no way of proving it, it’s possible that this positioning mishap is the cause of this very slight binding, though it’s rather unnoticeable unless you intentionally go looking for it (which is how we stumbled across it in the first place).
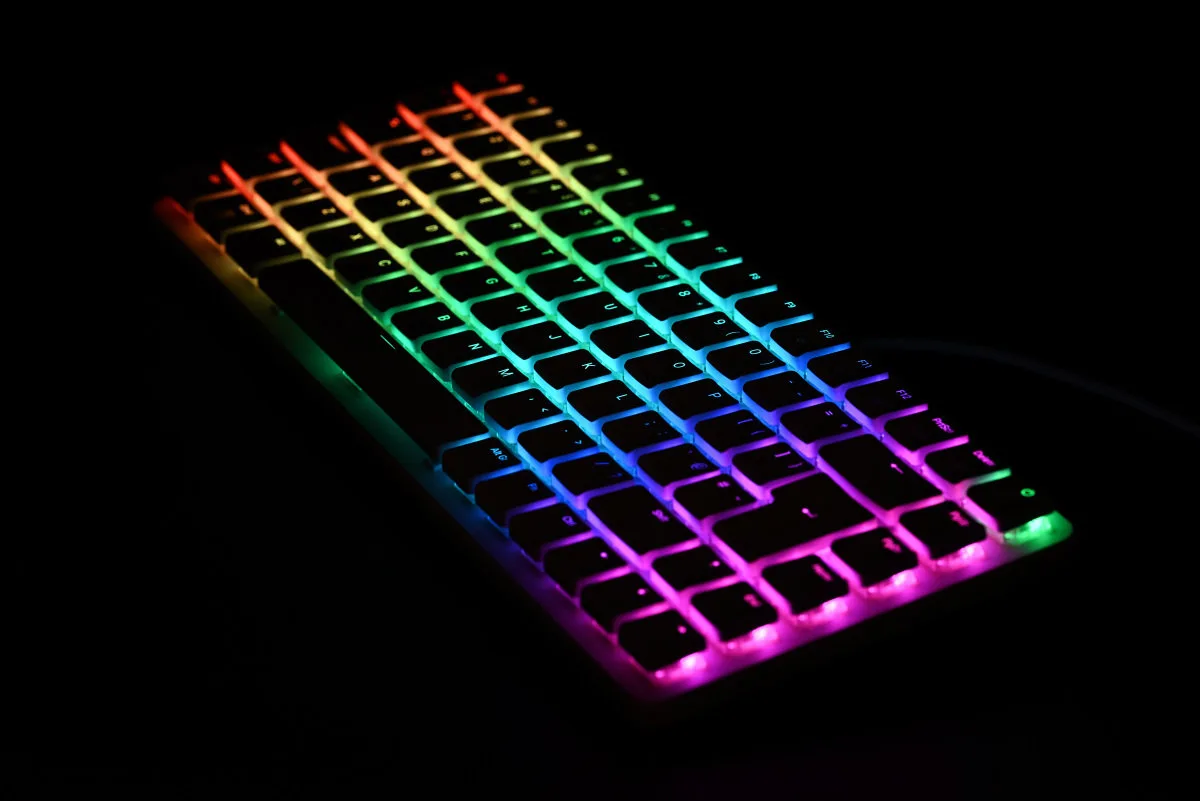
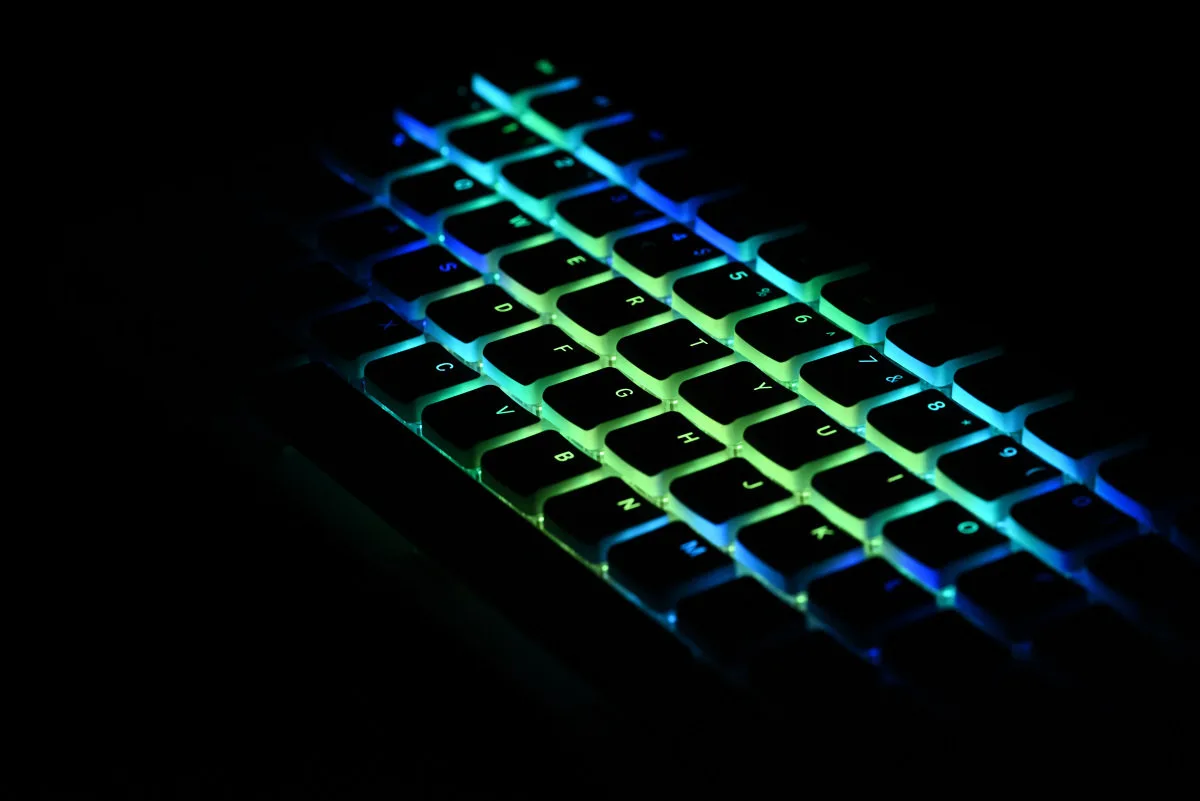
With RGB being one of the headline features of the new computer, we had to write a little about it — even if we’re pretty sure that, contrary to popular belief, it doesn’t make this Raspberry run any faster. By default, the Pi 500+ uses its RGB backlight in a very no-nonsense way. After an initial splash of color during boot, all the keys light up a crisp white, with the power key turning from red to green. Rather usable, if a bit dull. FN + F5 and FN + F6 control backlight intensity to better suit your lighting conditions (believe us when we say that the backlight gets bright). But practical backlighting is not why we’re here, is it? In order to unleash all the colors, you need to hit FN + F4, and the Pi 500+ will cycle through its built-in RGB presets with each press. There’s a nice red-on-white mode which brings back some of the snazzy classic Raspberry Pi look; there’s a rainbow splash of color that illuminates the whole board with a color wheel; there’s a lovely “typing heatmap” mode, which reacts in real time as you type and lights up most used keys and their surroundings from blue to red… you get the point. And if none of these tickle your fancy, Raspberry Pi provides a command line–based tool for designing your own custom lighting presets. Fancy!
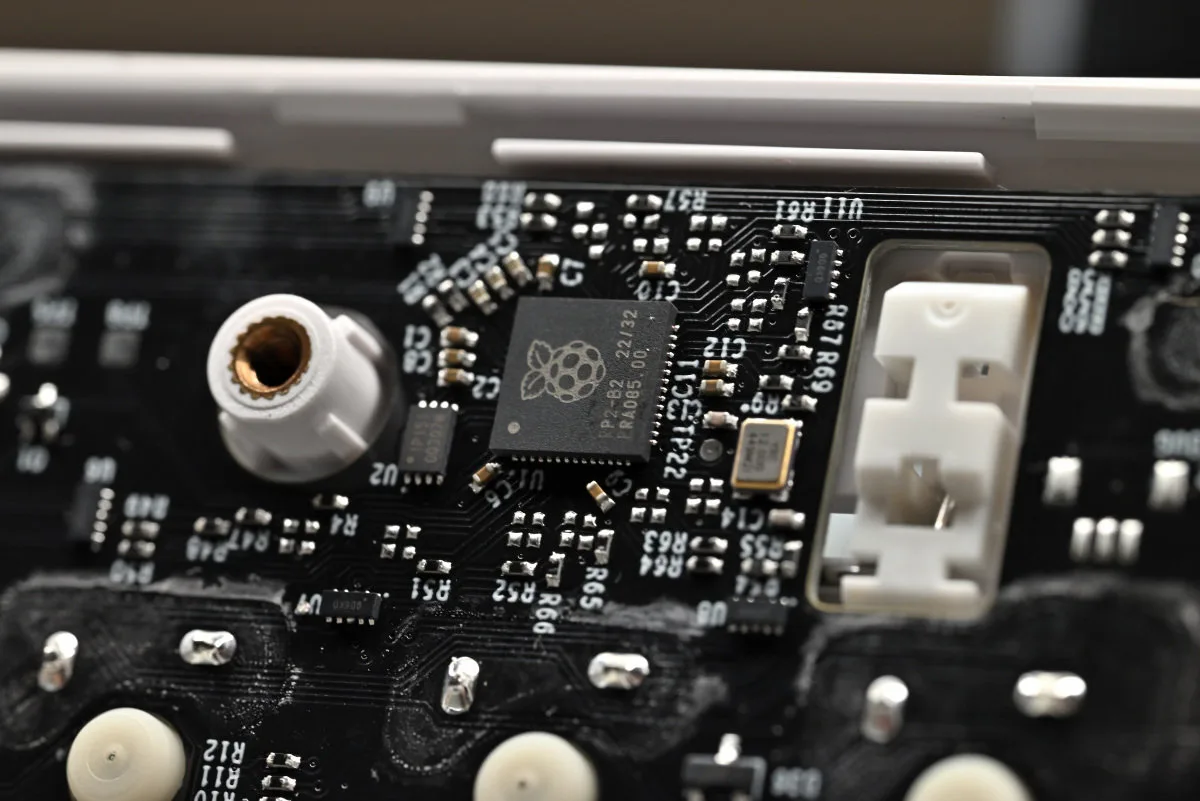
Oh — and here’s a little bit of trivia. The whole keyboard module uses Raspberry Pi’s own RP2040 microcontroller to drive all the switches and LEDs. It’s pretty meta seeing a mechanical keyboard running this sort of hardware. The firmware on these is updatable, and it’s possible to upload your own custom one too. This is a very intriguing option, especially since the official firmware seems to be a fork of the open-source QMK project.
All of this adds up to a keyboard that’s genuinely a joy to use, especially for typing. It’s not too shabby for gaming either, though some of the things that make it wonderful for productivity, i.e., the longer pre-travel and heavier switch actuation force, do detract a little in this department. But for all that Raspberry Pi got right with this design, they might have gone just a tad overboard on the entire polishing-the-keys-till-they-shine aspect. Okay, that’s maybe a bit of a hyperbole, but the keys are slick, perhaps due to their unique painted-on design. While this is definitely a matter of personal taste and preference, in our opinion these capture the essence of an old, shiny MacBook keyboard feel a bit too well. On the other hand, we’ve asked around a little and, to some, these feel extremely premium precisely due to their slickness. Your mileage may vary — we like our keys a bit grippy, though the gloss certainly makes for a keyboard that stands out both visually and in feel.

Remember us mentioning that the keycaps are replaceable? The Gateron KS-33 switches feature a Cherry MX-style stem that accepts all standard MX keycaps, so you’re free to customize these to your heart’s content. Do note, though, that keycaps with taller profiles, such as SA or OEM, can end up hitting the keyboard plate, which isn’t ideal (remember: these are low-profile switches). If the stock keycaps aren’t doing it for you, or you’re simply into customizing the way your Pi 500+ looks, Raspberry Pi recommends Cherry- or DSA-profile options, though any keycap with a sufficiently low profile will work.
Deconstructing the slice: a peek inside the Raspberry Pi 500+
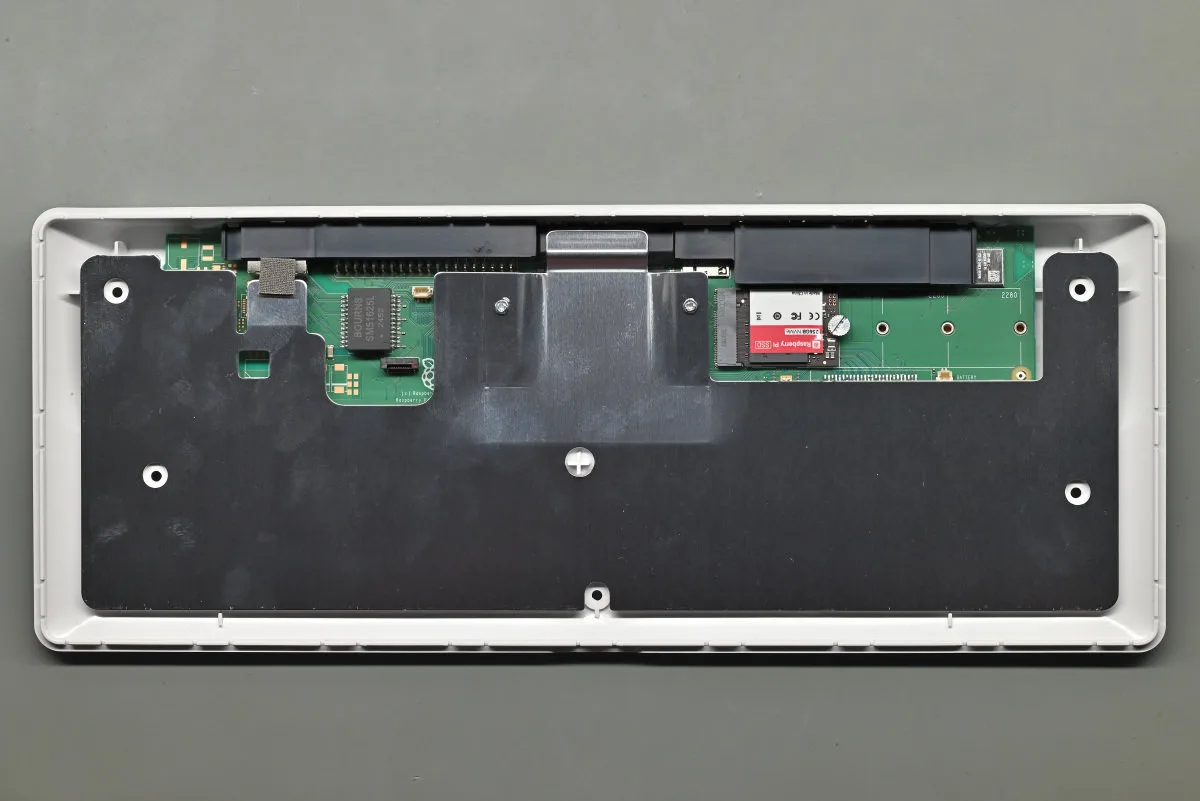
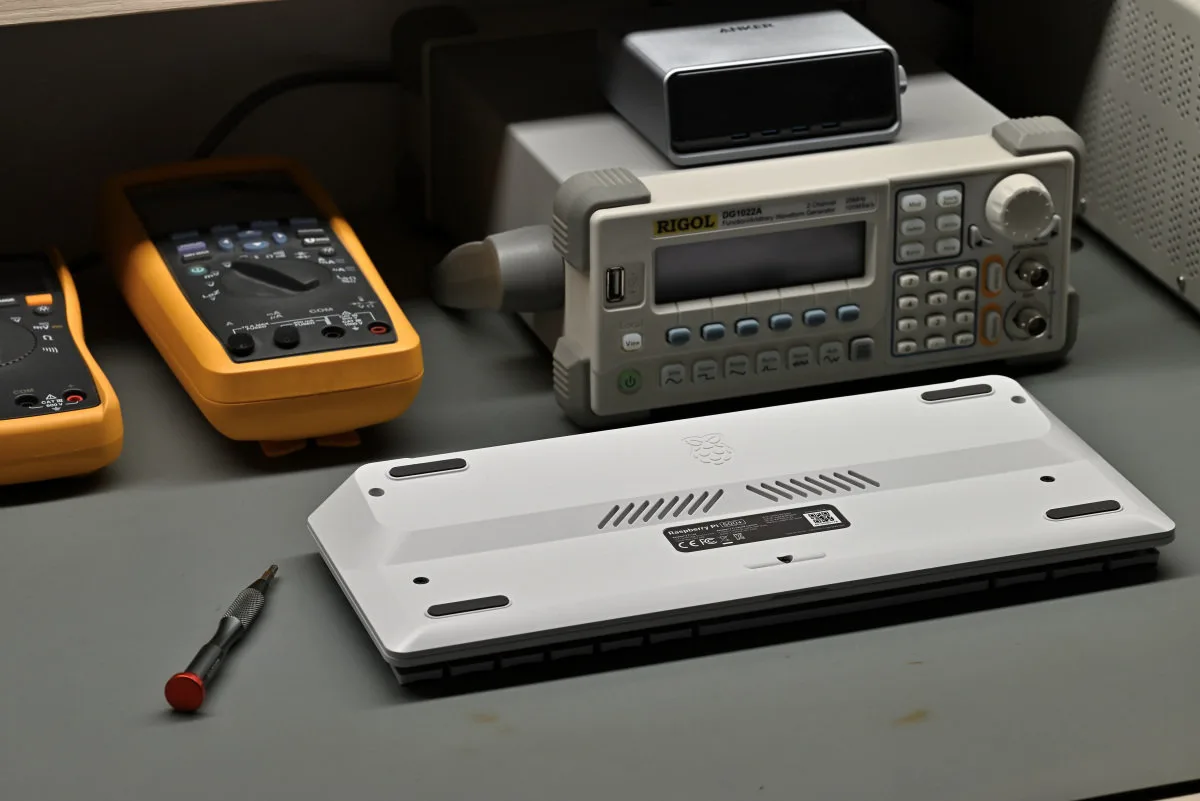
The Raspberry Pi 500+ is designed to be easy to open, which shouldn’t come as a surprise given the inclusion of a spudger tool in the box. A total of five Phillips head screws hold the back plate and keyboard assembly together. The front lip of the unit features a small notch that the spudger is meant to hook into and release the first pair of clips holding the body shut. With these unclipped, it’s possible to go around the seam with the spudger or even a fingernail to release the remaining clips, which releases the keyboard.
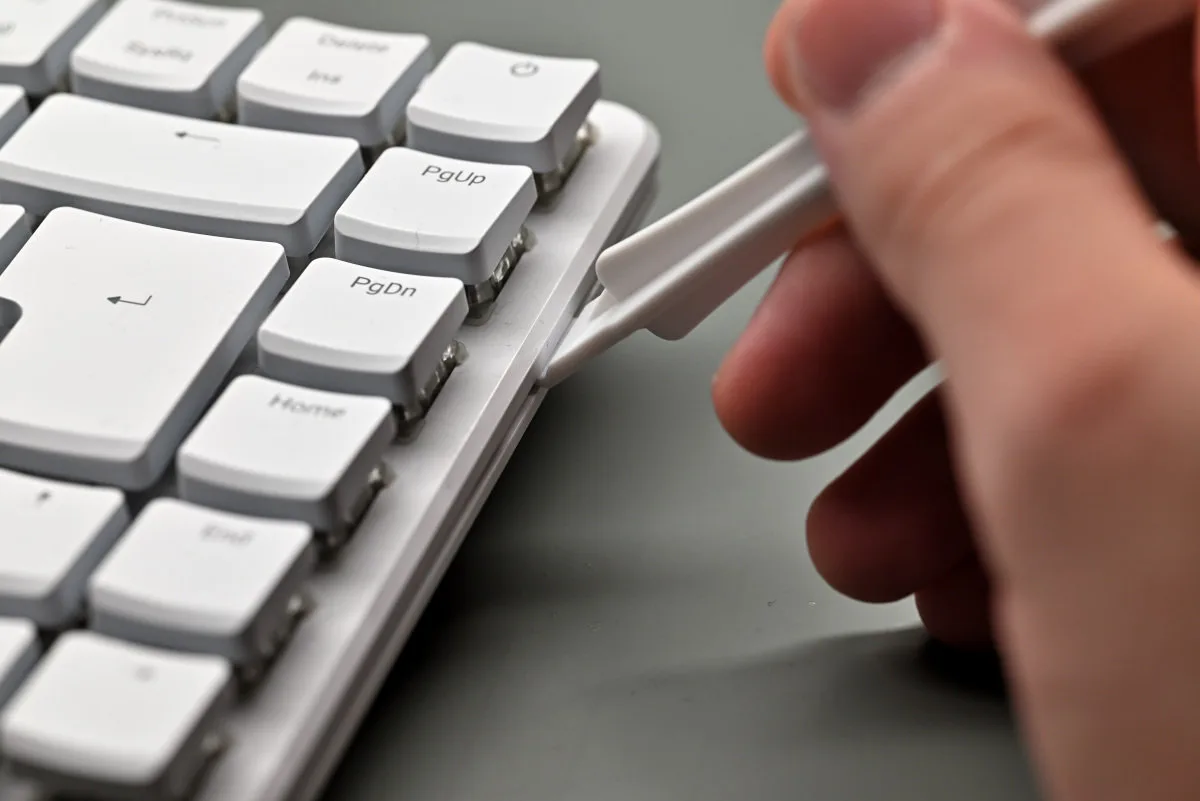
As disassembly is required in order to access the SSD, making it something you might end up having to do, we’d like to point out that the included spudger is made of the same plastic as the Pi 500+’s body, making is possible to leave some scuffs on the latter if you’re not careful.
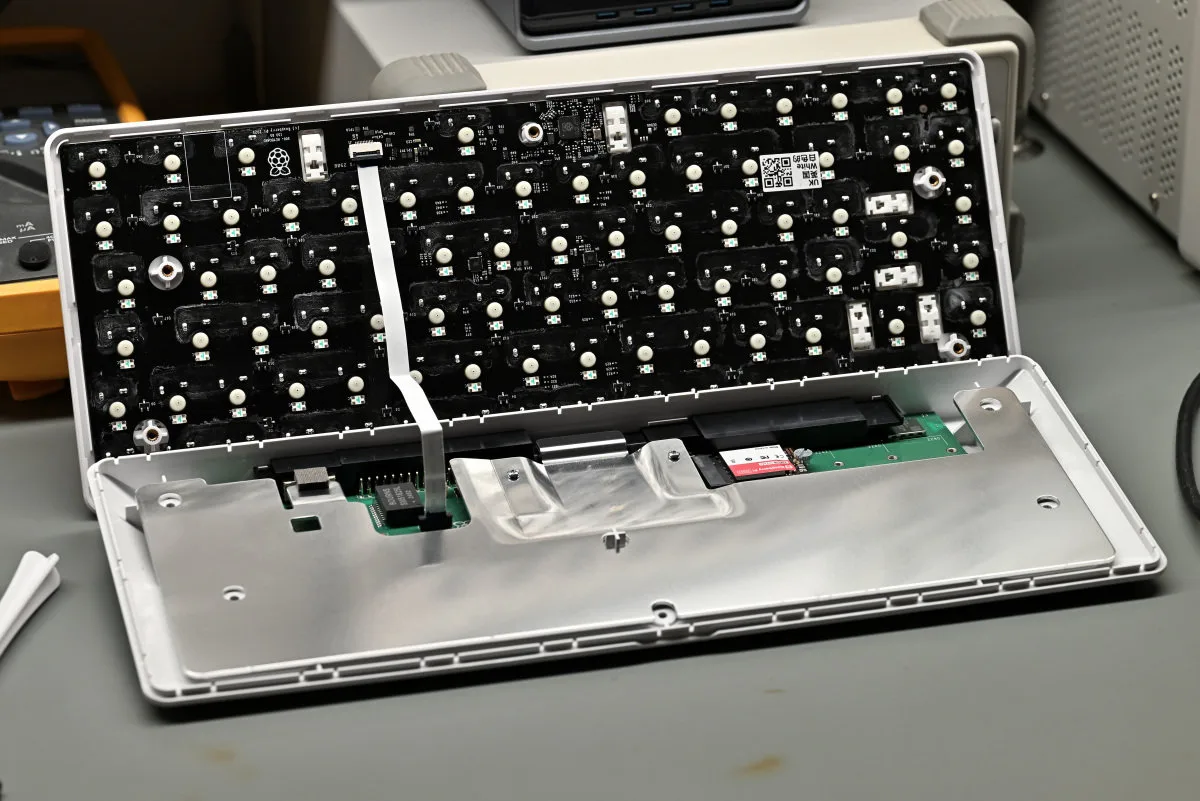
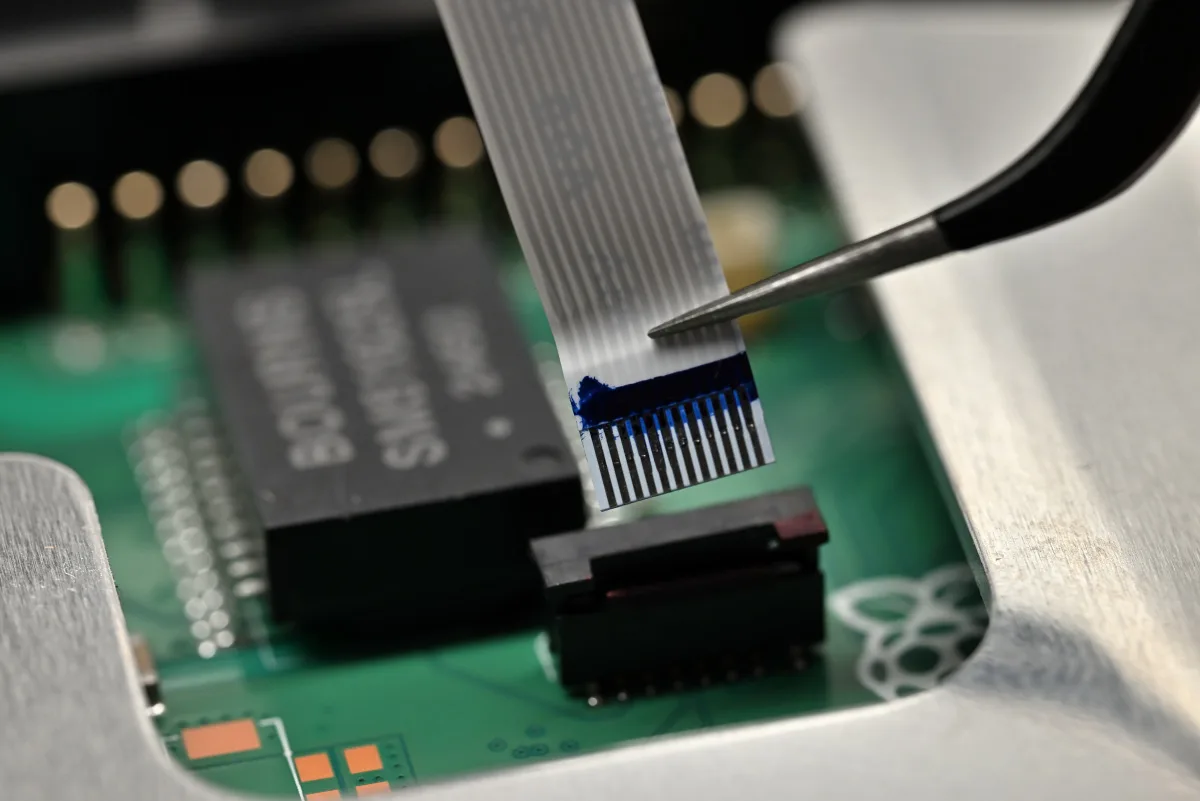
With the latches released, it’s time to unclip the ribbon cable connecting the keyboard assembly with the motherboard — and with that, we’re ready to take a closer look at the hardware!
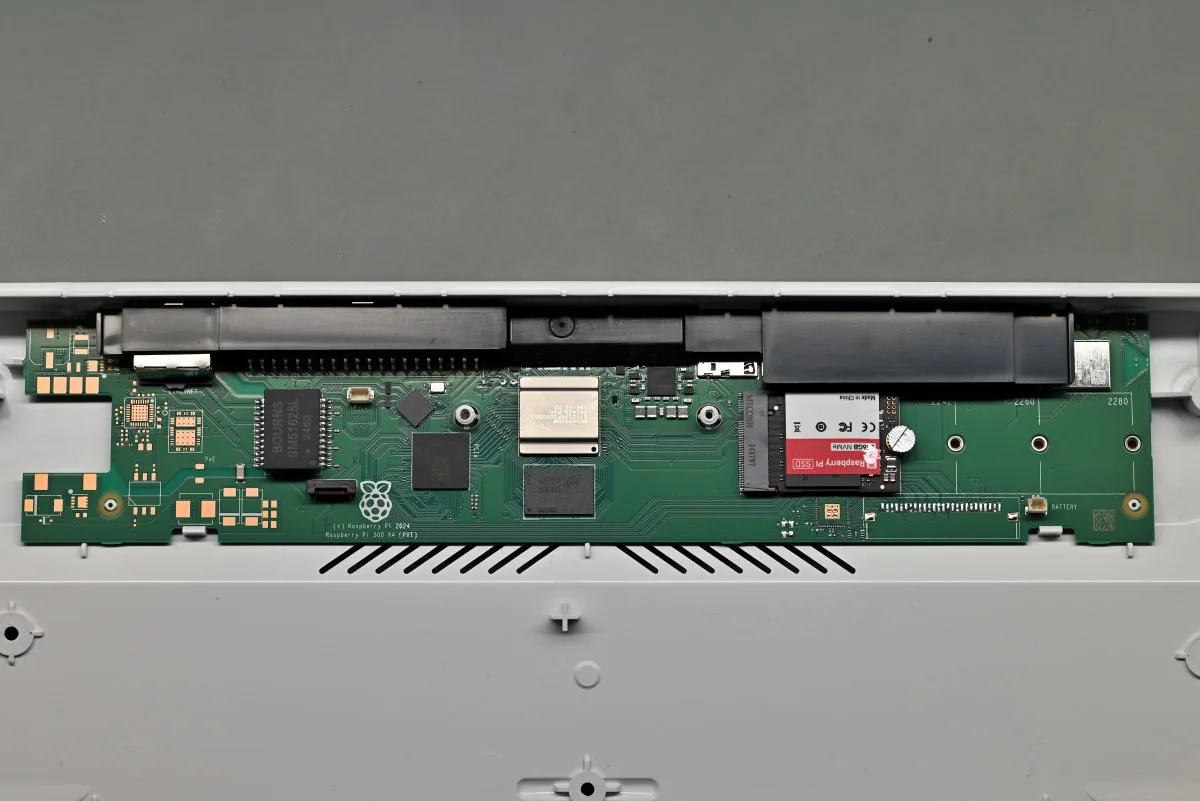
The huge metal heatsink is the most obvious component here, spanning the entire chassis, with cutouts only for the Ethernet transformer, keyboard connector, debug port and, most importantly, the NVMe SSD slot. In order to see the rest, we need to remove the heatsink, held in place by two screws. With it off, we see all the guts exposed, finally!
Side note: there’s likely no need for most people to delve this deep into disassembly, as there’s not quite a lot to do here. On top of that, removing the heatsink inadvertently damages the pre-installed thermal pad, so you’ll likely want to replace it with one of your own. Despite thermal pads generally being reusable, we’ve found that not replacing it generally does lead to worse thermal performance, at least in these all-in-ones from Raspberry Pi.
When reassembling your Raspberry Pi 500+, don’t forget to stick back the little bit of conductive tape connecting the Ethernet port’s casing and the heatsink, as it provides grounding for the latter and makes the whole PCB-heatsink sandwich just a little bit ESD safer.
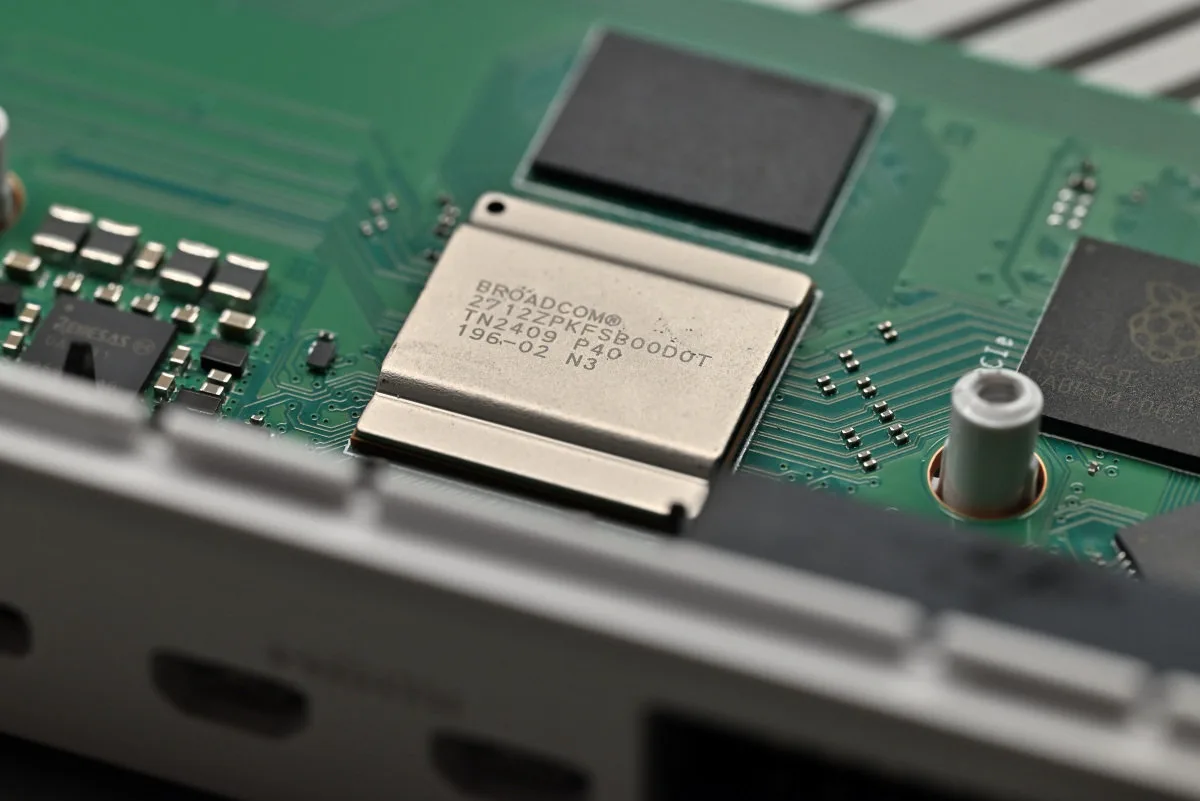
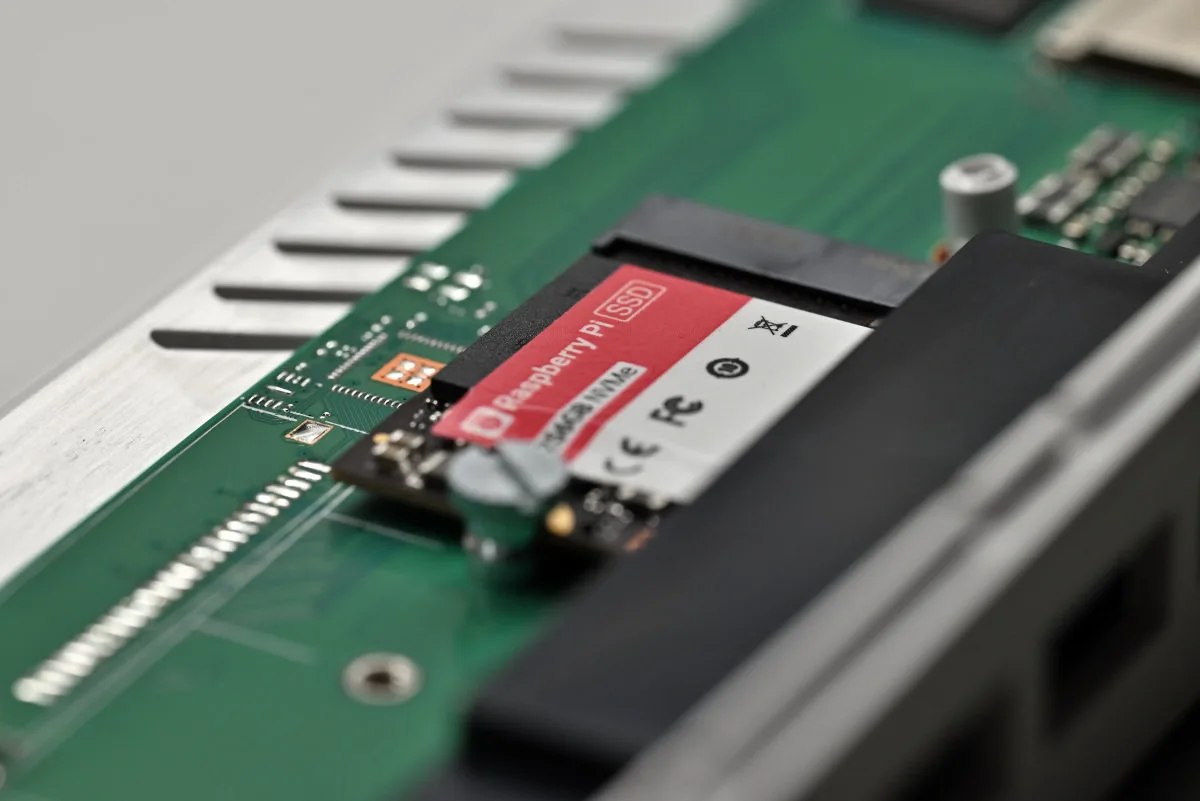
Time to take a look at the PCB itself! Prominently, the BCM2712 SoC sits right in the middle, with a single 16 GB MT53E4G32D8CY-046 LPDDR4X RAM chip from Micron sitting right below. The power circuitry, pretty much identical to the setup found on Raspberry Pi 5 boards, is situated to the right. Further to the right is the M.2 M-key slot, exposing a single PCIe Gen 2 lane (though, this can be bumped up to Gen 3 speeds by tweaking a few settings). Our pre-release model came with an itty-bitty 2230-format Raspberry Pi-branded SSD pre-installed, but we’ve got confirmation that release units will feature a physically larger drive — though with the same 256 GB capacity. (And that’s ample for any Raspberry Pi!)
Naturally, most any drive should work here, and Raspberry Pi’s been nice enough to include mounting posts for all the most common drive lengths, so feel free to use your favorite if you need more storage, though keep in mind that performance will be limited by the single PCIe lane to ~1 GB/s (in theory; in practice it’s likely to be a bit lower, at ~800 MB/s).
Tucked under a bit of plastic near the top-right corner of the board is the wireless module, supporting 2.4 and 5 GHz Wi-Fi, as well as Bluetooth 5.0. Nothing to get too excited about — it’s the same wireless setup as on the Raspberry Pi 5!
The board’s left-hand side features the RP1 chip, handling much of the computer’s IO, including the GPIO, Ethernet, and all three USB ports. The Ethernet transceiver chip is also nearby, as is an isolation transformer. Despite POE support on the latter, the Raspberry Pi 500+ omits this feature. Much of the board’s leftmost side is covered with unpopulated pads meant for POE circuitry (and a pair of pads in with a silkscreen marking suspiciously shaped like a DC barrel jack), so perhaps a future revision with more power options is in the works. (Raspberry Pi 500++ anyone?)
The PCB’s top side is covered with all the ports that we’ve already talked about, so there’s no need to repeat ourselves. A black plastic bar slotted above covers all the ports and presumably offers extra port stability and some ingress protection against dust, though we wouldn’t be surprised if it’s there simply to make the ports look nicer from the outside.
Sadly, what we don’t see on the PCB is any trace of the two MIPI camera/display ports. This likely won’t be an issue for most people, though if vision-based projects are your thing and the Pi 500+ seemed like the perfect platform, you’ll have to settle for a USB camera.
Overall, getting into the Raspberry Pi 500+ is a lot easier than getting into the Raspberry Pi 500, since the new computer’s designed with being taken apart in mind. It takes some skill and finesse, especially if you want to avoid scuffing the case, but with a little patience, most people won’t have too much trouble.
Benchmarks: performance, thermals, power draw
With the Raspberry Pi 500+ essentially being a glorified 16 GB Raspberry Pi 5 in a snazzy case, it should come as no surprise that the performance benchmarks reflect this rather directly.
But it’s not all that simple. There have been some performance tweaks that Raspberry Pi’s pushed out since our 2023 benchmarking sesh with the Raspberry Pi 5, with notable changes to the board’s memory access with NUMA emulation (first tested in mid-2024) and updated SDRAM timings making their way into the stable OS releases by early 2025. There are also other software optimizations that have been added along the way — reflected by some pretty significant score bumps in more application-oriented benchmarks like Geekbench and certain UnixBench tests.
Naturally, we’ve re-ran all the benchmarks on all of the Raspberry Pi 5 models we’ve got on hand for this article, so we’re dealing with up-to-date numbers here. Surprisingly, multiple sequential memory tests now return lower scores, especially with large memory buffer sizes (~1 GB), presumably due to memory fragmentation and interleaving overhead. This would also explain why speeds return to normal with smaller (~1 MB) buffers and why the system generally runs better (most software generally reads from and writes to memory in very small chunks in the kilobyte range).
Performance
Let’s dig in! On most synthetic tests, all the Raspberry Pi 5 models perform exactly the same, from the low-cost 2 GB variant to the highest-end Raspberry Pi 500+ — we’ve tested them all. In real-world use, though, especially when using a desktop environment, things are quite different as having enough RAM can turn an oh-dear-this-is-laggy-and-sad experience into a slick, breezy one.
For the purposes of this review, we’ll compare the Raspberry Pi 500+ with a 16 GB Raspberry Pi 5, as well as an Orange Pi 5 Plus and a Radxa X4 (the linked review here is still not available in English, though you might find it useful nevertheless). The latter two use a Rockchip RK3588 and an Intel N100, respectively, both popular processors in a similar weight class to the Pi’s own BCM2712, and many solid boards featuring either can be found for sub-$100, and let alone sub-$200 prices.
Kicking things off with Geekbench 5, we see that single-core performance doesn’t vary much between all the Arm-based options, with the x86 Intel N100 having a serious lead. Things even out a bit in multi-core results, with the Orange Pi 5 Plus and Radxa X4 standing face-to-face, with all the Raspberry Pis lagging behind a little.
Things look very similar in Geekbench 6, too. The RK3588’s eight cores and heterogeneous design give it a bit of an edge in Geekbench 6’s multi-core scoring approach. Overall, it’s a strong set of scores for all of the boards.
All three chips also perform rather well in the Sysbench CPU test, with the RK3588’s sheer number of cores pulling it through in this raw compute test.
In encryption tests, we see all the Arm-based options delivering roughly the same performance. This is due to Arm’s hardware encryption implementation being heavily tied to clock speed, and with the BCM2712 and RK3588 both featuring cores running at 2.4 GHz, it’s no surprise that results line up pretty much perfectly. Intel’s AES-NI extensions and associated hardware, on the other hand, work a bit differently, and have proven to be quite a bit more capable than Arm’s implementation — something which the results here also demonstrate quite well.
RAM is an intriguing one. We’ve already discussed that certain benchmarks, including Sysbench’s memory test, have started reporting slower speeds since the new RAM tweaks, despite the system being faster overall. Still, the Pi’s LPDDR4X memory is solidly specced and outperforms the Radxa X4’s memory, which, despite being of the faster LPDDR5 type, is only 32 bits wide. The Orange Pi 5 Plus, however, outperforms both — though, it’s worth noting that the Raspberry Pi had virtually identical results to this board prior to the memory tweaks, and still does when tests are run with smaller buffer sizes.
Similar overall trends can be seen in Tinymembench results too.
Finally, UnixBench presents an interesting set of results. Despite the BCM2712 being arguably the least powerful chip of the bunch, it kept delivering the best scores in both single- and multi-core UnixBench runs. As this benchmark suite has multiple tests that rely on good software optimization, we’ll chalk some of the results up to that — but it’s an impressive feat for the Raspberry Pi boards nevertheless.
This trend of Raspberry Pi boards being ever-so-slightly less performant, yet pulling ahead thanks to software quality (and, in no small part, incredible community/third-party support) is something we’ve seen before. Heck — RK3588-based boards predate the Raspberry Pi 5, meaning the performance gap was only more prominent back when Raspberry Pi 4 was king. Intel’s low-cost N-series chips are a very serious and speedy contender (as was the preceding Celeron lineup, though the new chips take it up a notch), and come with the benefit of being based on the trusty x86 ISA, hence being compatible with virtually all the software out there, and notably, offering full Windows support. We’ll talk a bit more about the Raspberry Pi’s software situation shortly.
A very similar optimization story can be said of the Raspberry Pi 5’s VideoCore VII GPU. Despite being a rather low-end part (a commonly cited compute figure is 76.8 FP32 GFLOPS, though exact figures vary by by source), it delivers decent performance: it’s much faster than the VideoCore VI in older Raspberry Pi 4 units, and is generally enough for some retro gaming and the like. The much more powerful (on paper) Arm Mali-G610 MP4 GPU in the RK3588 actually delivers similar performance in many benchmarks due to iffy driver support. Rockchip notoriously doesn’t provide any open-source GPU drivers so all the available ones are essentially community-made, reverse-engineered options. We’ve whined about this back in 2023, and sadly, over two years later, it’s still the case.
The Intel N100 packs the fastest GPU of the bunch, and with actually good driver support, it shows. Even though the X4 doesn’t drive its SoC as hard as some other boards, like the LattePanda Mu. While results in the thousands of FPS for low-resolution glmark2 runs don’t really mean much (and are way too dependent on driver latency, while simultaneously not stressing the GPU hardware enough), 1080p and 4K runs often paint a better picture. At higher resolutions, it’s plenty clear that the VideoCore VII starts lagging behind, with 4K performance being a huge win for the Intel chip, with the RK3588 (for some reason) completely unable to run the test at this resolution due to a memory error that we weren’t able to solve. We’ll look more into it and will post an update here should we figure out what’s going on.
With the CPU, memory and GPU tested, let’s turn our attention to the built-in storage. The included SSD drive here is one of Raspberry Pi’s own. We’ve already tested these drives thoroughly on a Raspberry Pi 5 in an earlier article, but we’ll run some quick sequential read and write tests on the Pi 500+ too, just to make sure that the results line up. As usual, Raspberry Pi boards run their PCIe lane at Gen 2 speeds by default, but this can easily be changed, with Gen 3 speeds easily obtainable by adding a few lines to your /boot/firmware/config.txt file.
At PCIe Gen 2 speeds — the default — you can expect ~450 MB/s sequential read and ~380 MB/s sequential write speeds. A lot better than an SD card (even than a good SD card), but more in line with older SATA SSDs than modern NVMe ones. At Gen 3 speeds, things change a little, with ~890 MB/s sequential read and ~640 MB/s sequential write speeds. Much better, though it’s clear that performance is still being held back by there only being a single PCIe lane — much in the same way as on the Raspberry Pi 5. Nevertheless, these speeds are ample for desktop use, and you’d be hard-pressed to end up in a situation where the Pi 500+’s SSD ends up being a bottleneck.
Thermals
The Pi 500+’s thermals are good. We were initially a bit worried about the surprisingly flat (albeit large) heatsink and limited airflow, but it seems that, despite a glaring lack of fins, there’s enough surface area to facilitate for efficient heat transfer. Our standard method of testing thermals is relatively simple: we use s-tui to monitor system temps during a CPU stress test that we let run for about an hour — or until the temperatures settle. Most systems warm up relatively quickly and plateau after some ten minutes, but the Raspberry Pi 500+, perhaps due to its large thermal mass, undergoes quite a slow heat-up process.
After about an hour, the temperatures do finally settle at around 65 ºC, which is a tad on the warm side, though nothing too dramatic. The shape of the temperature curve and overall warmth that can be felt through the system’s body did raise some concerns during testing — it’s likely that we’d be seeing better temps with more airflow through the body, and that convection, especially with vents only on the bottom side, can’t fully prevent the mass of air inside the case from getting rather toasty. However, we’ve continued stressing the CPU and the temperature stayed stable. An active cooling system would’ve been a loud addition to an otherwise silent (…save for the keyboard) package, so the big slab-shaped passive heatsink gets a pass from us. It’s unlikely that you’ll run into any issues in real-world use, even if your ambient temperatures are a bit higher than the 21 ºC that we tested at.
Power draw
Finally, let’s take a peek at the power draw. The Raspberry Pi 500+ draws 3.3 W when idle, with the backlight off. While performing a s-tui stress test, we get to 7.6 W and a Geekbench 6 run typically peaks at 9.6 W during multi-core tests. With the backlight on (set to white at full brightness), these numbers are 6.9 W, 10.5 W and 12.3 W, respectively — which essentially means that the backlight generally uses ~3 W at full blast.
These numbers were obtained using a wall power meter, so we factored in a ~90% power efficiency factor of the average PSU, but we also got a second set of measurements using a USB power supply with built-in metering. For the same three situations, with the backlight off, we measured an idle power draw of 3.1 W, s-tui stress test power draw of 7.1 W and Geekbench 6 peak power draw of 10.2 W. With the keyboard backlight on, we got respective measurements of 6.1 W, 10.2 W and 13.2 W.
The two sets of scores line up pretty well, though it does seem that Raspberry Pi’s official PSU that we were using here has slightly worse efficiency (seemingly ~85%) when supplying very low current, and slightly better-than-spec efficiency when supplying >2 A. Huh, neat.
Software support: now with extra customizability
Like all Raspberry Pi computers, the Raspberry Pi 500+ is built to run Raspberry Pi OS, the official Debian-based operating system. Being a Raspberry Pi board, though, there are quite a lot of third-party operating systems that are more than happy to run on the hardware. While not too many OSs offer customized versions for the Raspberry Pi 500+ yet, most things that run on a Raspberry Pi 5 won’t have any issues running on a Pi 500+ either.
The official Raspberry Pi OS comes in several editions. There’s a CLI-only Lite version, the standard desktop edition and an enhanced desktop version which ships with a bunch of useful software pre-installed. All in all, it’s a versatile OS that’s just as good at being a server as it is being an office computer, though we don’t really see anyone using the Raspberry Pi 500+ as the former.
It’s also really easy to get started with it on the Pi 500+ as it comes already installed. Plug in a power cable, hook up a monitor and a mouse, and you’re set — and you can likely immediately jump into doing whatever it is you want to do thanks to the abundance of useful included software.
Raspberry Pi OS also includes some features unique to the Raspberry Pi 500+ that have to do with the system’s keyboard. These are all provided as part of the rpi-keyboard-config tool, which allows you to remap any of the keys (this functionality is also available on the Raspberry Pi 500) or create custom RGB lighting scripts. There’s also an associated Python library if you want to access the keyboard’s hardware in your projects. And to demonstrate just how far you can take things, there’s a little built-in Flappy Bird game that you can access using rpi-keyboard-config game and that uses the Pi 500+’s RGB lighting as a display — it’s all rather endearing.
The keyboard’s firmware can be accessed, updated and tweaked using the rpi-keyboard-fw-update command, though we won’t delve too much into this as it’s not really within the scope of this article.
It’s also worth noting that these tools were designed to be mostly platform-agnostic (all the heavy lifting is being done by the keyboard’s own firmware), meaning that they should be available to download even if you’re running a third-party OS. We’ve tested things a bit and can confirm that the packages work on Ubuntu, and there’s the nice RGB lighting. Hopefully we see some gaming-oriented distros, like RetroPie, integrating the RGB functionality in a user-friendly way, perhaps mirroring the colors on the screen or…
You get the idea! Raspberry Pi did a good job at ensuring that the Raspberry Pi 500+ has no shortage of OSs it can run. After all, it is a dolled-up Pi 5 — though, with time, we expect to see more and more native support of all the mechanical-keyboard-y bits, especially in gaming-oriented distros.
Using the Raspberry Pi 500+ as a desktop
The Raspberry Pi 500+ is meant to be used as a desktop machine so it’s no surprise that it does a very decent job at that. By this point, we’ve already said all there is to say about the Pi 500+, at least from a technical standpoint. Neat ports in the back; solid, Pi 5–based performance with an SSD; good thermals, even though passively cooled; great keyboard — it’s an excellent package. With the Raspberry Pi 500+, we’ve finally reached the holy grail of an SBC-turned-home-computer the company’s been seeking all these years.
The thing with using a Raspberry Pi as a desktop, though, is that you’re using a Raspberry Pi as a desktop. It’s not necessarily a bad thing, but those used to more familiar Windows or macOS environments might need some time to get used to a Linux-based system. It’s also a more limited experience in terms of available software, though many high-quality alternatives exist.
Whether you’re making a new design in KiCAD or simply having a few too many tabs open, 16 GB of memory goes a long way in ensuring that things stay smooth. Perhaps it’s a bit overkill for a Raspberry Pi system, but with an ever-increasing number of manufacturers setting 16 GB as a baseline amount even in consumer-grade systems (likely due to the fact that you can’t sell things anymore unless they’ve got at least five AI stickers slapped on them, and the only thing artificial intelligence likes more than hoarding your data is snacking on RAM) perhaps it’s a nice way to future-proof your investment.
And yes, the Raspberry Pi 500+ handles all the daily basics with grace. Whipping up documents in LibreOffice, checking your e-mail or surfing the web flows without a hitch. Even slightly more demanding tasks, like editing a photo or two in GIMP, fiddling with audio in Audacity or editing a short video in Kdenlive aren’t out of the question. It’s no workstation, but it’s more than capable for light creative work.
Naturally, the Pi 500+ excels at being tinkered with. It’s an obvious choice for anyone looking to get a decently powerful computer that lets them have more access to its guts than a regular desktop would. It’s an inviting platform to learn coding on, tinker with Linux and — if you dare — build electronics projects with. In a way, the Raspberry Pi 500+ feels like the perfect lab PC, and while it likely won’t be replacing the Intel NUC that lives on our workbench due to our reliance on several bits of legacy x86 software, for many it could do the trick. With things like the Arduino IDE and Visual Studio Code fully supported on the platform, it’s a complete package for microcontroller development — while packages like Digilent’s Waveforms software enable the Pi to act as a proper little measurement and data processing station.
But even if you’re only after typing the occasional document out, leaving most of the Raspberry Pi 500+’s performance and cool maker features unused, the wonderful keyboard and sleek look make the whole system a joy for casual office work. (Though, gosh, imagine the contrapuntal dreadfulness of an office full of these…)
Oh, yeah, can you get those pa- (…clackclackclack.)
Pi 500 VS Pi 500+: what’s all the plus about?
We’ve been mentioning the Raspberry Pi 500 quite a lot during this review. Makes sense, given that it’s the Pi 500+’s closest relative, sharing much of the hardware. It’s a cheaper model, both in terms of price — it’s just $100 (and mind you, this was recently increased from $90 due to RAM price hikes, though the folks at Raspberry Pi promise that it’ll return to normal once these settle) — but also feel, with certain features missing and the overall unit feeling somewhat creakier and more plasticky.
Both units feature the same array of IO ports on the back, with the Raspberry Pi 500 also including a Kensington lock on the back which is missing on the Pi 500+, perhaps alluding to the cheaper model’s greater focus on schools and other low-cost, public-use institutions.
Whereas the Raspberry Pi 500+ takes its guts from a 16 GB Raspberry Pi 5, the Raspberry Pi 500 goes for a more modest 8 GB Pi 5 model. Despite the RAM downgrade, there’s no shortage of performance in either, as it’s the same BCM2712 running the show in both. Benchmarks demonstrate this rather well, with virtually identical scores across the board. For most day-to-day tasks, you likely won’t even be able to tell the difference — extra RAM makes things run better, but 8 GB is still enough for casual use.
The thermals are thus also virtually identical. Sure, the Pi 500 is a slightly smaller machine, so its heatsink is also, naturally, a tad smaller. The size difference is in the single digits percentage-wise, though, and in real-world use there’s absolutely no difference.
The keyboard is a whole ‘nother story, though. The Pi 500’s chiclet-style membrane keys can’t really compare to the Pi 500+’s mechanical glory. It’s a rather mushy board, with muted feedback and wear-prone pad-printed labels. We really don’t like it too much (should be clear…), though it’s not necessarily a low-quality board. It’s relatively comfortable, despite the lack of clear feedback and it’s quiet, which could be a plus, depending on your environment. The Raspberry Pi 500’s keyboard is also smaller, lacking the extra column of keys on the right and going for half-size arrow keys. It’s not a bad layout, though the Pi 500+’s 75% design is much nicer.
For those of you who have made it this far, here’s a side-by-side aural comparison of the two keyboards, with the Raspberry Pi 500 first and the Pi 500+ second. The difference in loudness and timbre is pretty obvious.
There’s also no snazzy RGB on the Pi 500, but, okay, we can forgive that. The lack of an M.2 slot is less forgivable, as it severely limits the system’s performance by forcing you to rely on SD cards for storage. Sure, it’s nice that the Raspberry Pi 500 comes with a 32 GB Raspberry Pi-branded SD card included — these are quality class A2 cards that deliver excellent performance (for an SD card) on Pi 5-based hardware — but it’s not nice that we’re effectively getting less than a tenth of the disk speed that the little computer is capable of because…?
No, seriously? And the worst part is that the Raspberry Pi 500 has the unpopulated pads on its PCB for the missing M.2 hardware! We get using SD cards for edge compute or a small home server of some kind, but desktop usage basically relies on fast storage access to make loading programs and opening files feel seamless. Many Celeron-era potato laptops can be given a second chance at life by swapping their inefficient HDDs with SSDs, yet the Pi 500 sticks to SD cards that feature similar performance to the former.
Sure, it’s not like an SD card is unsuitable for a device like this. We’ve all been booting our Raspberry Pis from SD cards for ages and they are still the go-to solution for many as they’re cheap, readily available and easy to flash. But, just — even if including an SSD with the Pi 500 at the $100 price point isn’t really a viable option, penny pinching by throwing out the slot and several SMT components doesn’t make too much sense to us. Keep the port, leave the SSD out and keep shipping the SD card, and the Raspberry Pi 500 would’ve ended up a much more attractive package, even if it meant tacking an extra $5 to the price in the worst-case scenario.
There is an upside to the Pi 500 however. It uses less power than its bigger sibling: 2.6 W when idle and 6.2 W under load! That’s a consistent ~1 W less than the Pi 500+ with its keyboard backlight off, which is rather nice, especially if you’ve got a whole lot of these running in the same place.
Finally, let’s address the elephant in the room. For the price of a Raspberry Pi 500+ you can get exactly two Pi 500s now. Whether faster storage, a nice keyboard and extra memory make this up to you is, well, something you’ll have to figure out on your own.
Conclusion: who’s the Raspberry Pi 500+ for?
The Raspberry Pi 500+ is Raspberry Pi’s most impressive computer to date. There’s no other way to put it. Packing the highest-end specs a Raspberry Pi 5 can have; a nice, clicky and, ooh, shiny mechanical keyboard; as well as a built-in SSD storage into a premium-feeling chassis, it’s a complete all-in-one desktop.
It’s also the priciest Pi yet. At $200, it’s an investment in the same ballpark as cheap Dell or HP laptops or, if you’re desktop-inclined, NUCs and similar mini PCs. But the Raspberry Pi 500+ isn’t quite the same as these, being a keyboard-based all-in-one, it lives in its own niche. Being a Raspberry Pi, it’s even more special thanks to its GPIO and easy access to the hardware. Write your own custom firmware or hack away at the OS — not many platforms will let you tinker so much with the things that make them tick.
Then again, you could get 4 ‘regular’ 2GB Raspberry Pi 5s for the price, or two 8 GB ones with change to spare; or you could get a 16 GB Pi 5 with the same specs and have $80 left over — that’s how much the SSD, keyboard and case cost you, which isn’t a bad deal at all. Good luck finding nicer gear at that price! But perhaps, you’d rather go for one of the alternatives, an Orange Pi board, or a LattePanda…
Ahh! So many choices. Especially at the price. But there’s something magical about the Raspberry Pi 500+. It feels much like a promise delivered, one that we’ve waited for so long. And if you enjoy the world of Raspberry Pi and want a more desktop-oriented one in your life to tap your thoughts on, this capable little machine won’t disappoint. Not one bit.