

Seeed Studio Wio Terminal
The Wio Terminal is an excellent all-in-one development platform with a number of peripherals and great learning materials - with only the most advanced features left somewhat undocumented. For an impossibly low price, it's hard to find a fault with it.
Pros
- Great hardware
- Truly all-inclusive development board
- Fast performance
Cons
- None really, given the price
Seeed’s Wio Terminal is an all-in-one contender in the educational development kit market. By interfacing with the real world, these boards allow programs to come to life and enable students to visualise concepts easily. Dev boards are of great appeal to the hobbyist community, as well – enabling makers to create complex devices with minimal involvment in hardware design. These two communities – the education market and the maker space – have been actively utilizing this tech for over a decade now. The ease of use enabled brands like Arduino and Raspberry Pi to gain traction and their almost legendary status in the industry which they have today.
The tools available at any price point continue to evolve rapidly. In the 90s, it would cost millions and take years to build some of the hardware components we mass-produce for pennies nowadays. It simply makes sense that – a decade later – we move on from the classic bare-bones MCU board format and get something more – at least in the price bracket.
See, the price of an Arduino Uno has mostly remained the same – at around $28. It features the beloved ATMega328P, an 8-bit, 20 MHz, with 32K of flash, 2K of RAM and a whole 1K of EEPROM. It’s not a lot – but there’s a suprising amount of things which can be (and have been) done with this chip. The great support and tens of thousands of projects are what draws people towards the Uno – and what’s cemented its rightful place in tech history.
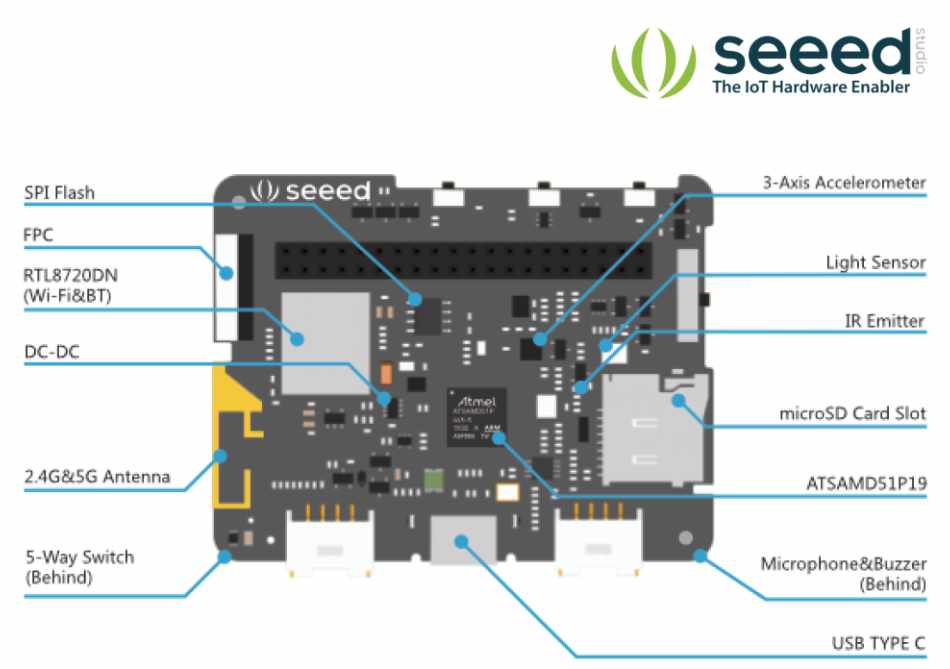
However, Seeed wanted to offer a different deal at a similar price – for $36 at the time of this reivew. They’ve taken a modern ATSAMD51P19 MCU and given it 4MB of external flash, while also including an array of sensors, ports, and even a full-color LCD screen on the front.
Taking the terminal out of its packaging, it’s immediately clear that Seeed wanted to go for a mobile-like design. Thus – it’s pretty odd that there’s no internal battery in the design. There is, however, an external battery pack which snaps on the back and also provides additional Grove connectors (Grove is Seeed’s own protocol for connecting expansion boards to their systems).
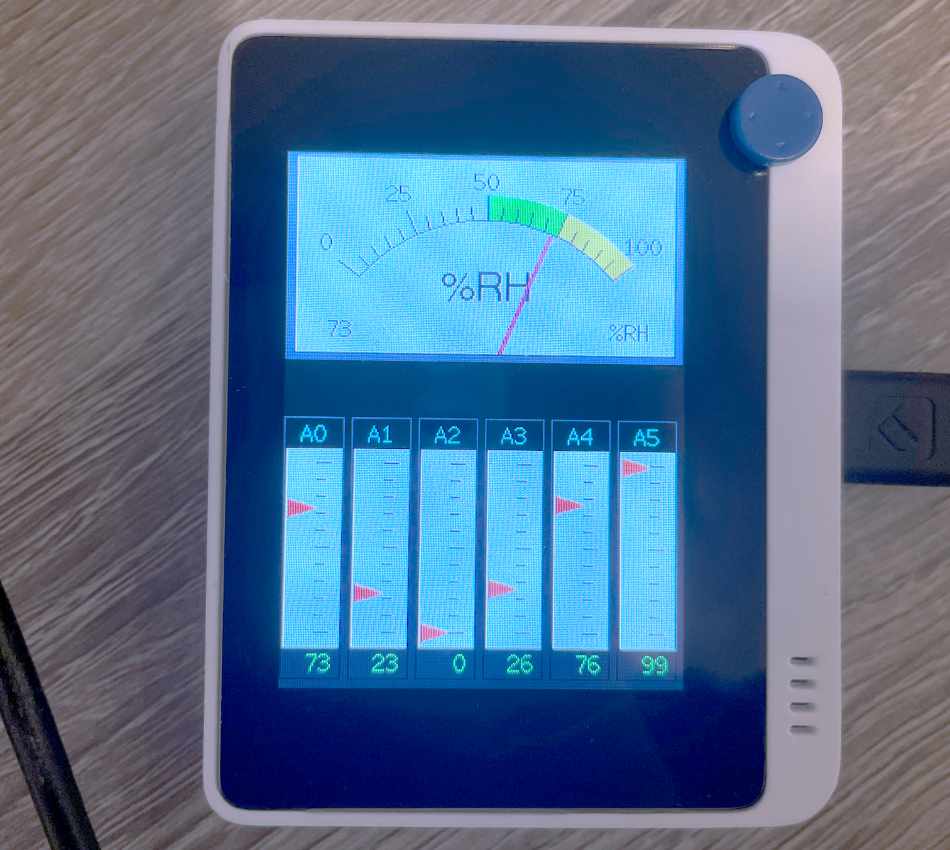
Now that we’ve mentioned Grove, let’s mention the general hardware spec list. Input wise, there are three clicky buttons on the top and a 5-way joystick on the front. There’s also a USB-C port on the bottom, between two LEDs. A full 40-pin GPIO header sits on the bottom (one of the most impressive features – more on this later), two Grove ports on the bottom and an SD card slot on the side. There’s a microphone, buzzer, color sensor, IR blaster and accelerometer on-board, too. There’s a Realtek RTL8720DN dual-band WiFi and Bluetooth controller. Last, but not least, there’s the (relatively) large and colorful screen on the front side of the unit.
That’s a whole lot of gear for less than $40!
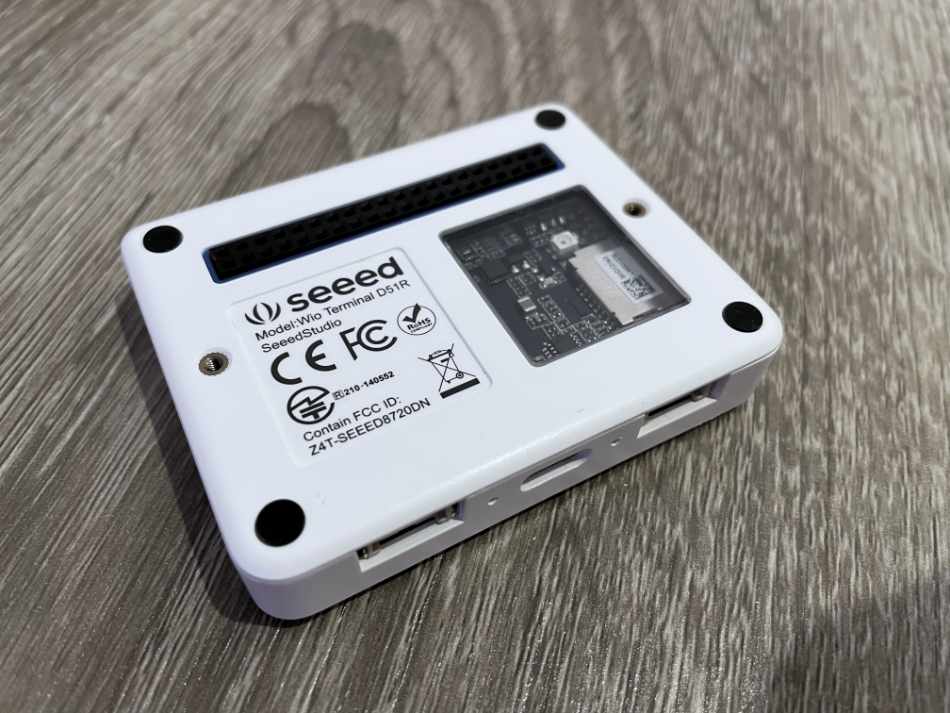
Flipping the Wio Terminal around, we see a little window which enables the aforementioned color sensor and IR blaster to work. It’s a neat way to send data between multiple Wio terminals, but is somewhat overshadowed by the inclusion of proper wireless comms protocols.
That being said – the wireless connectivity is top notch. There’s both 2.4 GHz and 5 GHz WiFi, as well as Bluetooth and BLE support.
The Wio Terminal works with the Arduino IDE, but also with Visual Studio Code (using Platform.io) and MicroPython and CircuitPython. This means it’s compatible with almost everything commonly used today – and in our tests it truly does work great.
But, aside from all the features, Seeed’s great documentation and support is what truly makes the Wio Terminal special.
We’ve mostly been using it with the Arduino IDE – and the installation was a breeze. After installing the necesarry board support packages, we had to update wireless drivers. Seeed provides a tool for Windows, MacOS and Linux, so we were easily able to finish this procedure on our review machine. However, in order to utilize the specific peripherals on the terminal, additional, separate libraries are required. This does convolute the process a bit, but Seeed’s great documentation should get most people through these steps.
The Terminal can also work as a Raspberry Pi HAT. By putting it on top of a Raspberry Pi, you can use it as an integrated MCU which interfaces with the Pi through the GPIO header. This is incredibly handy for some projects where the high processing power of a Raspberry Pi is required.
Let’s talk about the processing power of the system. The ATSAMD51P19 is undoubtedly a powerful chip. Its 120 MHz Cortex-M4 CPU with a built-in FPU is no slouch, and enables the Wio Terminal to execute much more complex tasks than your average Arduino. The RTL8720DN also features another Cortex-M4F core, along with two Cortex-M0 cores, used for maintaining wireless communication.
During compilation, it’s possible to pass main core clock speed as a compliation parameter, which enabled overclocking it up to 200 MHz. This way, it’s possible to squeeze about 50% more computing performance out of the Terminal itself while maintaining full core stability, at the cost of increased power usage.
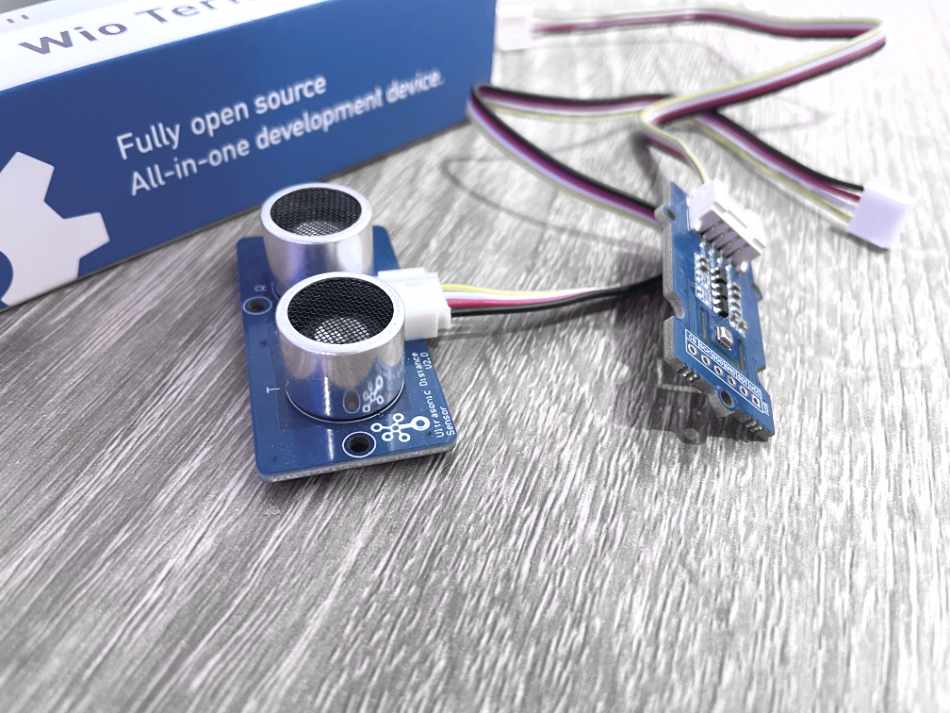
All this power can be leveraged for machine learning – and Seeed has made a starter kit together with a set of great online courses to showcase it. The kit retails for $59 and includes the Wio Terminal and two Grove-based sensors: an ultrasonic distance sensor and a temperature/humidity/pressure sensor. The projects are enticing and use the full range of features the Terminal has. Also of note are the online video and written tutorials, covering everything from basic IO to using Bluetooth and WiFi and drawing graphics on the screen. All of this material is available free-of-charge.
In conclusion, the Wio Terminal truly performs well. It packs so many features for such a low price – which are all very well documented. It’s a great platform to learn the basics (and some not-so-basic things) and is a joy to use. The ommission of the battery is odd – but not a big deal in the grand scheme of things. For the price – it’s one of the most fully-featured development systems on the market.
More informations: https://www.seeedstudio.com/Wio-Terminal-Getting-Started-with-TinyML-Kit-p-5324.html