





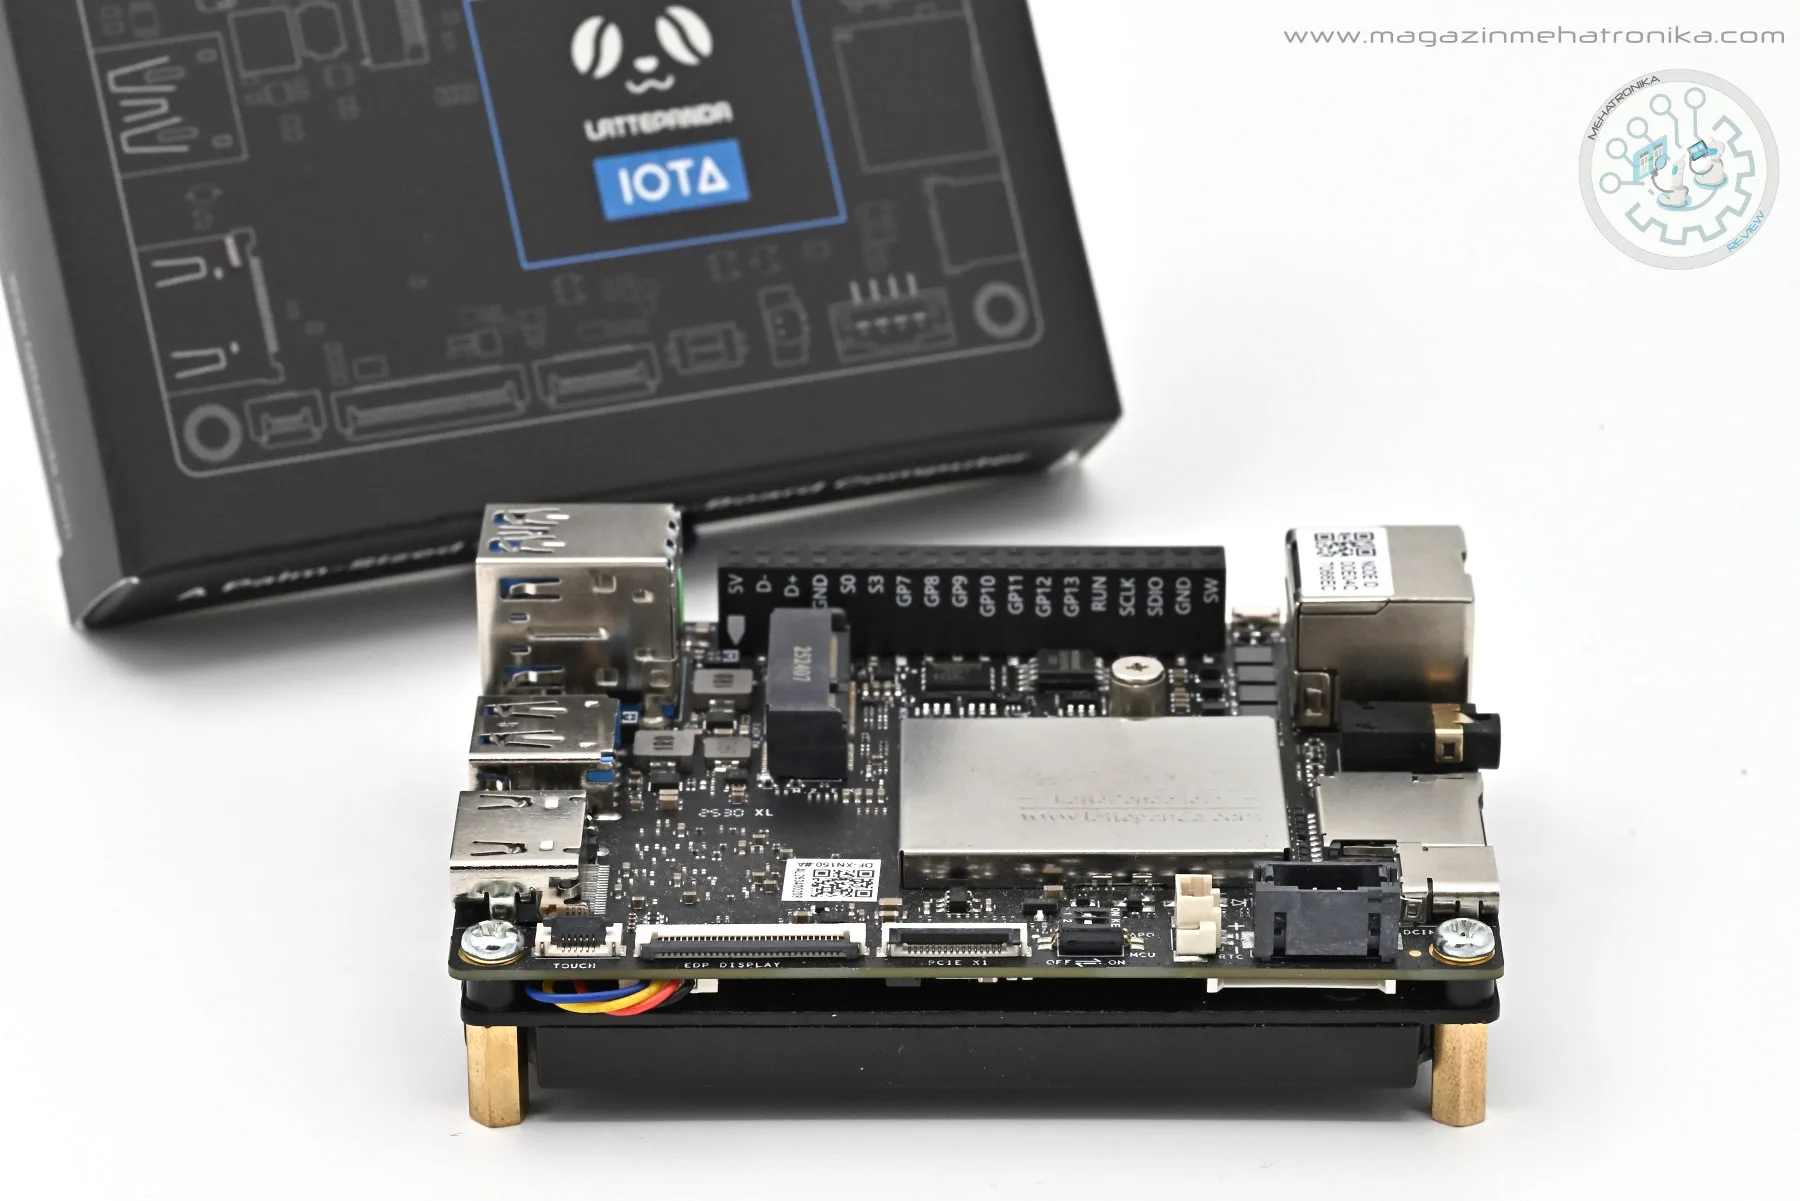
LattePanda IOTA
The LattePanda IOTA does a lot of things right, but also cuts corners. (Puzzlingly) subpar memory performance holds back an otherwise zippy and up-to-date Intel Processor N150, while space constraints delegate some everyday connectivity to expansion boards. Nevertheless, a well-designed accessory ecosystem, general convenience, and very competitive pricing (especially in today's market plagued by memory shortages) help the IOTA cut through the competition.
Pros
- Powered by a modern Intel Processor N150
- Fantastic set of accessories available at launch
- Superb software compatibility
- Competitive price
Cons
- Underwhelming memory performance (given the hardware)
- Compromises in design influenced by limited board space
On their trek through the Greek alphabet, LattePanda has covered numerous formats. From the desktop Alphas and Deltas, to the server-oriented Sigma and the module-based Mu, these boards have bridged the gap between PCs and more traditional, Arm-based SBC models.
Powered by Intel processors, LattePanda boards have great software support baked into their DNA — x86 has been the computing platform of choice for decades, and that comes with all the benefits of standardization and swathes of legacy software. See, there’s not a whole lot that can go terribly wrong when it comes to an x86 board, at least not in the way things can go wrong with an Arm-based or, even more so, a RISC-V–based one. Broken or missing drivers, abysmal Franken-distros, arcane boot procedures, and other baffling issues (or “design decisions”) that should’ve never made it into a final product… Believe us when we tell you that we’ve just about seen every way a computer can spectacularly fail to, well, compute.
But it’s not always the board manufacturer’s fault — or perhaps it’s only partially so. Behind SBCs stands a legacy of embedded hardware design, often with very conflicting approaches to the way things are done. Even if brought about by Microsoft’s overreach, the UEFI/ACPI combo has enabled portable OS images and plug-and-play hardware configuration on x86 machines, with a robust set of standards and generic implementations to back it all up. Arm-powered embedded systems are still in their Wild West phase, with proprietary software all over the place, down to the lowest level. Even Raspberry Pi — with its mostly open-source design and exceptionally good software support — uses a proprietary bootloader that runs on the system’s GPU. Yeaaah.
We can’t gloss over all the progress RISC-V has been making — it’s a promising option when it comes to standardization, with a meticulous open-source framework that vows to bring a little more order to embedded compute, though the ISA’s immaturity prevents it from becoming a fully-fledged alternative just yet.
Promising open-source hardware and software is sometimes at odds with licensing schemes that SoC vendors and ISA architects lobby for. A notable case of this happening is the mess that’s been going on for years with Arm Mali GPUs. These are found in a number of popular SBCs, yet Arm’s been unwilling to provide an open-source driver for years. The community has responded with home-made, reverse-engineered (and now discontinued) Panfork drivers, and Arm seems to be trying to remedy the situation for certain newer Mali architectures with official open-source Panthor drivers, but there’s still work to be done.
Intel’s (and AMD’s) willingness to provide open-source drivers early on led to Linux running flawlessly on their hardware. And while not quite everything is perfect in x86 land (cough, power efficiency, cough), it sure is nice not having to worry (as much) about software stability.
So why aren’t all SBCs using x86 chips?
Power efficiency is a huge factor for all edge computers, SBCs included, and Arm’s decisive lead in performance-per-watt has made it the de facto choice, despite all the flaws discussed above. x86’s inability to adapt fast enough had repercussions in the consumer market, too — look at the Apple silicon transition and all the Arm-based Windows machines popping up on the market.
But Intel’s power efficiency has been improving. It used to be the case that low-power x86 chips delivered absolutely abysmal performance. It was an all-or-nothing sort of affair: with great power comes great TDP. But that’s changing, and has been for a bit. The ever-popular Celeron N5105 was one of the first x86 chips to truly become mainstream in the SBC market, as it already struck a solid balance between performance and power efficiency. And the new Alder Lake-N and Twin Lake-N chips are particularly delightful, offering Skylake-level performance for half a dozen watts or so, ushering in an Intel SBC renaissance of sorts.
And that’s the thinking behind the LattePanda IOTA! Take a Raspberry Pi, put the most power-efficient Intel guts you can find in there, and make the overall experience SBC-y as possible. The chip of choice is the Intel Processor N150, a refreshed version of the Intel Processor N100 that we’ve already seen in LattePanda’s previous board, the LattePanda Mu (that is, the entry-level configuration of said board). Despite being a newer chip, the N150 is an incredibly minor update, so don’t go throwing your Mu (or other N100-based SBC) out just yet. And it’s not like the IOTA and Mu share the same market segment, either. Despite that, the two systems just beg to be compared — and we’ll get to that near the end of this article.
Before we continue, an obligatory ethics statement! All hardware under review was sent to us free of charge by the manufacturer, but as always, all of the opinions presented are our own, and no third party had any say in the content of this article.
LattePanda IOTA: a hardware overview
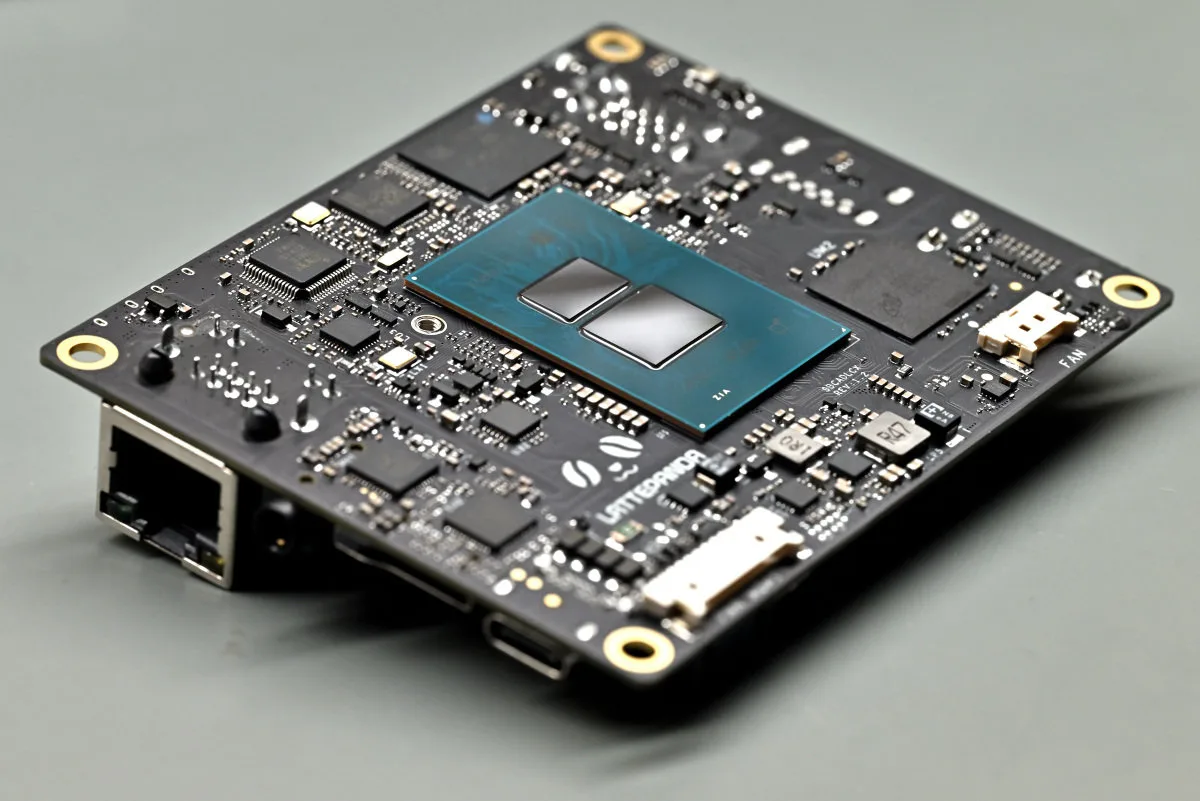
The LattePanda IOTA is the smallest of the LattePanda boards, with an 88 mm x 70 mm footprint — tied with the LattePanda V1 that it replaces. Released in 2015, the LattePanda V1 was among the first Intel-powered SBCs to tackle the Raspberry Pi head-on. Its itty-bitty Intel Atom x5-Z8350 processor wasn’t exactly a fast chip back in the day, and by 2025, it was time to let it go to processor heaven. The aging components slowly being pushed out of production didn’t exactly help with supply chain logistics, either. It was time to move on.
The IOTA’s N150 is quite literally an order of magnitude faster, but despite running circles around the little Atom (that couldn’t), the N150 still has the heart of one: its Gracemont cores are, though many generations apart, successors to the x5-Z8350’s Airmont cores. Trying to outrun Arm’s energy efficiency with a CISC architecture is a Herculean undertaking, and Intel’s poured immense energy into improving their low-power architectures. With the consumer-oriented Atom line being sunset in 2016, Intel’s merged further architectural improvements into energy-efficient E-cores found in many of its mobile chips — and it’s these very Gracemont cores that you’ll see running simple, daily tasks and propping up their performance-oriented P-core siblings in most higher-end Alder Lake and Raptor Lake processors.
The N150 is an Alder Lake-N series chip (or, well, Twin Lake-N, if we want to be meticulous about naming schemes — it’s a minor refresh to the Alder Lake-N series, retaining the same core architecture, which is why we’ll keep mainly using the former name in this review, for the sake of clarity). Designed for entry-level portable, thin-and-light laptops where power efficiency matters most, these models omit P-cores altogether. Nevertheless, the N150’s quad-core design, clocked at 3.6 GHz, provides enough oomph for most things you’d want an embedded computer to do, as well as most daily desktop tasks. After all, even a higher-end Intel chip wouldn’t dispatch its P-cores for light browsing or inbox fiddling.
The LattePanda IOTA pairs the N150 with 8 or 16 GB of RAM, which is ample for its use case. Regardless of the model you pick, you’ll get LPDDR5 RAM running at 2400 MHz. Due to the N150’s limitations, there’s only a single memory channel — that is, the bus is 64 bits wide. (Yes, we know that there are technically four channels here, as LPDDR5 generally uses independent 16-bit wide channels that get grouped into wider ones; however, it’s a bit of a de facto standard to use legacy DDR terminology, i.e., each 64 bits make a channel.)
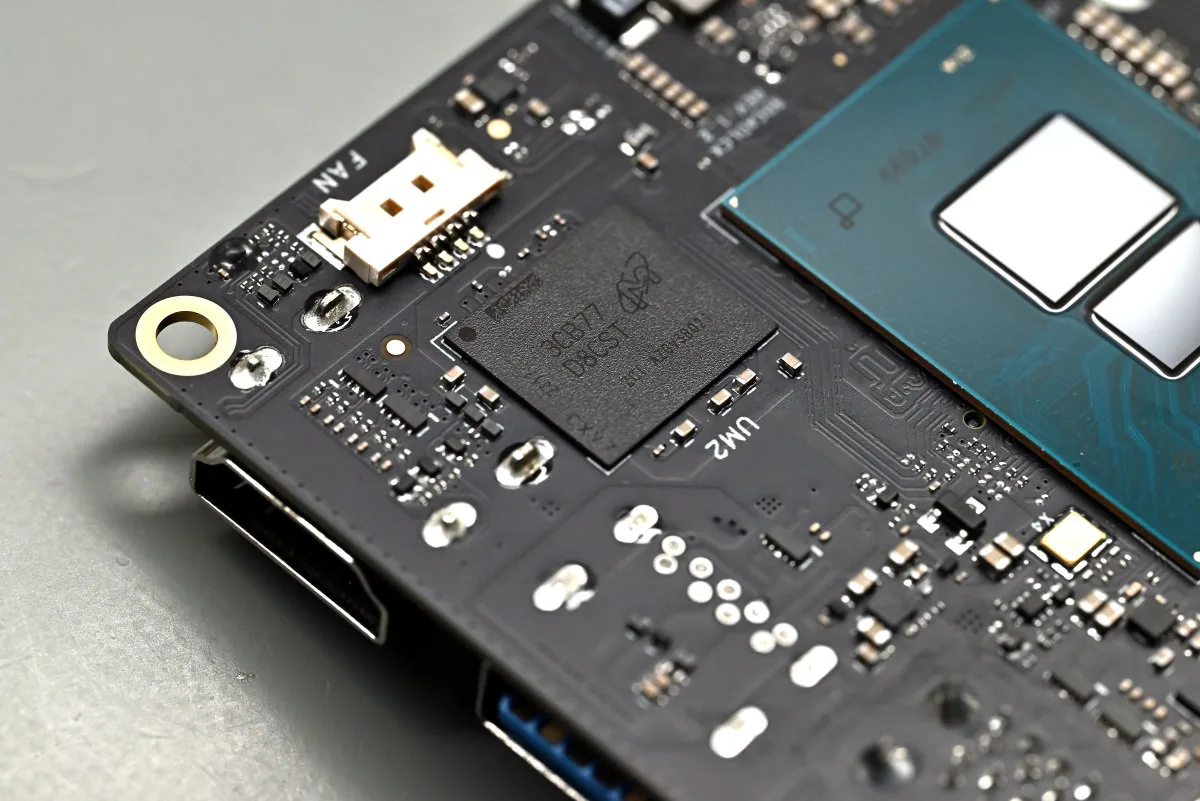
All of the RAM lives on a single Micron MT62F1G64D4ZV-026 WT:B LPDDR5 chip. It’s an interesting choice for the board, as it supports clock speeds of up to 3750 MHz, despite the N150’s memory controller only supporting speeds of up to 2400 MHz, hence the board’s final spec. It’s likely that several other features of the memory chip made it a good fit — its 64-bit bus (many LPDDR5 chips come with 32-bit buses) and high memory density made a single-chip RAM solution possible, which translates to a less crowded and complex design on such a small board, where any and all space is at a premium.
All IOTA models feature on-board eMMC 5.1 storage. The amount of space you get is tied to the RAM configuration — models with 8 GB of RAM come with 64 GB of storage, while those with 16 GB feature a larger 128 GB drive. Given the ever-increasing bloat present in modern operating systems, and especially Windows 11 (that the IOTA can be purchased with pre-activated), the lower-tier storage option seems insufficient for all but the simplest projects and tasks. And let’s not overestimate how far 128 GB will get you, either, though it’s a lot more serviceable. We’d love to have seen both RAM configurations ship with 128 GB eMMCs — and, now that we’re talking about what-ifs, a switch from eMMC to SSD tech has been long overdue when it comes to these integrated SBC storage solutions, both for the sake of performance, but also longer-term durability.
A deeper dive into IBECC…
And if you don’t want to read this bit, you can skip it by clicking here. We won’t tell.
Like the LattePanda Mu, the IOTA features In-Band Error Correction Code (IBECC) support. Intel has been giving many of their Alder Lake-N processors a bit of a dual identity, marketing them both for consumer, as well as embedded IoT use. This isn’t the only such trend coming from Intel. Almost all desktop Intel Core processors from the 12th generation onward feature full-blooded side-band ECC support with compatible motherboards.
Full-blooded? Side-band? What’s the difference between it and our little N150’s in-band setup?
Well, IBECC is not true ECC — or at least not what most mean by it. There’s no specialized 72-bit wide memory bus here, and no need for specialized RAM modules, like in side-band ECC. Instead, it repurposes the hardware already available, and requires only a processor equipped with a memory controller able to perform the necessary tricks. The way it works is relatively simple: IBECC reserves 1/32 of your available memory for storing parity bits generated by the memory controller, creating a 16-bit code for every 512 bits of data written to system memory. This obviously has some performance implications (aside from the obvious drawback of slightly less memory available to the user) as there’s more command overhead. Scouring the (rather sparse) available documentation does show that Intel’s IBECC implementation tries to circumvent this by caching and batch-sending the parity bits. In a way, IBECC can be seen as a mostly software-based implementation of ECC (though it does require a memory controller that supports it), with side-band ECC being its hardware-based progenitor.
But IBECC is still true ECC in the sense that it uses the same SECDED codes that standard, side-band ECC implementations do. IBECC can also correct one-bit errors, and detect two-bit ones, theoretically making it just as safe. Whether it really is depends on a number of factors, as well as the type of system you’re running it on. Side-band ECC is preferred in enterprise systems for its performance benefits and inherent reliability offered by dedicated hardware handling all the parity data — but in small IoT devices, like the ones a LattePanda IOTA is likely to power, in-band ECC is more than enough.
Ultimately, don’t get too stuck up on the topic of IBECC’s reliability, as this very same debate has been had many times about other technologies, RAID being a prime suspect. Software RAID has happily saved data from many a disk failure, and in most cases, the mere presence of any RAID setup in a system tends to outweigh debates about specific implementations.
Before we continue, we’d also like to address a bit of misinformation floating around regarding the N150’s IBECC functionality, or more accurately, the lack thereof. Remember how we mentioned that the N150 belongs to a refreshed Twin Lake-N generation? Well, quite a few places claim that IBECC support got dropped on these chips. This includes the N150, but also the N250, Core 3 N350, and Core 3 N355. (Gosh, it still feels so wrong to omit the ‘i’ when it comes to Intel Core processors.)
This is evidently wrong both due to the LattePanda IOTA obviously featuring IBECC, but also due to Intel’s own datasheet addendum, verbosely dubbed Intel Atom® x7000 Processor Series, Intel® Processor N Series, Intel® Core™ i3-N305 Processor, & Intel® Core™ 3 Processor N355 for Edge Applications, lists the N150, N250, and Core 3 N355 as featuring all the required kit. The Core 3 N350 is oddly absent from the document, and it’s likely that it’s the odd one out. Perhaps this is where the misinformation originates from, though who can tell for sure? We’ve seen the N150 directly listed as not supporting IBECC, purportedly making the older N100 superior in this regard (this is especially promulgated on NAS user forums, a place where there’s an unlikely combination of people using low-end hardware and caring for features like this).
Graphics on these low-power Alder Lake-N processors are not the most powerful out there — to absolutely no one’s surprise. Intel’s been doing a wonderful job of making sure their recent naming scheme updates make absolutely no sense, so what’s been historically known as Intel UHD Graphics is now, in certain chips, simply called Intel Graphics. To make matters worse, this isn’t a terribly descriptive… erm… descriptor, since it gets applied to both older, Execution Unit-based systems, as well as newer Xe-core–based ones (though, systems that feature the newer GPU architecture and have dual-channel memory can/should carry the Intel Arc Graphics branding). On top of that, according to Intel’s own documentation, the Intel Graphics name should only be found in Intel Core Ultra chips (and, uh, the N150 is definitely not one of those, but it’s also not the only outlier), while Intel UHD Graphics and Intel Iris Xe Graphics brands keep their legacy going in “regular” Intel Core chips.
Either way, after scouring the datasheet, it does (unfortunately) seem that the N150’s new graphical branding is little more than a marketing refresh. Under the hood, there’s still the same old 24 Execution Unit design that we’ve seen in previous entry-level chips, like the N5105 and the N100 — though this time with a higher maximum frequency of 1 GHz. We’ll see how much of a difference, if any, this ~200 MHz clock increase makes in benchmarks and real-world use.
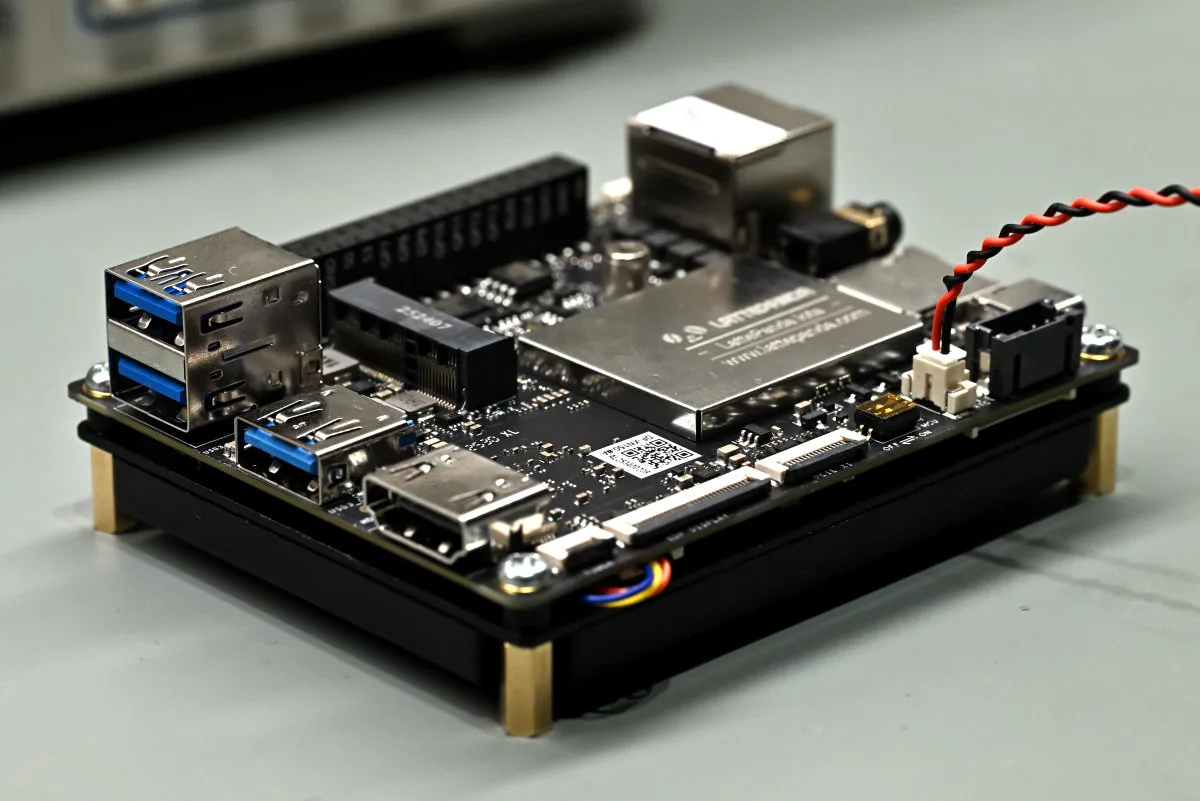
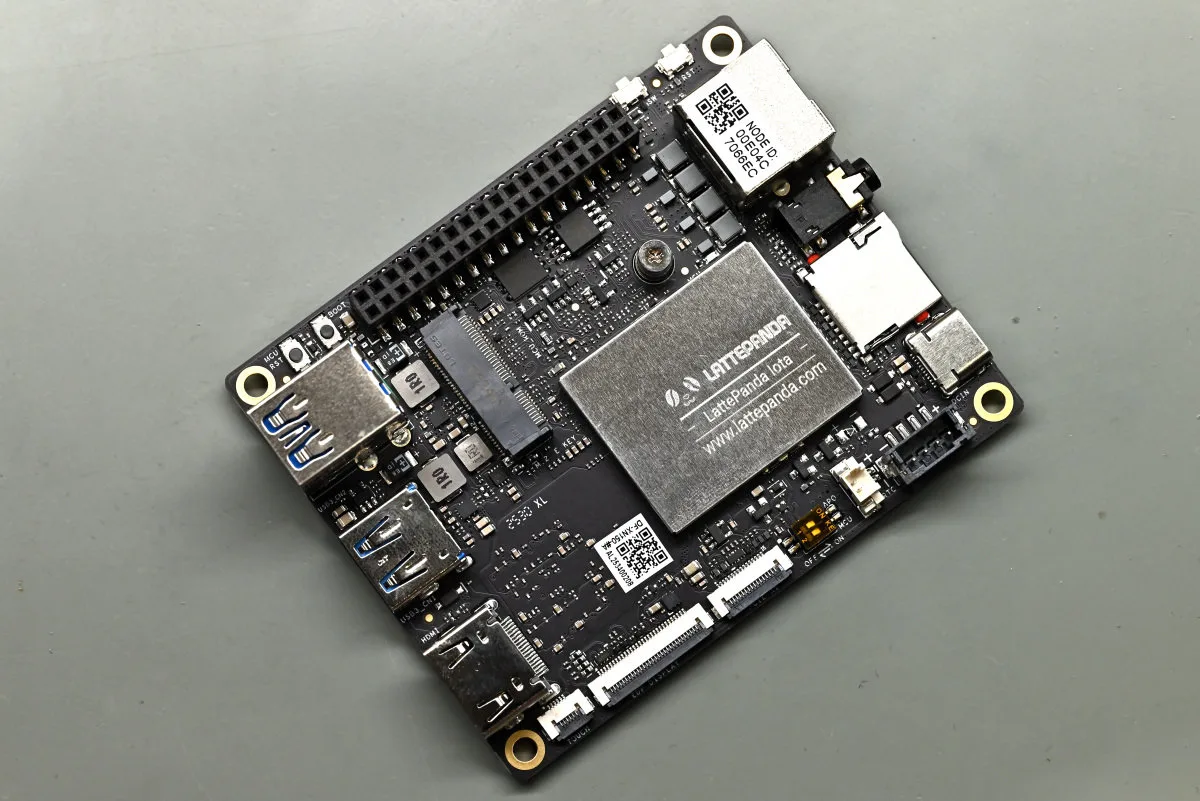
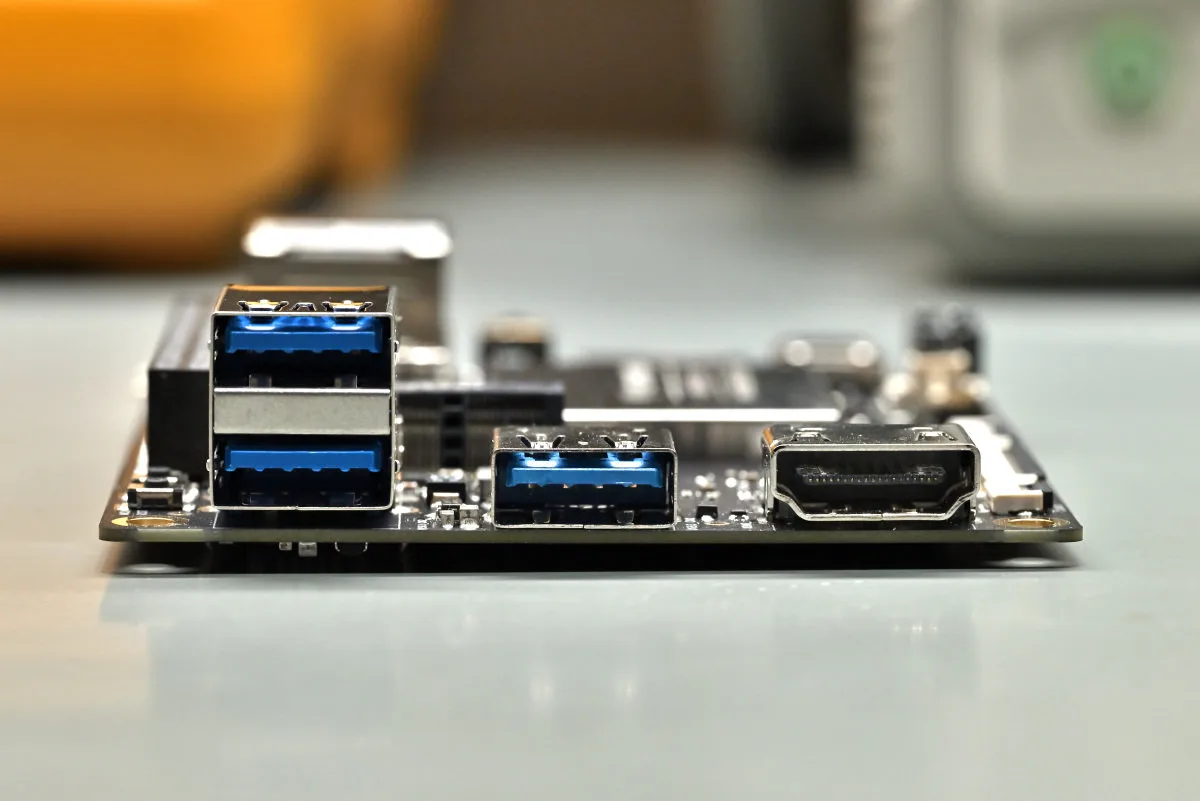
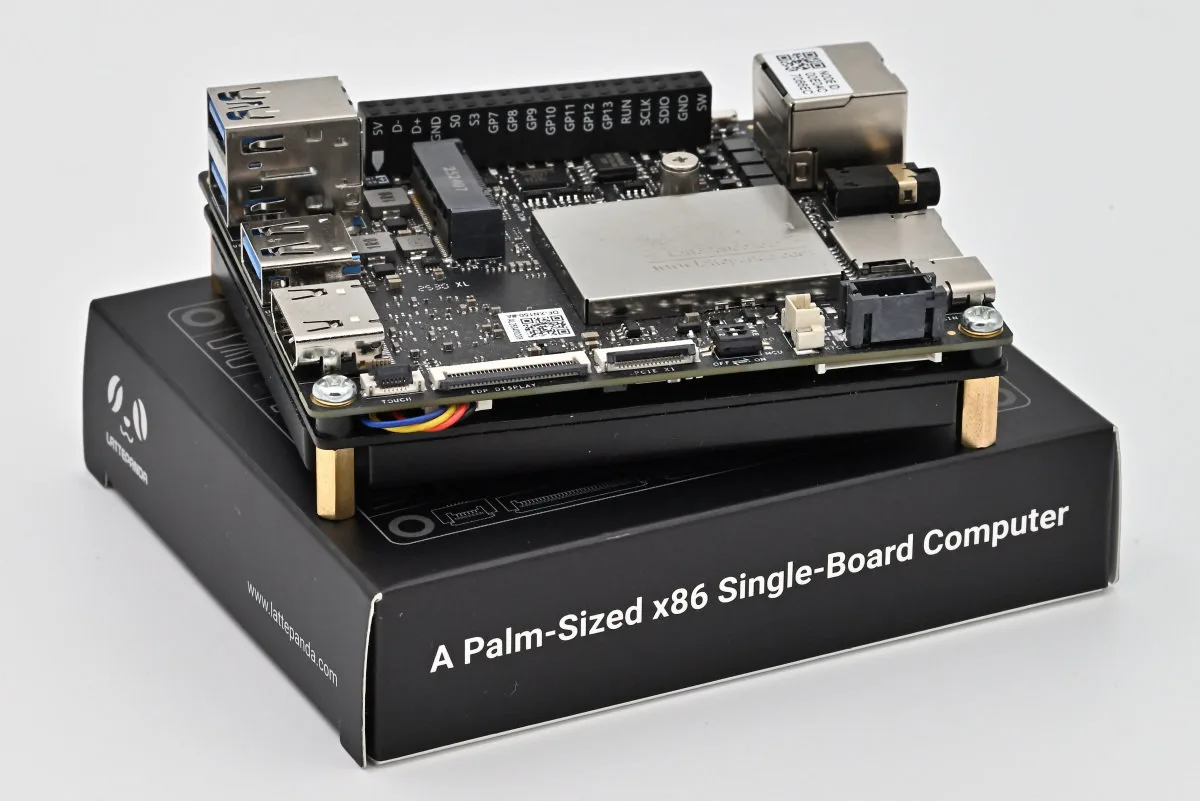
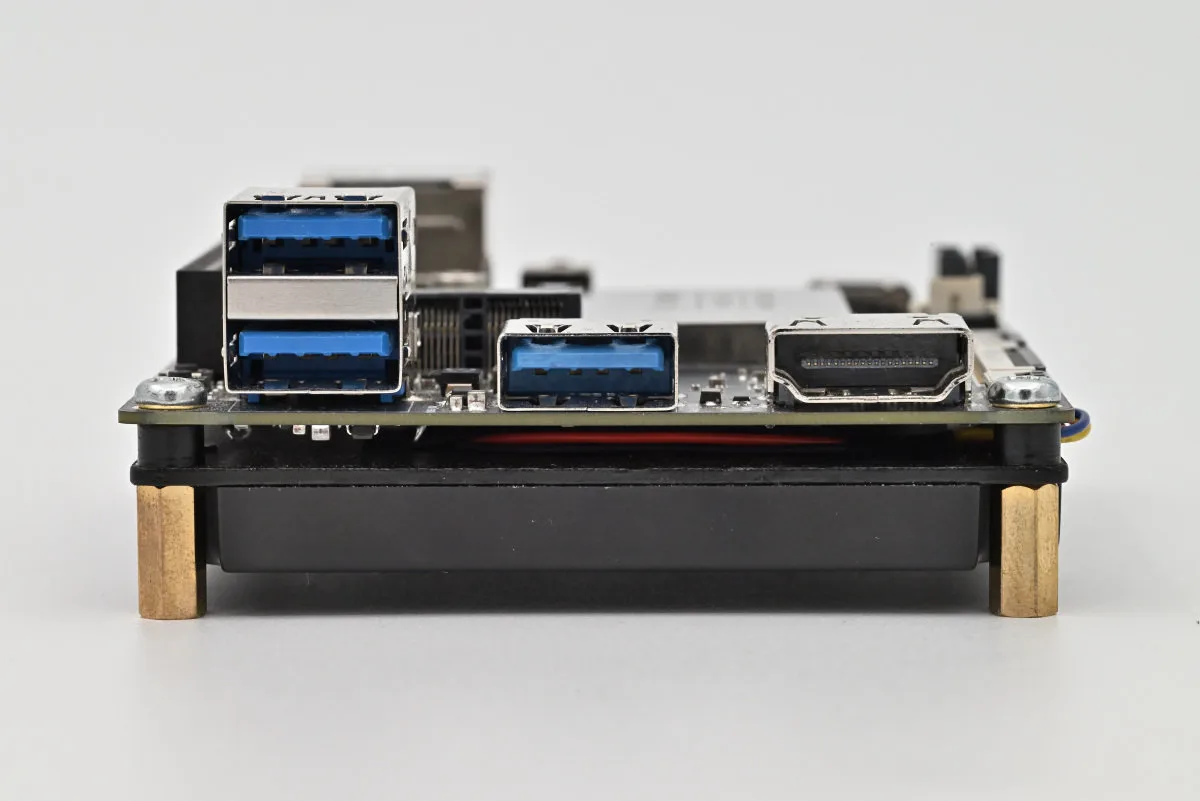
Turning our attention to the rest of the board — after all, we’ve spent a while talking about a couple of chips — we’re treated to a solid, though not completely exhaustive, port selection. The most important ports, with the IOTA oriented so its laser-etched logo faces the right way up, are located on the two sides. Everyday connectivity runs along the left side of the board, featuring three USB 3.2 Gen 2 ports and an HDMI 2.1 port. The right side is similarly essential — this is where you’ll find the Gigabit Ethernet port, a 3.5 mm headphone jack, a (very easily accessible) microSD card slot, and a USB-C PD power connector.
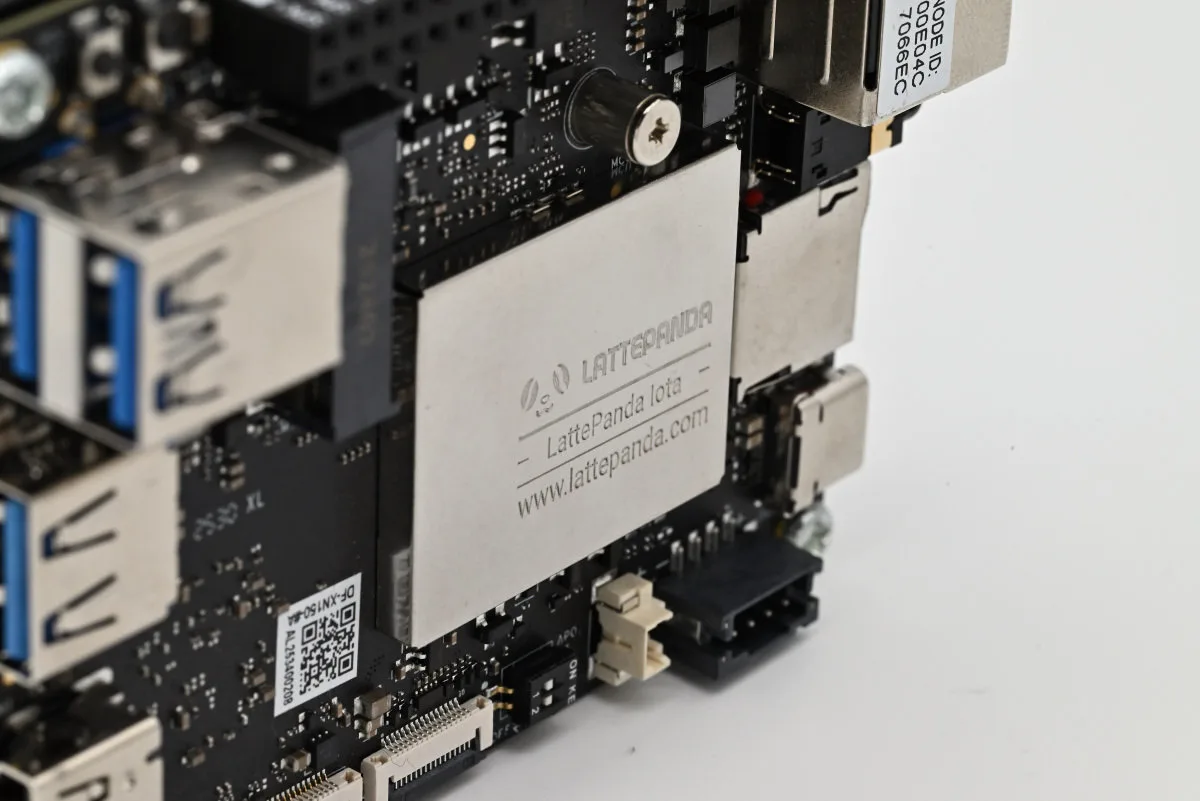
It’s pretty great that we’ve got faster 10 Gbps USB ports, though it’s odd that there are only three instead of the SBC-standard four. Perhaps this was brought about by the LattePanda V1’s form factor that the IOTA makes a point of matching. It would’ve been nice to have the USB-C power port support some data transfer. As we’ll see in a bit, there are quite a few ways to power the LattePanda IOTA, so it’s likely that many people will have this port just sitting around. Imagine how elegant of a solution it would’ve been if it served double duty as the “missing” fourth USB 3.2 Gen 2 port!
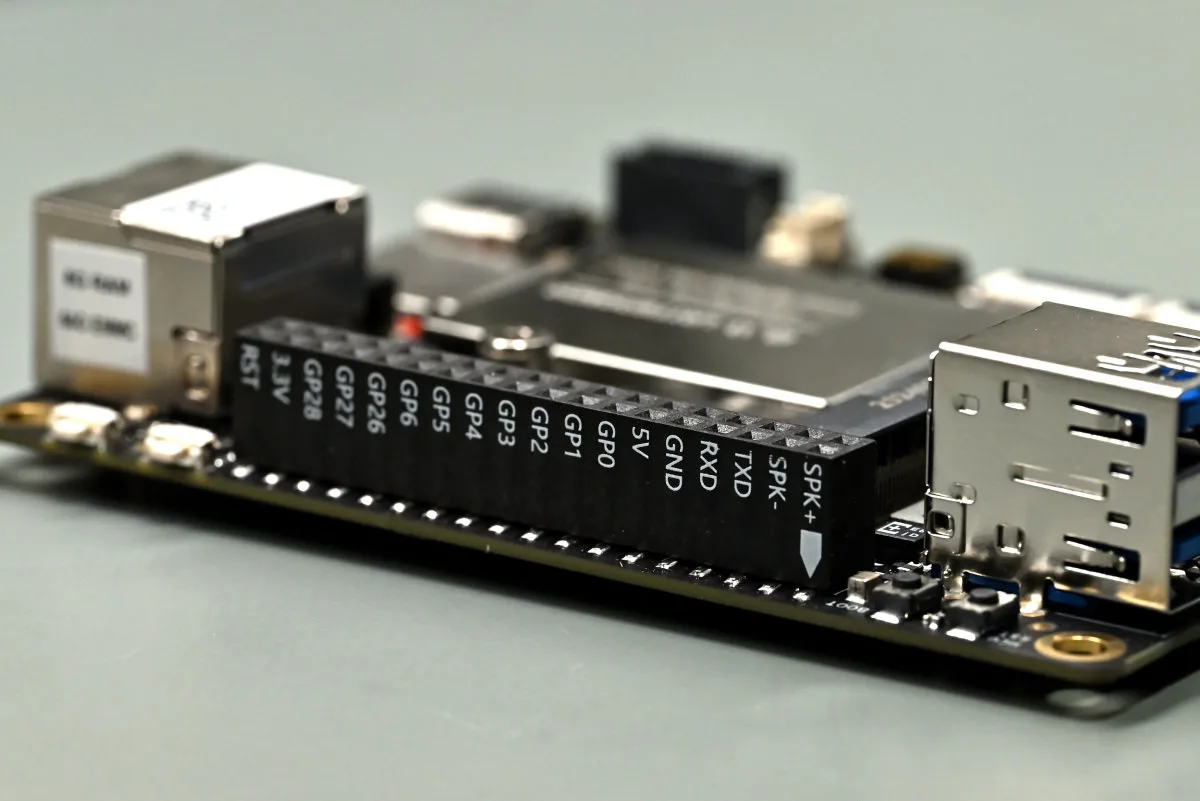
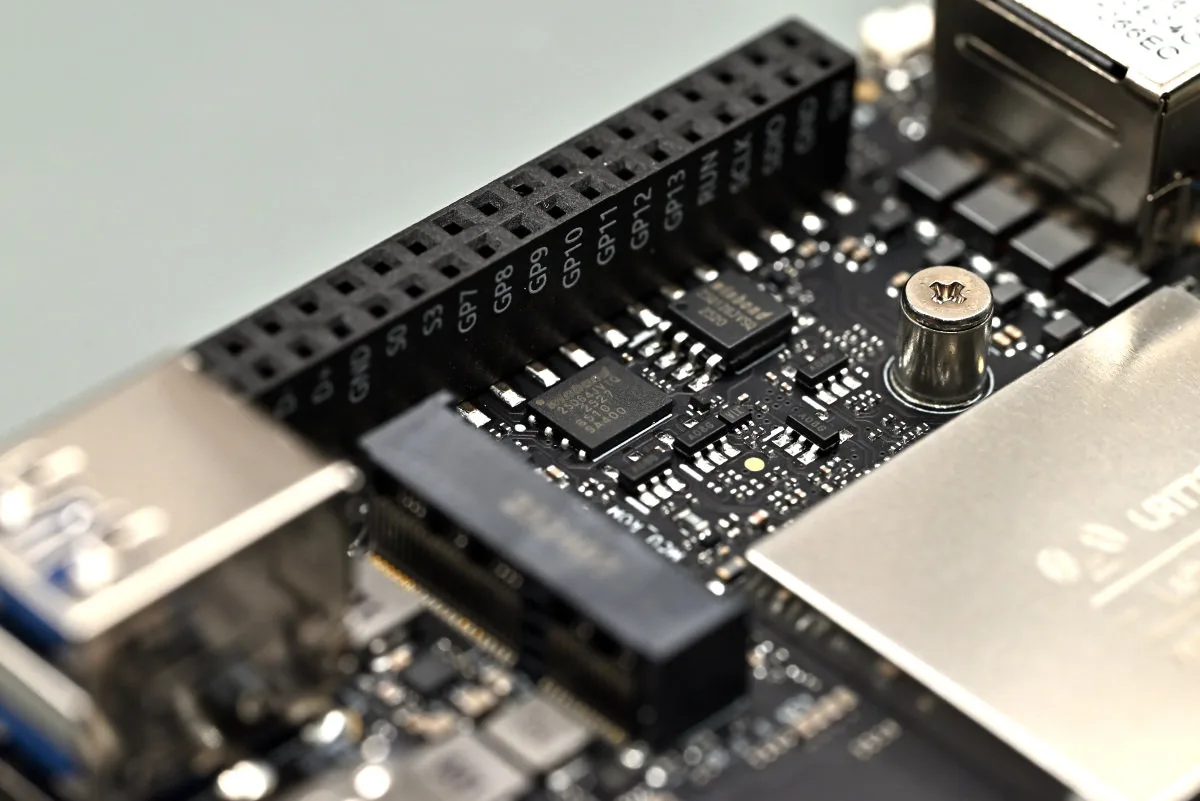
The board’s top and bottom edges are where things get hacker-y and maker-y. The top edge features the RP2040-powered GPIO header, which features the MCU’s own GPIO lines, as well as a sneakily hidden extra USB 2.0 header (ah, so that’s where it went), a 2-wire UART header, and a speaker header. The top-left corner of the IOTA features two buttons, one for resetting the RP2040 and the other for accessing the bootloader, while the top-right similarly features two buttons, though these are a more conventional power and reset button pair.
The bottom edge features multiple ZIF connectors. The first (i.e., leftmost) is a touchscreen touch cable connector, right next to which is the eDP display connector. The final of the lot is a Raspberry Pi 5–esque PCIe Gen 3×1 connector (its two implementations share the same pinout), used for connecting some of the official accessories, which we’ll get to soon. The underside of the board also features a tucked-away fan connector, used for the official cooler.
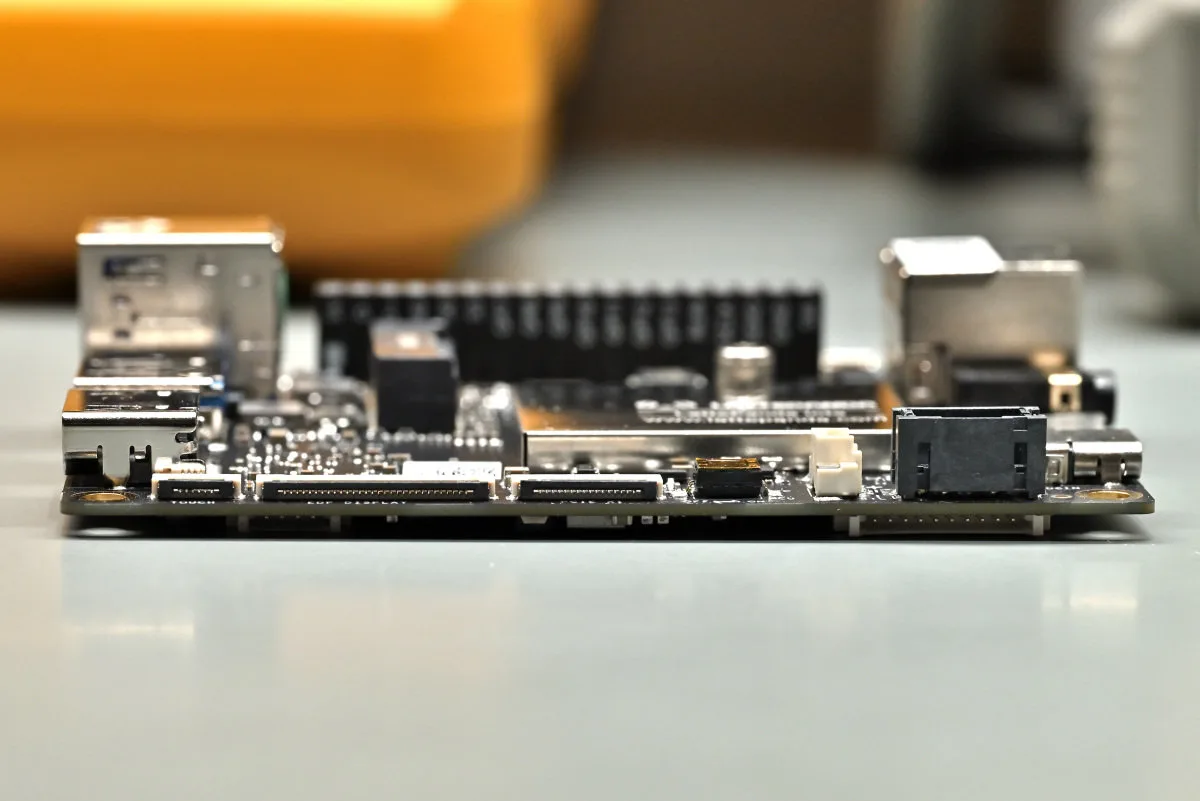
The next port along is the RTC battery connector, followed by a four-pin DC power connector (that can take 10-15 VDC). Right under it, on the board’s underside, there’s a power management connector — LattePanda’s own little solution for connecting several accessories with board-powering capabilities, such as the UPS or PoE expansion boards. This all makes the LattePanda IOTA surprisingly flexible when it comes to power. While the USB-C port is the default, and likely most convenient option during prototyping, the IOTA really doesn’t limit you in any way. Heck, run it off of battery power, if you’re so inclined.
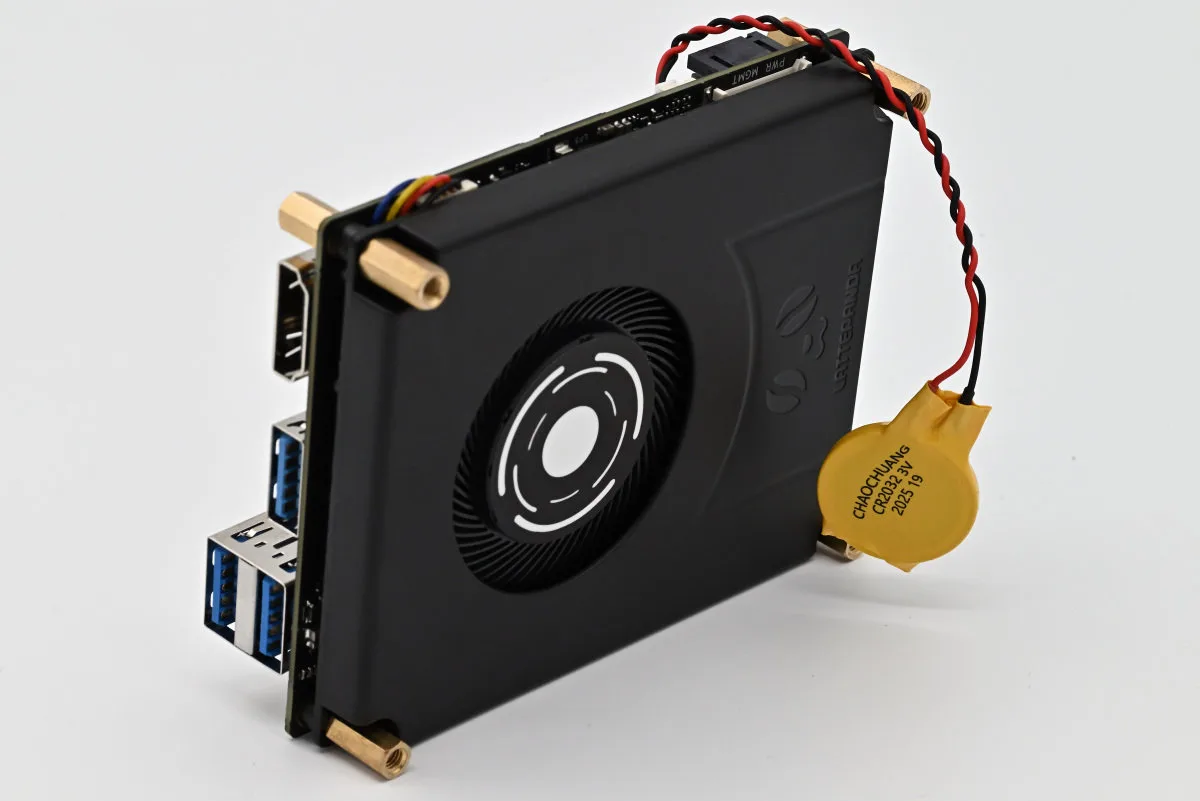
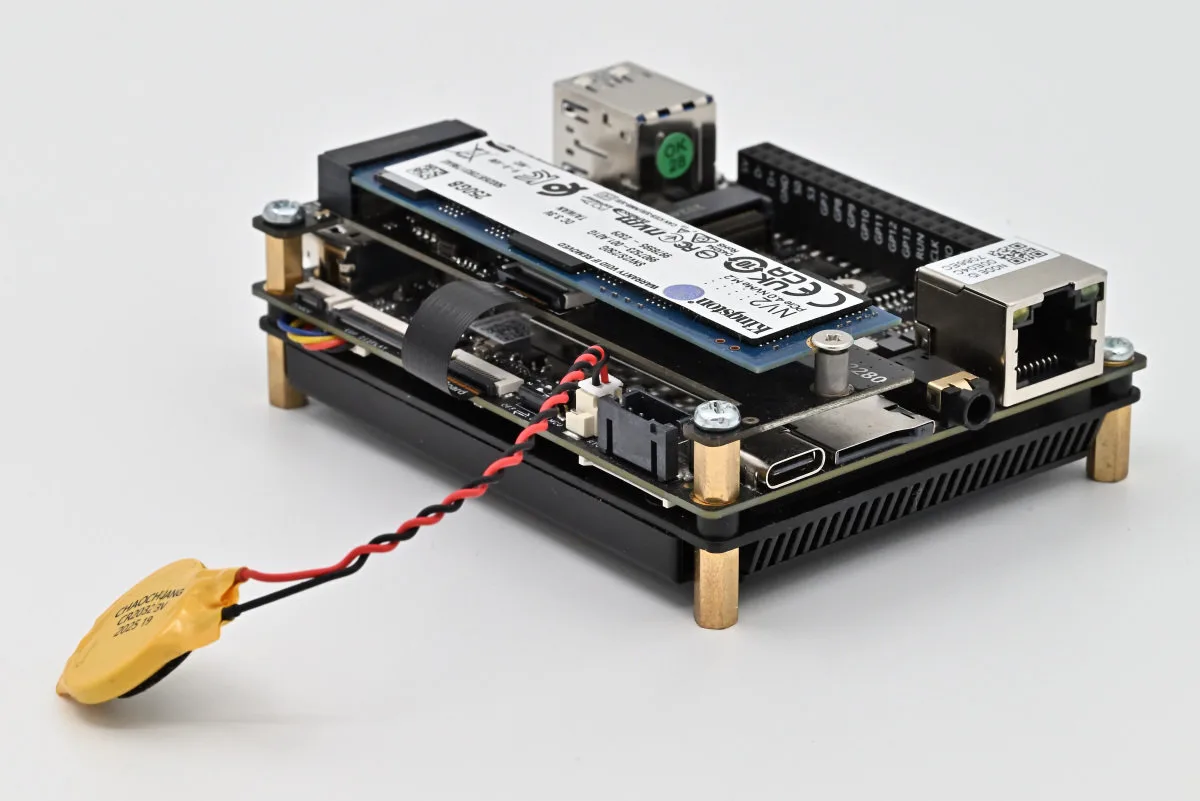
…which makes us really disappointed that, with power so elegantly handled, the RTC battery is about as janky as could be. Due to a general lack of board space, instead of a standard SMD battery holder, the team went with an external button cell that connects to the aforementioned RTC connector. It’s a nice touch that it’s included in the box, but, for crying out loud, once connected, it just dangles there haphazardly. And sure, there’s a bit of sticky tape on the battery that should, in theory, let you whap it against a surface and have it stay. But, let’s say, for the sake of the argument, that you’re using the LattePanda IOTA without a case. Um, where do you exactly attach the silly thing? Certainly not the warm and toasty cooler block, that’s not an ideal spot for a battery? Right?
…right? So, dangling off to the side it is.
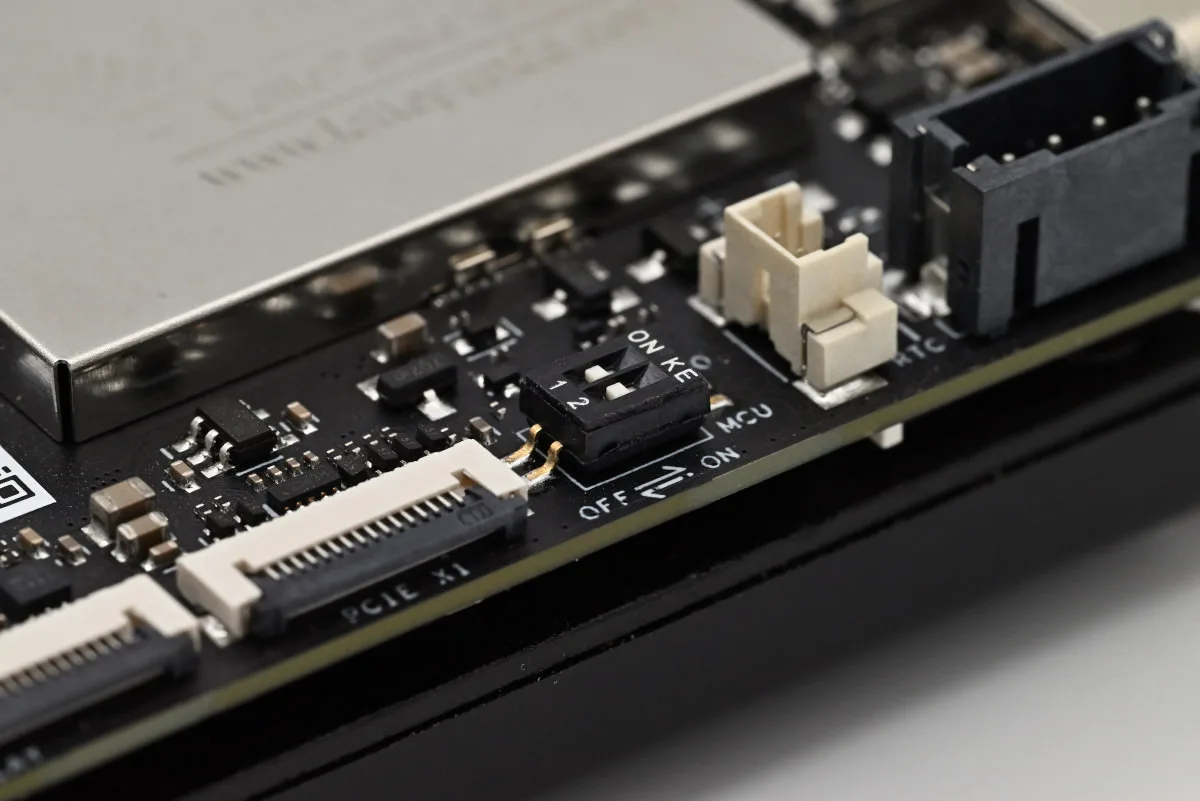
Quick, time for a distraction before we get too vexed — oh, look at that — there’s a little dual DIP switch on the board. Located along the bottom edge, it provides a physical set of controls that changes power-on behavior. One of the switches controls the board’s auto-boot behavior when power is applied, while the second switch separately controls the RP2040’s power-on behavior. This latter option is especially exciting, as it makes it possible to have the on-board microcontroller independently come online before the operating system boots. It goes without saying that this can be incredibly useful for various start-up sequences or sensor calibration.
RP2040 this, RP2040 that — what’s a microcontroller doing on a LattePanda? It’s simple: LattePanda’s main shtick has always been offering Raspberry Pi-like GPIO on Intel-based systems, generally accomplished through a separate microcontroller “co-processor” which helps with this. Every single LattePanda system to date, with the exception of the LattePanda Mu, features this arrangement — including the LattePanda IOTA. What’s new, though, is the switch over from the beloved ATmega32U4 to Raspberry Pi’s popular and powerful RP2040 MCU, plucked right out of the Raspberry Pi Pico. This makes the IOTA the most capable board LattePanda’s shipped to date, at least when it comes to its MCU capabilities. Internally, the RP2040 communicates with the N150 over a USB 2.0 bus, so it’s not too different from using an external development board (…like a Raspberry Pi Pico), but it certainly is a lot neater and more integrated.
There’s one final interface that’s worth mentioning — the IOTA’s M.2 E-key slot. Being an E-key, this slot is primarily meant for wireless modules (as the IOTA comes with no built-in Wi-Fi nor Bluetooth). It exposes a single PCIe Gen 3 lane, as well as CNVi and USB 2.0 interfaces. There’s no on-board M.2 M-key slot, meaning that NVMe SSDs require an external adapter. For us, this might be the most notable flaw, however…
…the number of small hardware and design tradeoffs are excusable given the IOTA’s small size and an attempt to stay true to a 2015 board form factor. Luckily, the IOTA launched with a rich accessory ecosystem which addresses quite a few of these shortcomings.
LattePanda IOTA accessories: some assembly required
The LattePanda team was kind enough to throw in a bunch of extra goodies in the package. Some of these are rather necessary for even getting started with the IOTA, while others provide more niche functionality — we’ll get to check them all out in a second.
Starting with team necessary: a cooling solution. The N150 is definitely not a chip that can run without it, and LattePanda offers two official accessories: a very slim active cooler (currently $12 on the official store) and a beefy passive aluminum heatsink-case combo (priced a bit steeper at $29.90).
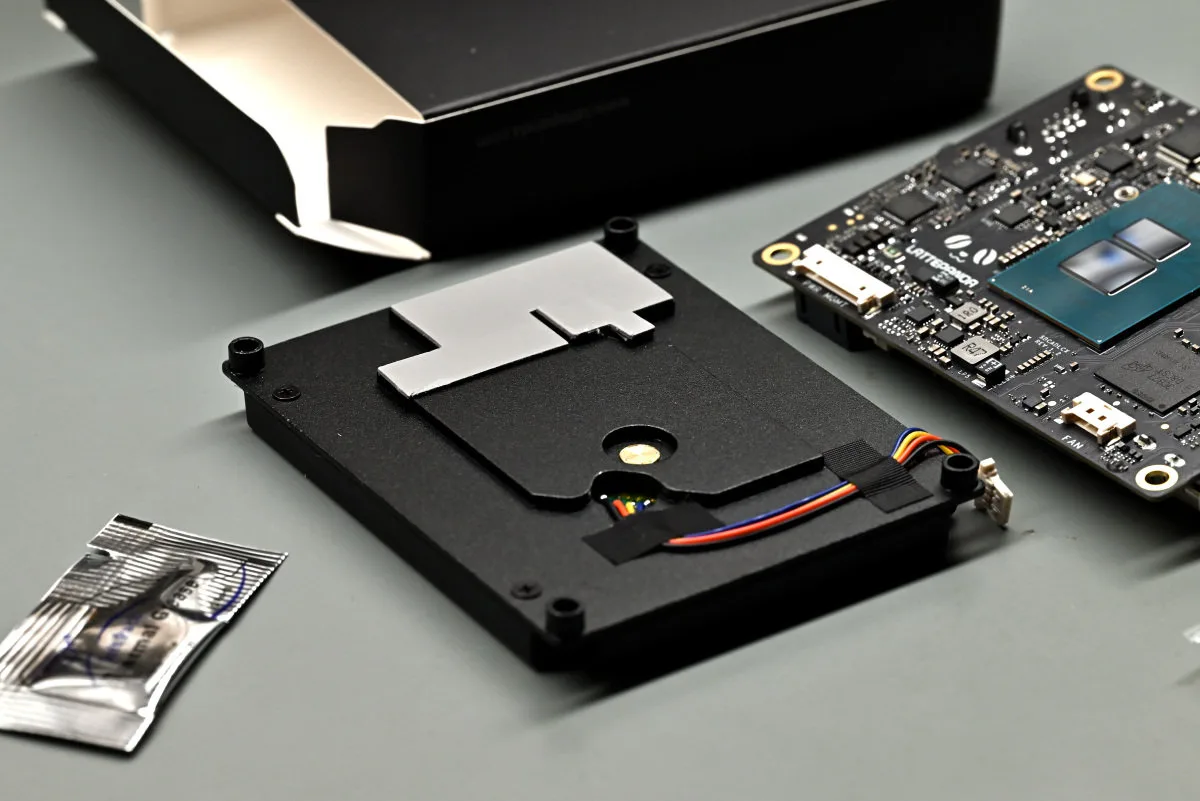
The active cooler is solid. It’s a strikingly low-profile design that tucks away neatly under the IOTA (or on top — two different standoff sets are provided depending on your preferred board orientation). This design sacrifices some thermal performance (as we’ll see later), which is a bit of perhaps an unwelcome tradeoff, but we also understand wanting to keep the design thin. Thermal pads for the power management circuitry come pre-applied, but the CPU needs manual thermal paste action. A bit (enough) of some rather chintzy thermal compound is provided, but we honestly didn’t want to risk things getting messy, so we reached for some trusty Arctic MX-4 and went to town. We’d likely have been just fine with the stock option, so don’t despair if you don’t have any other paste on hand, but — hah — erring on the side of caution never hurt anyone.
Installation is straightforward, as the whole heatsink mounts onto the board using four screws. The fan connector takes just a second of fiddling around to attach, and after you’ve got the first screw in, there’s not a whole lot that can go wrong.
Where we do feel some things can go wrong is during reinstallation. The pre-applied thermal pad is, as most are, re-usable, but it’s also a relatively complex shape. It might be a bit irrational, but we really don’t like the idea of it breaking apart during cooler removal or getting a bunch of airborne dust sticking to it. Yes, some patience and enough time with an X-Acto blade suffice if you really need to replace it, but it just seems a bit more tedious than just… avoiding having to take the thing off.
The fan is loud, especially with the CPU under any type of load. (Well — rather, it’s the air rushing through the narrow channels between the heatsink fins that’s loud, but this makes little difference to the end user.) The fan noise is charmingly enhanced by the fact that the fan governor can’t seem to pick a speed to stick to, so you’ll be hearing a lot of whooshes at different pitches. Musical. The IOTA seems to be yet another victim of the fan noise epidemic going on lately, but we reckon most won’t be terribly bothered by it. Besides, if you are terribly bothered, there’s always the passively cooled route.
Another accessory we’d consider a must-have is the M.2 M-key expansion board, which fixes one of our main gripes with the LattePanda IOTA’s built-in IO. This expansion board is an incredibly simple bit of kit: a custom PCIe ZIF connector matching the one on the IOTA itself, a few components, and an M.2 M-key slot with mounting posts placed to accommodate for 2280 and 2230 drives.
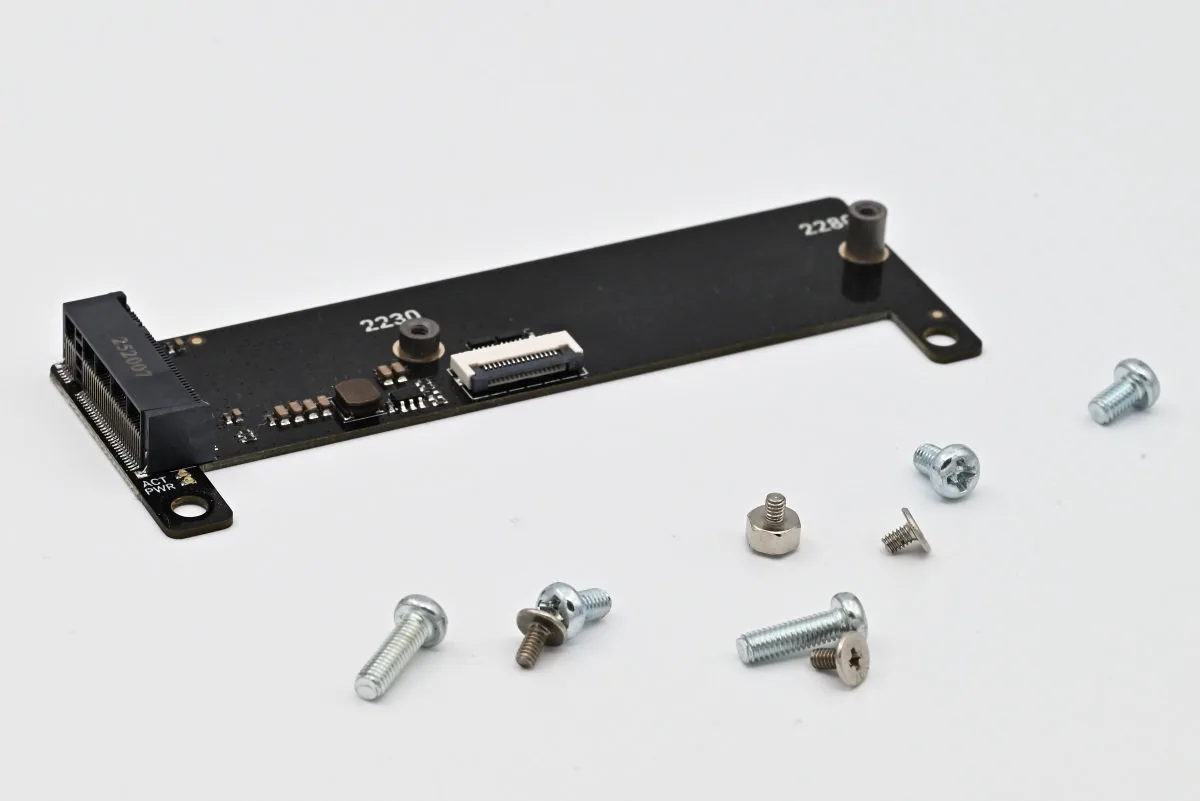
SSD performance on this thing is fine, though a far cry below what you might get on a LattePanda Sigma or an Intel NUC, more in line with a Raspberry Pi 5 and its M.2 HAT+ accessory. A single PCIe Gen 3 lane offers ~1 GB/s of bandwidth, which won’t bottleneck only the lowest-end SSDs. On the other hand, it’s more than enough for a system like the IOTA, which hardly needs faster storage. Compared to the built-in eMMC, the speed difference is night and day.
If you’ve got an M.2 AI accelerator on hand and you’re fine with sticking with eMMC, the M.2 expansion board turns the LattePanda IOTA into a surprisingly fine little edge inference machine. Once again, be wary of performance limitations imposed by the PCIe configuration (we’ve seen similar single-lane PCIe data transfer rates be real bottlenecks during our time with the Raspberry Pi AI Kit) as AI applications generally rely on pushing a lot of data around, fast.
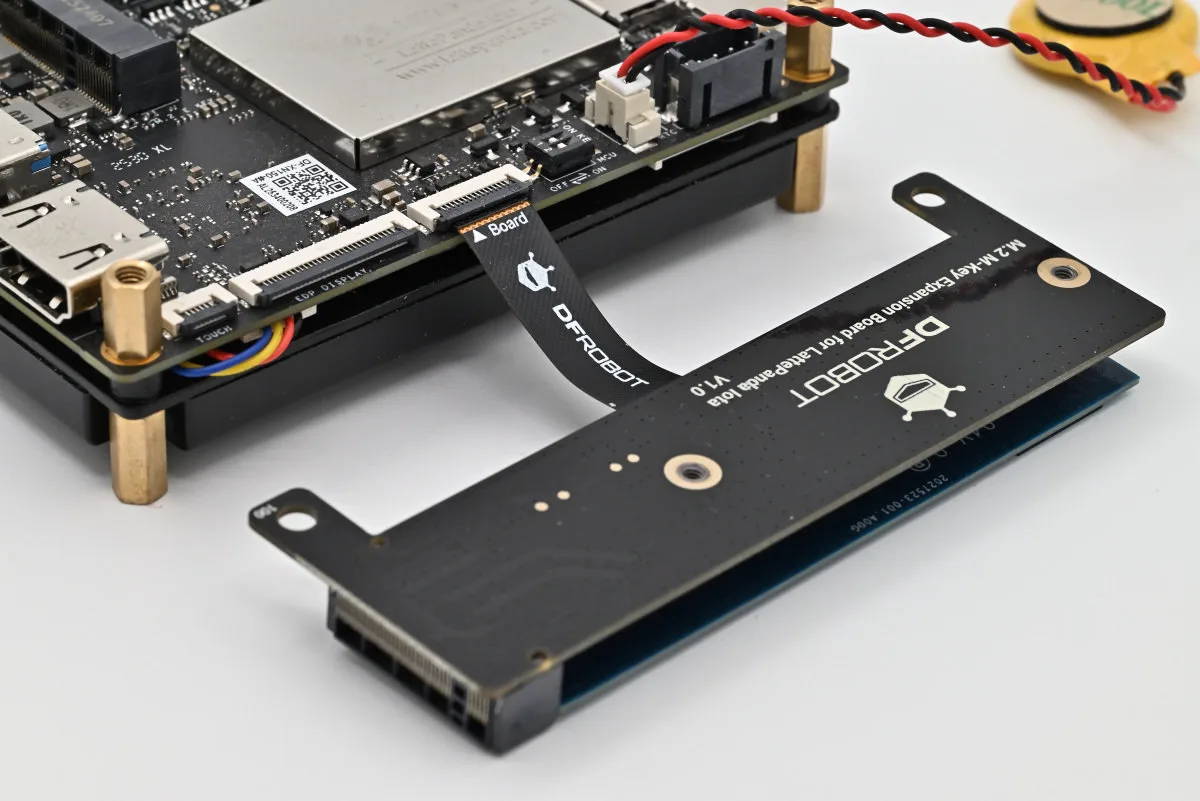
Installation is, once again, very simple. Two screws hold the expansion board in place, and a single ribbon cable handles all the comms (there are very clear markings on the cable to ensure you orient it properly). Overall, it’s not even a two-minute job. All the required standoffs, as well as the mounting screw for the SSD, come supplied with the board. For $11.90, the whole thing is a no-brainer.
Now, let’s take a peek at the more fun accessories, starting with the PoE expansion board. This stocky bit of kit is based around a wonderfully hefty Pulse PA2398NL high-frequency transformer. Capable of delivering 51 W to the LattePanda IOTA, it implements the PoE++ standard (802.3bt). The provided user manual very strictly warns against using less powerful PoE/PoE+ equipment (802.3af/at), though, unless you’re quite heavy-handed with your connected accessories, lowly PoE+ ports, with their 25.5 W rating, should be capable of keeping the IOTA running stably under most circumstances — or at least that’s what our testing concluded.
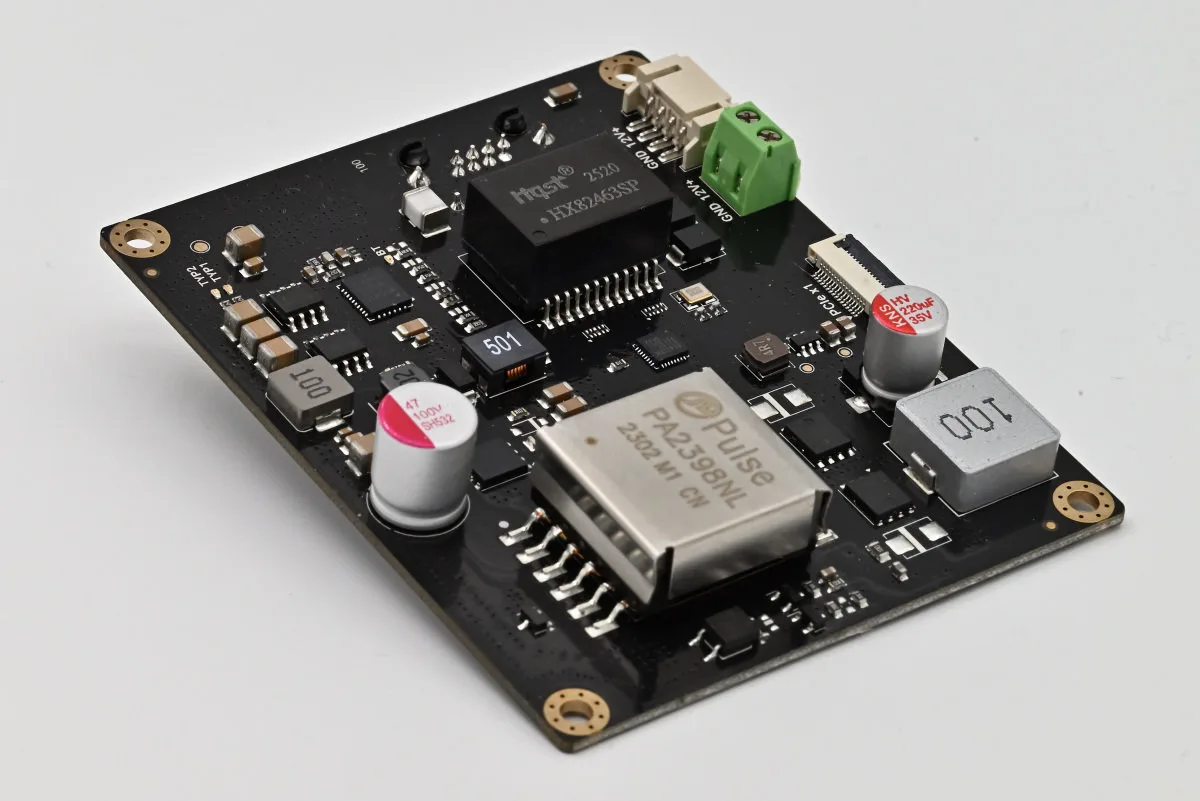
Installation is identical to that of other accessories. Four screws, two cables (ooh), and a bit of screwdriver action are all that you really need to do. The PoE expansion board is designed to sit above the LattePanda IOTA, as there are heat-producing components on its top side. Curiously, one of the graphics in the manual shows a copper heatsink mounted on the largest inductors on the board. This heatsink doesn’t come in the package, and as far as we can tell, isn’t mentioned anywhere in text, nor required.
Those keen-eyed among you might have noticed that this expansion board has its own Ethernet port. It’s bring-your-own Ethernet day over here in PoE(++) county, and it’s a bit of a contrast to most PoE modules we’re used to, which tend to upgrade the SBC’s onboard port. Nevertheless, this comes with the extra advantage of giving you a second, fully-functional network interface. Go wild. Unfortunately, the way this network interface works is by utilizing the single available PCIe lane, so say goodbye to your NVMe SSD if you intend to use the PoE expansion board.
Well, uh. Two steps forward, and one step back, right? Retailing for $42.90, three of these add up to a whole other IOTA — so consider whether the extra flexibility offered by PoE and expanded networking makes the cost (and occupied PCIe lane; this might be important in some projects) worth it.
If you really want to try and make both of these work concurrently, you technically could only connect the power cable, and leave the PCIe ribbon cable detached (or rather, attached to your M.2 expansion board). Even though you definitely shouldn’t do this, we did try it out — PoE still works, but, naturally, your PoE port is no longer internet-enabled, making it little more than a glorified power jack. If you need both internet and power, you’ll need two Ethernet cables, which takes away the main point of using PoE in the first place. Nice that it works, but there’s basically no practical use to such a setup.
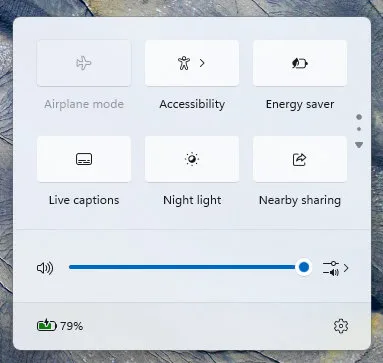
Next up is another power-related accessory: this time a UPS expansion board. It takes three 18650 Li-ion batteries (button or flat-top, since the expansion board features built-in protection circuitry) and connects to the IOTA using the power management connector. A neat little thing about this expansion board is its native integration with Windows, letting the OS manage charge levels and power policies, much like how a laptop manages its battery. The UPS expansion board also adds a DC barrel jack that accepts 12-24 VDC, as well as its own dedicated USB-C port for charging. (See, our wishes for a data-capable USB-C port keep getting vindicated.)
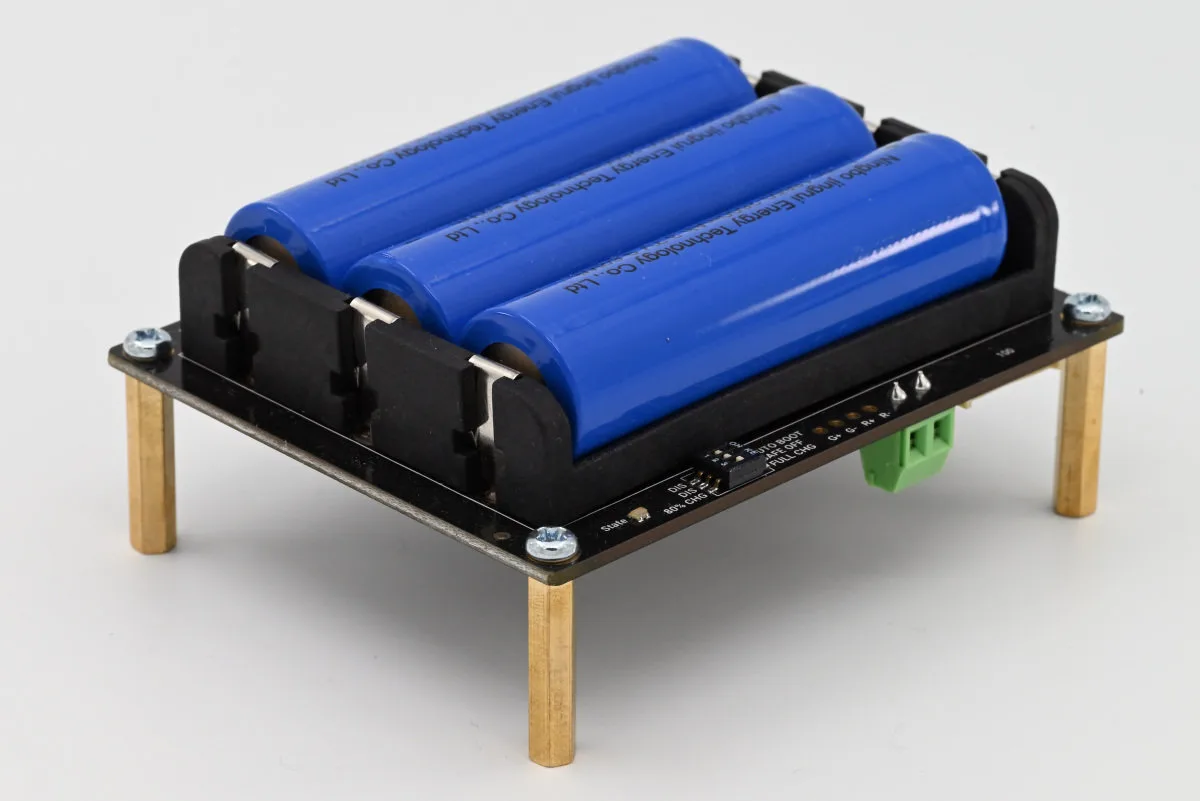
The modern trend of charge-limiting batteries to 80% for better cell longevity has also made it to the SBC world, though, in true maker fashion, the controls to enable or disable this feature are rather physical — there’s a DIP switch on the board. Two other options control auto-boot (yes, again, because the UPS expansion board has to pass power through to the LattePanda IOTA), and safe shutdown, turning the IOTA off when primary power gets interrupted.
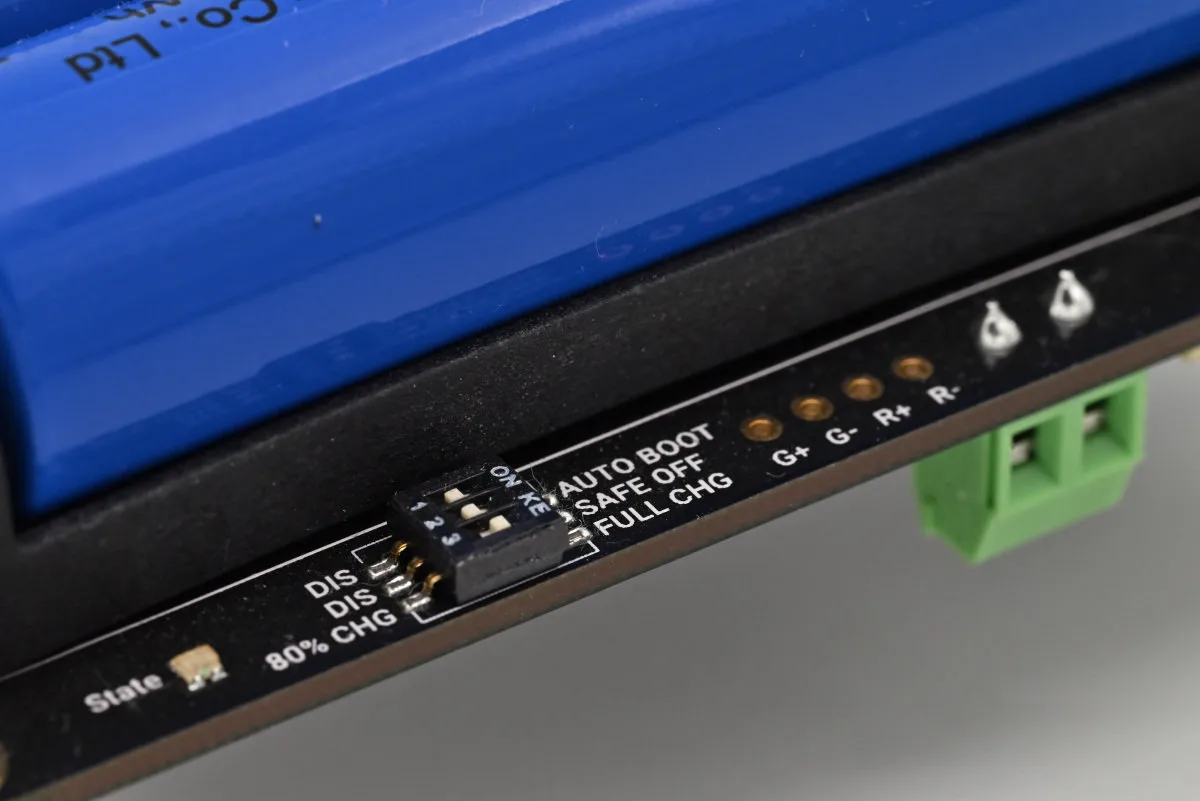
Despite being capable of, per its datasheet, powering the IOTA for up to 8 hours, this expansion board is marketed as a UPS, meaning that it’s meant to cover for safe shutdowns and mission-critical operations that cannot get delayed due to power inconsistencies, though we’ve got no doubt that in real life, especially taking the long runtime and native OS integration into account, this board will likely serve as a battery pack. Many projects benefit hugely from portable power, and $39.90 isn’t too steep an asking price. Just keep in mind that batteries have to be purchased separately.
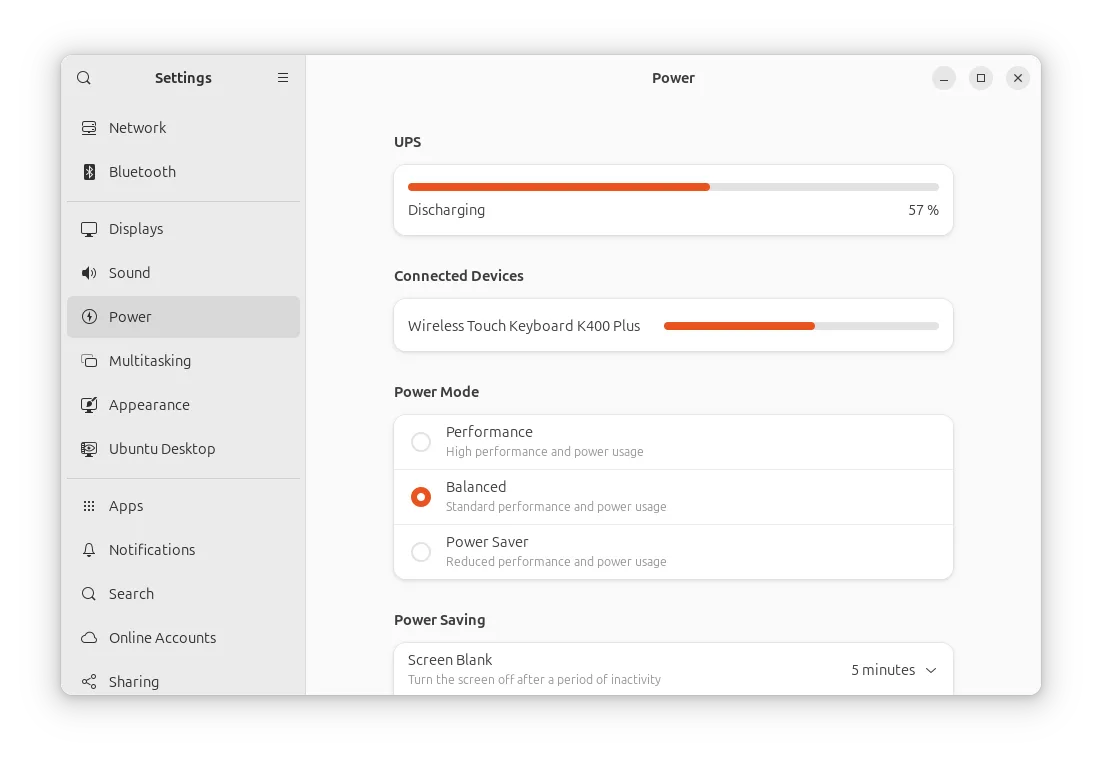
We tried the UPS board with both Ubuntu 26.04 and Windows 11, and both systems properly detect it and handle displaying power levels and discharge states accurately. It seems that Ubuntu cannot accurately report when the system is charging, though the hardware itself reflects this state by turning its status LED red.
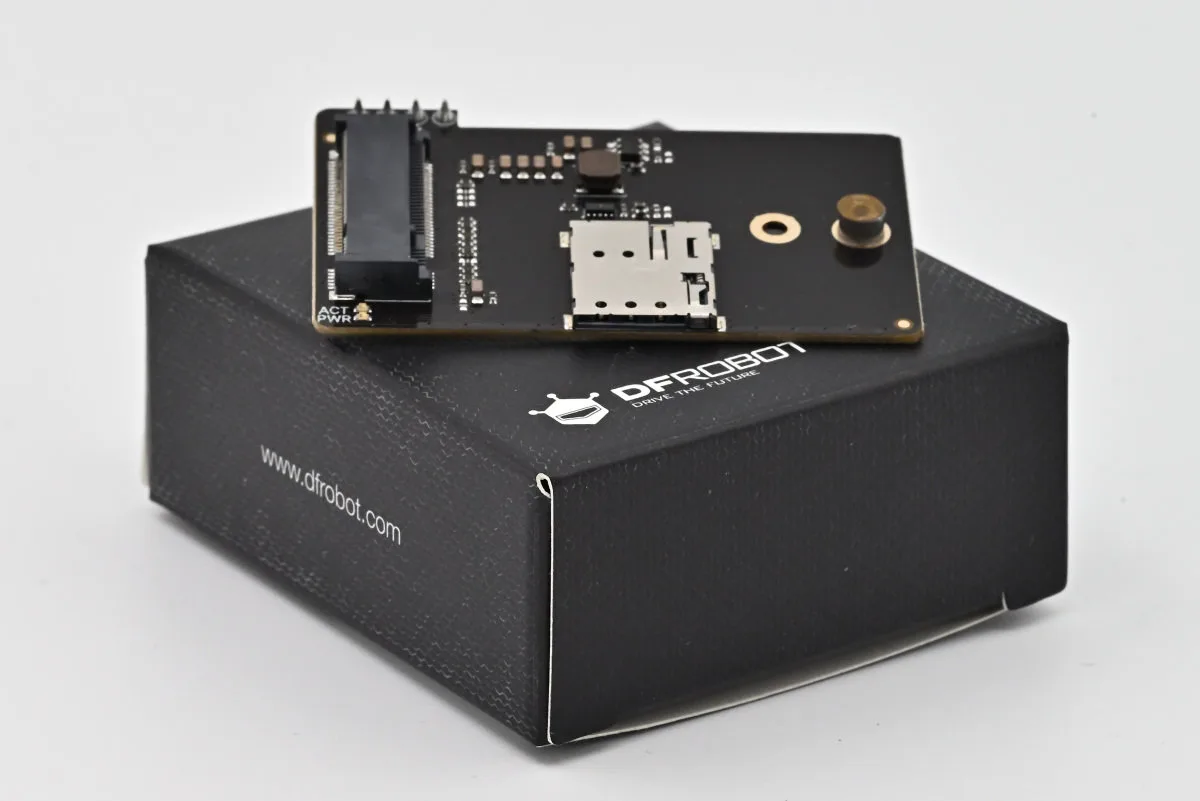
Finally, there’s the M.2 4G LTE expansion board, which is a rather neat one. This board hijacks the GPIO header’s USB 2.0 pins (the PCIe lane lives!) and converts them into an M.2 B-key slot for use with cellular modules. Since the 3042 form factor is practically ubiquitous for these modules, there’s only one mounting post. A Nano SIM slot sits right below and is easily accessible. The 480 Mbps limitation imposed by the board’s interface shouldn’t present an issue with most 4G/LTE modules, though it’s clear why there’s no 5G module support. Unfortunately, all of the modules we’ve got in the lab are mPCIe ones, so we can’t — at the time of writing this review — test this accessory out. We’ll aim to update the article once we get the chance to!
All in all, the accessory ecosystem seems pretty impressive and well-designed. While the decision to offload some commonly-used functionality over to expansion boards isn’t our favorite, it is an understandable one. There is, however, one key flaw with the whole setup.
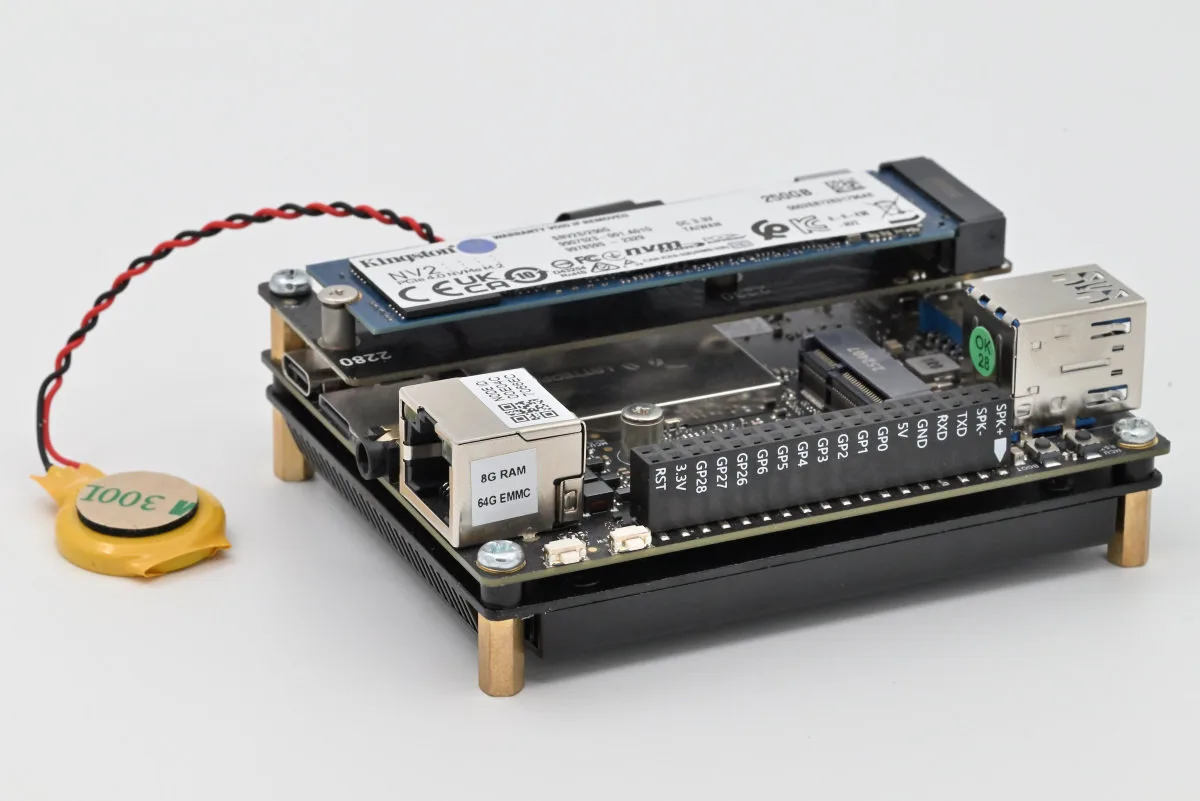
We’ve hinted at it while talking about the tug-of-war several of these boards wage over the PCIe connector. To put it simply — the accessories aren’t necessarily designed for simultaneous use. And this goes past oh-there’s-only-one-PCIe-lane. Sometimes, things just stand in the way of one another. Take the M.2 board, for example — with it in place, the UPS board can’t fit on top of the IOTA, unless you’re willing to get crafty with extra standoffs and longer cabling, despite these two having no connector conflicts.
But, with a little effort, you can make it all work — most people won’t need to use multiple accessories at once, and for them, the IOTA offers a very smooth experience. And if you’re willing to design and print your custom enclosures, you’ll get even more flexibility to mix and match various expansions to build your desired IOTA setup.
Using the LattePanda IOTA
The LattePanda IOTA unit that we’ve received is the entry-level model, with 8 GB of RAM and 64 GB of eMMC storage. It came with a copy of (dubiously licensed) Windows 11 Pro pre-installed, and was ready to use right out of the box. Windows 11 is really not our top choice of operating system for SBCs (or, well, anything, really) — we’d much rather have a nice, clean Linux installation for tinkering with, but it’s a familiar and powerful system that’s regarded as a bit of a holy grail over on the Arm side, so it makes sense why LattePanda offers the option of having it pre-installed.
64 GB is not a lot of storage — we’ve mentioned this already — and it gets cramped fast. After a round of Windows updates (painfully slow due to a sneaky, rotten Ethernet cable that brought everything down to a 100 Mbps crawl) and only two apps installed (Chrome and Minecraft for some casual user experience evaluation), we were left with exactly 18.3 GB of usable space. Disk cleanup managed to eke out an extra ~3.5 GBs by removing update files, bringing our total to 21.9 GBs. Better, but still a far cry from a comfortable amount. For us, this was a signal that it was time to migrate to an SSD.
The task of relocating your Windows installation to an SSD is simple, but just a touch arduous. And with Microsoft’s licensing shenanigans, it’s always a bit nerve-wracking to see if it’ll all work out or somehow decide to cannibalize your license along the way — especially an OEM one. Since we had a relatively clean installation with no important data, we decided to take a shortcut and use a standard installation USB to reinstall Windows on the new drive. Normally, you’d probably want to create a system backup image and use that, but the extra hassle just wasn’t worth it.
An SSD isn’t just more spacious, but also significantly faster, and even an itty-bitty system like this can clearly demonstrate the difference it makes. Everything feels smoother and snappier. The built-in eMMC still has merit and can act as a secondary data drive, or even for booting up a second OS, like Ubuntu. Whatever makes the most sense for your setup.
But it’s the N150 that’s a decently capable chip. We’ll be staring at benchmark figures shortly, but those don’t tell the story in a human way. Take a moment to consider the fact that a 6-watt N150 delivers a similar level of performance as a 65-watt Core i5-6500. We’re so used to tracking technological progress through performance gains that efficiency gains often take us by surprise. It’s incredible.
We’ve tried daily productivity apps, including Microsoft Office and LibreOffice. These two suites both worked flawlessly. The N150 doesn’t struggle at all with web browsing either, or running web apps — though you’ll likely want to keep an eye on RAM utilization, especially if you’re using Chrome. 1080p video is perfect, and 4K video generally works well with only the occasional dropped frame. Navigating the OS feels fluid, though, having been spoiled by the much higher-end hardware that we usually work on, we can definitely feel a difference.
In a maker environment, the LattePanda IOTA is likely to be running a lot of Visual Studio Code, Arduino IDE, IntelliJ, and what not — these all work well, with compile times not being half bad either. Heavier creative programs, like Affinity, definitely aren’t this machine’s forte, and creative workflows are a… just, no. Don’t. We tried.
Some light gaming is possible, with games like Minecraft running acceptably, as long as you’re willing to sacrifice visual settings (the CPU itself can’t really keep up with render distances past 8 chunks) and stick to 1080p. Many other games with similar performance requirements, like Roblox or GMod, run fine as well. And if you’re looking for something cozier, the N150 is perfectly capable of playing 2D titles like Stardew Valley (unless you’re prone to minmaxing in games like these, in which case it’s definitely not a cozy title for you).
On the other hand, not in small part due to Windows 11’s (and we’re really struggling to put this nicely) bloated design, we’ve had some baffling cases of 100% CPU utilization while idle, with performance grinding to a halt. Grabbing all the telemetry data is hard work, and something we’re glad the OS decides to use electricity and processing cycles on. Imagine giving users the choice of what their computer actually does — ah, the headaches that would cause!
The IOTA also makes a fine server. Simpler tasks, like running an FTP file server, don’t even strain the system (though, you might want a board with more IO for something like that). A media server might seem an ideal task, though the N150 might struggle a little with 4K content. Gaming servers generally work well, thanks to rock-solid single-core performance, and common home automation or network-wide ad-blocking software runs flawlessly.
Perhaps some of these use cases don’t fully align with what the LattePanda IOTA wants to accomplish as a device, and that’s okay. In choosing so general-purpose tasks, we wanted to get an idea of how well the IOTA performs as exactly that: a general-purpose computer. This small, low-power board is capable of all the things a “real computer” can do. For all intents and purposes, it is a real computer, and that feeling never gets old.
Okay, perhaps it gets a little bit less impressive once you consider the fact that N150-based laptops exist and are mainstream low-end options, but still — back in the early 2010s, when Raspberry Pis and BeagleBones were novel and 8-bit MCU boards were what most hobbyists relied on, equipment like this was what dreams were made of.
It was at this point that a completely unrelated event happened in our office: a (what was supposed to be) run-of-the-mill firmware update for our Miniware MDP-P906 power supply (check our review out here) turned into a bit of a disaster after macOS decided to brick the device. Attempts to re-upload the firmware using Windows 11 and Linux failed across multiple devices, as did our other macOS devices (both Intel- and Apple silicon-based).
This isn’t an unheard occurrence when it comes to update procedures that rely on STM’s DFU mechanism, but being rational about it during a time when a nice little device has been firmware-upgraded into paperweight status is… difficult. The issue at hand is rather simple. Many modern operating systems ship with USB drivers that are woefully inept at dumping data down a comms line as-is, without trying to do various clever things to it. Long story short, older operating systems with simpler USB drivers often do a better job — and in this case, reverting back to Windows 10 was all that was needed to get the update to go through successfully.
Why mention all this here? Well, we had no Windows 10 machines around, so we decided to give the time-traveling honors to the LattePanda IOTA. Microsoft, thankfully, still hosts download links to Windows 10 installation media creation tools on their website, which let us get up and running pretty quickly. LattePanda’s official docs list the IOTA as fully Windows 10–compatible, and our time with the OS does seem to confirm this (the IOTA accessories work as well, in case you were wondering). Oh, and it runs beautifully! No Copilot in sight, no AI-generated slop code, better performance across the board (which can absolutely be felt on lower-end hardware). It’s just nice.
But don’t take this as us telling you to ditch modern operating systems. With Windows 10 now past its end-of-life, it’s already considered insecure, and is bound to become even more so as new vulnerabilities get discovered. With a bit of common sense and good safety etiquette, you’ll likely be fine for the time being (many systems rock Windows 7 or even older versions, and are just fine). We just don’t want any fingers pointed at us for not mentioning that there are security risks involved.
Unfortunately, this is where we have to bid farewell to Windows 10, returning to Windows 11 for a little round of testing, and then finally moving over to Ubuntu 26.04 for our trusty benchmark collection.
A benchmarking conundrum — performance, power draw, and thermals
Since we’re testing an Intel-based board here, let’s kick things off slightly uncharacteristically with a few Windows-based benchmarks. Coming up first is Cinebench 2024, which should provide us with some quality insight into how the N150 stacks up against a range of other x86 CPUs.
After an, admittedly, painstakingly long installation, Cinebench gave the IOTA a consolation prize: 39 points in the single-core run, and 141 in the multi-core one. This isn’t too bad of a result for what’s arguably one of Intel’s lowest-end chips, especially in the single-core department. Despite not sounding too impressive, it’s broadly comparable to the single-core performance of an AMD Ryzen Threadripper 1950X (49 points), or roughly half that of an Intel Xeon W-3265M (64 points).
Naturally, multi-core results are a whole other story, and even a middle-of-the-road laptop chip, like the LattePanda Sigma’s Core i5-1340P, will run circles around the N150. That’s not to say that the little chip has no power to spare, since it does, but — as you’re likely already aware — it does mean that you should keep your expectations reasonable.
The second test that we’ve run on Windows, 3DMark, gave us a score of 2398 (that is, 14.36 FPS). This is, as per 3DMark’s own reporting, on the low end for Intel N150-based systems, with an average of 3552 for the chip. That’s a 32% performance drop! Odd… but, keep this number in mind. It’ll be relevant again soon.
Time to switch to Ubuntu, and grab an assortment of boards to compare the IOTA to. Naturally, we have to throw in a couple of LattePandas into the mix, and our boards of choice are two LattePanda Mu’s, one powered by the Intel Processor N100, and the other with the Intel Core i3-N305 (no need to bring in a juggernaut like the LattePanda Sigma). We’ve also thrown in an Orange Pi 5, to represent the RK3588 slice of the market, as well as the Raspberry Pi 5, for obvious, industry-standard/everyone-knows-this-one reasons. With a nice little stack of boards to compete with, let’s see how the IOTA fares in our test gauntlet.
Kicking things off with Geekbench 5 and Geekbench 6, we see an expected set of single-core results, but a surprisingly low multi-core score, ~33% lower than that of the N100-powered LattePanda Mu. We called the N150 a very minor refresh — but these results don’t exactly point in the direction of a refresh altogether! Nevertheless, the IOTA still scores higher than a Raspberry Pi 5, though the Orange Pi 5 takes it over in multi-score tests. (This is quite unexpected: an N150 should perform better!)
Our initial suspicion turned towards the CPU TDP configuration, especially since the single-core results seem perfectly normal. With power levels set to 10 W for PL1 and 20 W for PL2 by default, we felt this might be limiting performance a bit. These same numbers are default on the N100-powered Mu, so worse performance out of an N150 at the same TDP would have been a bit worrying, but still — perhaps we got unlucky in the silicon lottery.
(Un)fortunately, no. Even with the PL1 increased to 15 W, the results stayed the same. Seems that this wasn’t a case of power throttling, but of…
…thermal throttling! Oh no, that’s not great. And while we definitely spent a bit of time worrying about our thermal paste technique, the fact that the IOTA’s heatsink was hot let us know that thermal transfer was definitely happening, but that thermal dissipation might be a bit more of an issue.
Well, with this in mind, let’s take a quick gander at s-tui and see if we notice anything amiss with the thermals. The following stress test was performed with the default 10 W TDP settings applied. Initially, things seem stable, though core temperatures of ~40 °C right after idling do seem a bit high. With a multi-core load applied, the N150 can’t reach its maximum 3.6 GHz boost clock, but manages an all-core boost clock of 2.9 GHz. This isn’t a discrepancy per se, as it’s quite normal for processors to have higher single-core boost clocks than multi-core ones (and, while monitoring CPU behavior during our Geekbench runs, we’ve seen the N150 reach 3.6 GHz with no issue during single-core tests).
The cores hit ~80 °C very quickly, and the system was fine with allowing this to go on for around 15 seconds, before slamming the brakes and dropping the clock to 2.2 GHz, with the temps dipping down to 65 °C, and climbing up to 70 °C over the course of the next ten or so minutes. We had not seen this behaviour during our time with the LattePanda Mu, but this frequency drop (of exactly 27.3%) correlates quite directly with the performance loss. Things are lining up nicely, right? Well…
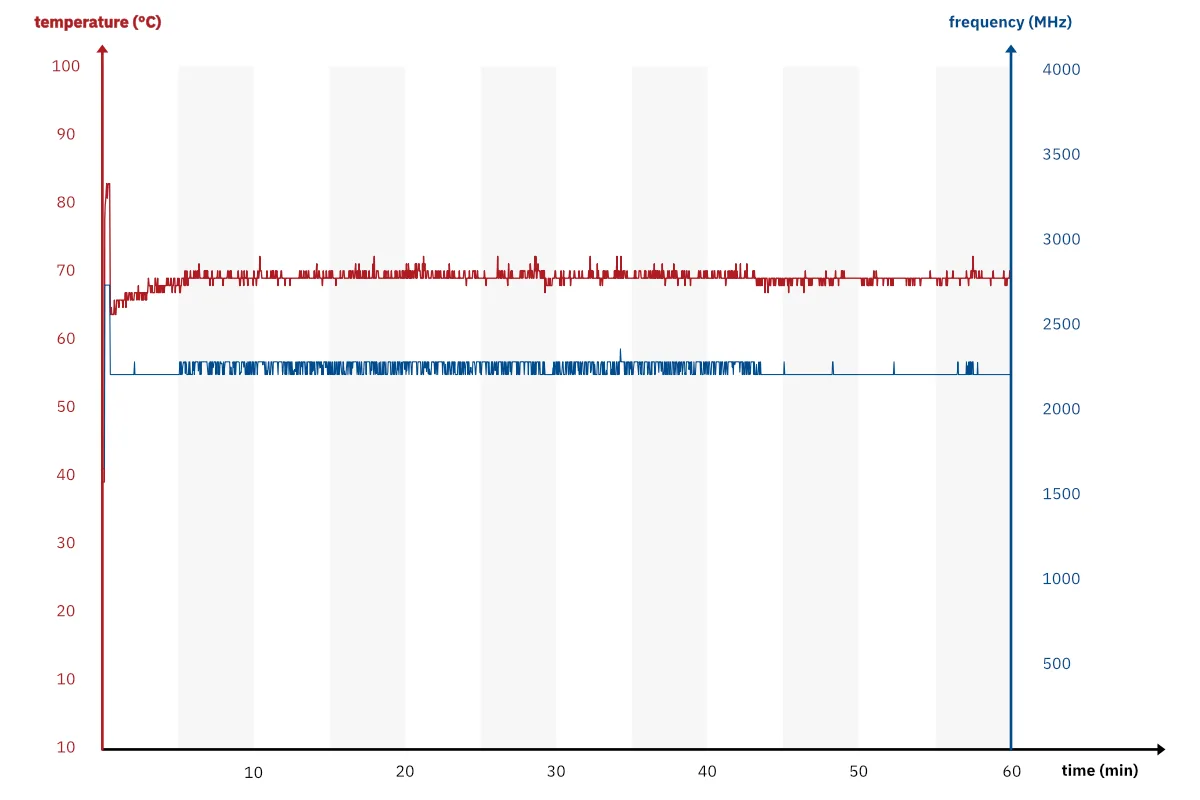
All that aside for a second, throttling at 80 °C seems relatively early, so we headed into the BIOS once again to find the culprit. And there it was: an aggressive default 22 °C TCC activation offset, bringing the throttling point way down to 78 °C. From a longevity standpoint, this is a good choice, but a more capable cooling solution would have been even better. We, perhaps a touch overzealously, dropped this offset down to 0 °C, just to make sure there’s no more funny business. We also further tweaked TDP settings by ensuring the processor spends as much time as possible within its PL2 envelope. In theory, this should mean no more thermal (or power) throttling at all.
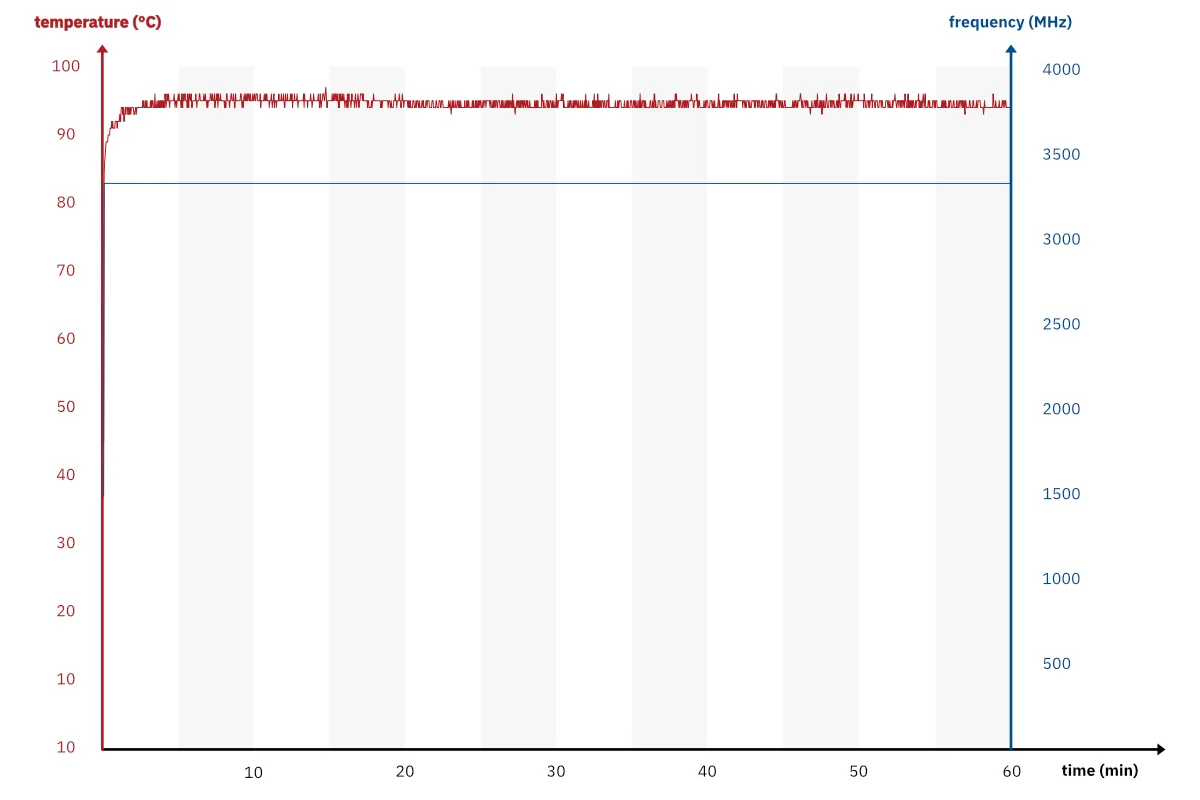
Nope, still the same low benchmark results, despite subsequent s-tui runs indefinitely maintaining that 2.9 GHz multi-core clock — so the throttling part was clearly not the issue in question. What’s going on here?
Skipping over to memory benchmarks, we immediately saw something quite odd — a score of 4667 MiB/s in the Sysbench RAM test is pretty abysmal. tinymembench results don’t fare much better, with scores hovering around half of what we’re used to seeing in N100 and even N5105 systems.
The Sysbench CPU test demonstrates solid compute performance, though Unixbench shows a clear downward trend in tests where memory speed plays an effect. More on that in a second.
The RAM situation also explains the Geekbench scores discussed above. Several of the tests that make up these benchmarks heavily stress the memory, and while it’s not directly tested, it can definitely affect scores. Great — but this still doesn’t tell us why this is happening.
We had to get a sanity check, so we headed back to Windows 11 for another round, running AIDA64’s excellent memory benchmark. And now, somehow, we got a pretty good score! With both read and write speeds hovering around ~30 GB/s, our math (remember: the IOTA’s theoretical RAM bandwidth is 38.4 GB/s) is finally adding up, accounting for memory overhead.
Is this problem localised to Ubuntu 26.04? Further testing shows that it might not be OS-dependent at all. We obtained very similar scores on Ubuntu 24.04 and on Fedora 44. As to why AIDA64 gave us much better results? It’s likely to do with the testing procedure. We usually test RAM speeds with 1 GB memory block writes, as to nullify any effects that the CPU cache might have on the performance. This does add overhead to the memory controller, and requires some paging wizardry in order to avoid disaster, but generally, the results shouldn’t drop too low — we expect predictable drops that yield repeatable and comparable results between boards and runs.
This is mitigated with smaller memory block sizes, but then you run the risk that the memory controller turns to the CPU’s L3 cache and speeds things up significantly past what the system’s DRAM chips themselves can offer. Unlike the open-source Sysbench, which simulates real-world workloads by making higher-level system calls, Aida64 uses optimized low-level code that disables all optimizations that might skew results, allowing it to use smaller memory block sizes without sacrificing result accuracy. And, on lower-end systems, even Sysbench runs with smaller memory blocks can offer accurate-ish results.
Note about the above: these Sysbench RAM results were obtained using sysbench memory --threads=4 --memory-block-size=<size> --memory-total-size=100G --time=5 run. This deviates from our standard testing procedure in several ways. Normally, we test using a total amount of data written/read equal to the memory size of the DUT. We also mostly test and publish single-core RAM performance, which lets us cross-compare results with systems where multi-core results are less trustworthy.
LattePanda Mu results shown above were provided by DFRobot using the same testing methodology. Similar memory performance figures to the ones we obtained for the IOTA were obtained and verified by the DFRobot team.
It’s pretty clear that something is bottlenecking RAM performance at larger block sizes. The results above all show multi-threaded memory access results, and no amount of taskset fiddling got us a better score. Whereas we expect results of at least ~14 GB/s at the larger block sizes, we instead get results that drop to almost half of that!
This RAM oddity affects other benchmarks too. We’ve already seen it affect Geekbench results, but there’s also a trend of lower scores in Unixbench. Take good note of the multi-core File Copy tests, and the performance degradation with buffer size increase (sound familiar?), as well as Shell Scripts tests. All of these rely on speedy memory access, and — well — their results suffer accordingly. Now compare that with the results of traditional Dhrystone and Whetstone CPU benchmarks, included as part of the suite, that deliver pristine results since both of these benchmarks fit within the L1 cache and care little for the system RAM.
In order to ensure that our LattePanda IOTA wasn’t a one-off dud, we reached out to the LattePanda team, where DFRobot’s Youyou kindly assisted us with some troubleshooting steps. He managed to recreate the same results we obtained on his own LattePanda IOTA, expressing surprise at the results, too — since the LattePanda Mu and LattePanda IOTA share the memory specifications.
For now, it seems that this sort of performance loss is just something you’ll have to accept as a compromise when choosing the LattePanda IOTA over its siblings. The team promised us they’d look into it, and we certainly hope it’s something a BIOS update can fully resolve, and not a quirk of the hardware itself.
Linux graphics benchmarking time! Our usual duo of glxgears and glmark2 is back, and the results follow the established pattern. The N100 LattePanda Mu outperforms the N150 LattePanda IOTA by a fair bit. The performance loss is in the ~15-30% range; given that RAM speed greatly affects iGPU performance, and that, save for a slightly faster GPU clock in the N150 (which should work in its favor!), these two chips share the same graphical architecture, the culprit behind the discrepancy should be immediately obvious.
And that’s a wrap for the benchmarking results. There’s obviously an issue with the RAM speeds, which leaches into other test scores too, rendering the IOTA slower than other systems of the same class. Nevertheless, the overall performance remains competitive — and will get even more so in case upcoming updates further tune the memory.
Software support
There really isn’t a whole lot to be said here that wasn’t said already. We had started this entire review talking about x86’s rich software ecosystem and general compatibility as its main upsides. It doesn’t really matter what your OS of choice is, as long as it’s modern enough to support the N150, it’ll run on the IOTA. Similarly, pretty much any bit of software you might want to run will launch on the IOTA. The board’s performance will likely dictate what makes sense to run on it, and what doesn’t, but that’s pretty much the only limitation.
Now, naturally, certain bits of hardware might not perfectly get along with every OS right out of the box, but such conflicts are often easy to resolve with some driver fiddling. We haven’t run into any show-stopping compatibility issues while experimenting with a number of different operating systems, so it’s pretty safe to assume that most people won’t either.
The IOTA comes with a full-blooded UEFI BIOS, which lets you tweak low-level settings. Importantly, it’s here that you’ll set things like IBECC up, configure CPU power levels and fan curves, or set boot order. It offers a nice bit of customizability that makes setting the IOTA up a breeze, though, on the other hand, it’s also likely that the RAM troubles we’ve discussed in the previous section stem from something going a bit awry with the BIOS defaults — perhaps ones that aren’t visible to the end user.
All in all, a short software support section is always a good sign. We don’t have nearly as much fun as it might seem writing rant-like paragraphs on how graphics drivers still don’t work, for the umpteenth time, on an ARM board, or how the manufacturer-provided OS images look like something straight out of a sysadmin’s worst nightmare. None of that with the IOTA.
LattePanda IOTA vs. LattePanda Mu
The IOTA and the Mu are two very similar systems in terms of specifications. But that’s where their similarities end, tempting as it may be to directly pit the two against each other. The IOTA is a standalone SBC with a rich accessory ecosystem, while the Mu lives at the centre of a module-based system, which makes their target niches quite different.
The IOTA only ships with an Intel Processor N150, and while there’s a choice between 8 and 16 GB of RAM, the performance options are limited. On the other hand, the LattePanda Mu comes with either an Intel Processor N100 or an Intel Core i3-N305, also offering the choice between 8 and 16 GB of memory.
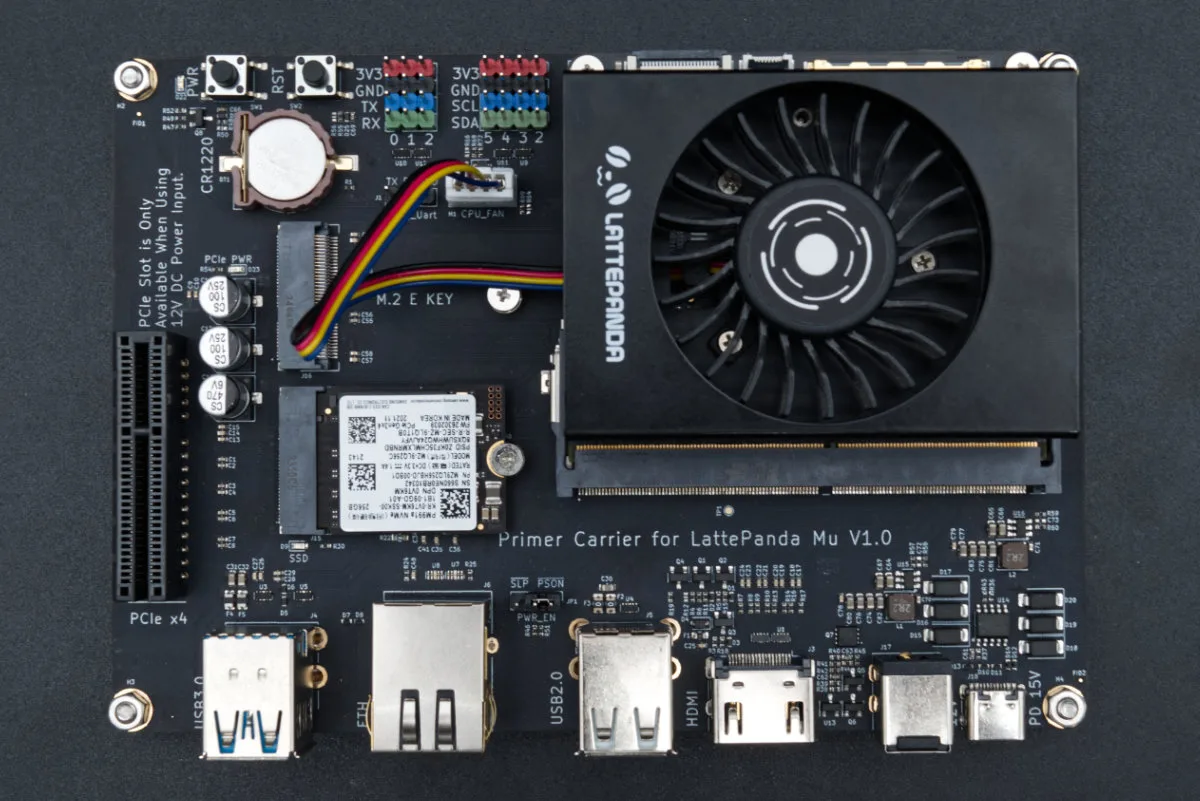
But it’s unlikely that you’ll choose a LattePanda Mu just for the option of having a faster chip. It’s an unwieldier system, even with the relatively compact Lite Carrier board, and one that exposes way more interfaces than daily computing or a simple project might need. Things go a step further when choosing the Full Carrier board, which turns the Mu into a Mini-ITX–sized behemoth (in SBC terms, that is).
The IOTA is as polar of an opposite as you can imagine. Its entire purpose is to be a streamlined, convenient board for tinkering. And despite some performance drawbacks, even compared to the (specs-wise) virtually identical N100-based Mu, the IOTA’s form factor is an appealing enough reason to make the trade-off seem worth it. In short, if you’re looking for a Raspberry Pi–like experience, the LattePanda IOTA is your best bet — don’t let synthetic benchmark results dissuade you from picking one up.
On the other hand, if you’re interested in designing your own custom hardware that deeply integrates a LattePanda computer at its heart, or are curious about using an external GPU (something that the LattePanda Mu now supports thanks to official MXM GPU carrier boards — review of one coming soon), you might get extra mileage out of the module-based setup. Naturally, if your project absolutely needs the faster Core i3-N305, the Mu is also the only way, though, at that point, a LattePanda Sigma might also be worth looking into.
Alternatives and conclusion
Writing this review was a daunting task. A proper rollercoaster — from being somewhat underwhelmed with certain design decisions and the board’s reliance on accessories, to growing fond of the tiniest LattePanda, and its ecosystem, to once again feeling a bit let down with the benchmark scores, it became increasingly difficult to form a concise, singular opinion.
This is probably noticeable to anyone reading this article, and — completely unapologetically — this conclusion is going to keep the ambiguity. The LattePanda IOTA is a wonderful little board that is likely to satisfy first-time Intel SBC users and those jumping ship from Raspberry Pi land. It’s stable, with all of the benefits of an x86-based system, primarily in regards to general software support.
On the other hand, yes — there is more performance to be extracted from the very hardware that the IOTA has. There’s still a bit left untapped, which leads to some nominally slower boards outperforming it. Whether this actually makes a difference in real-world use for a board like this, or whether it’s just a thing of vanity — the jury is still out — but the case still stands. LattePanda definitely knows how to get more out of an N100/N150 and the specific RAM setup, as evidenced by the LattePanda Mu.
We’ve just finished discussing the comparison between the two, so let’s also take a look at other, third-party options that might entice potential IOTA buyers. For starters, there are (keeping in mind all the limitations and issues with these we’ve already thoroughly discussed) Arm-based options, like the Orange Pi 5, or any of the plethora of RK3588- and RK3588S-based options on the market.
There’s always the option of a Raspberry Pi, which, despite being Arm-based (and its associated quirks), possesses a uniquely good software ecosystem. Older versions of the board perhaps a touch more so than the most recent ones, but you’d be hard-pressed to call any Raspberry Pi board anything but well-supported. Where the IOTA has an edge in this case is sheer speed — our testing shows a clear performance lead across virtually every tested category.
In the price range, there’s not a lot of SBCs that are ready to sport an N150. Options from competing companies generally pack the N100 (like the excellent Radxa X4), or even older Celeron N5105 chips. There are Mini PCs with the current-gen N150, sure, but those are slightly different tools — about as different from the IOTA as it is from the Mu — which might make them more suited for some, but less suited for many of those looking specifically for an SBC. Higher-end options, like LattePanda’s own Sigma are undoubtedly appealing, but with prices north of $600, they are significantly more… significant on the investment scale.
And it’s hard not to like the IOTA’s flexibility, afforded by its accessories. While these raise the price of the board at checkout, at $129, the board is competitively priced. The 16 GB RAM model (that also features double the eMMC — 128 GB) bumps this price up to $215. If you want Windows pre-activated, the prices go up to $209 and $285, respectively (making the license cost oddly fluctuate between $70 and $80, depending on your model — though it’s close enough). For most people, we’d recommend grabbing a discounted Windows key from a reputable store, which should save you at least $50.
If you consider the M.2 M-key expansion board a must, like we do, that’s another $11.90 on top, which isn’t a punishing expense. With the price hikes of Raspberry Pi boards due to memory shortages caused by rampant AI over-deployment (an 8GB Raspberry Pi 5 initially released at $80, and is now $175; while a 16GB Pi 5 released at $120, and is now $305), the IOTA debuts at a fair and fiercely competitive price. It’s a capable board, with drawbacks, sure, but ultimately — it manages to strike a good balance that makes it an appealing choice, especially in the current market conditions.

