

LattePanda Mu
The LattePanda Mu is a step in a new direction for the company. The $139 SoM targets those left wanting more by all of the ARM options on the market. It certainly delivers on many of these users' expectations, and offers some inherent benefits due to being x86-based. Sadly, the choice of processor mandated slightly underwhelming memory performance, and the current state of firmware support leaves some key hardware features still unimplemented.
Pros
- Strong performance
- In-band ECC support
- Highly customizable power draw
- OS support as good as it gets
Cons
- GPIO not implemented yet
- RAM performance is rather mediocre
The LattePanda Mu is the company’s first foray into SoM territory, packing an affordable Intel Processor N100 CPU and seemingly attempting to give the swathes of ARM-based SoMs a run for their money. It’s a crowded and competitive field, with almost every major SBC manufacturer offering some sort of module-based option. Perhaps the best-known are Raspberry Pi’s Compute Modules (and we’re all still waiting for a BCM2712-based Compute Module 5) and NVIDIA’s excellent Jetson series, but there are plenty of other options on the market, usually featuring Rockchip and Amlogic SoCs. But why opt for a module-based setup instead of a more traditional single-board computer?
For starters, it often boils down to format flexibility. In embedded applications there’s often a need for a highly customized port selection — one that’s unlikely to be suitable for a general-use board. Modules allow for deep integration with custom hardware and let designers expose only the interfaces they need and cut away features that aren’t needed or would pose vulnerabilities. This allows for creating hardware that feels completely custom to the end-user. As an example, just take a look at Korg’s wavestate hardware synthesizer, which is built around a Raspberry Pi Compute Module 4 to see what we’re talking about.
On the other hand, modules offer some benefits even to users not looking to design their own custom hardware. Most module manufacturers also offer ready-made reference carrier boards which turn modules into fully-fledged general purpose SBCs (well, perhaps having more than one board renders the SBC title a tad inaccurate here, but we feel like what we want to say is clear — these systems work just like SBCs and for us, that’s good enough). Aside from the regular USB, HDMI, Ethernet and similar ports, reference carrier boards often pack in some sort of GPIO for easy tinkering. Where the modular nature of such a setup comes in handy is the inherent upgradeability (and flexibility). Companies can create several carrier boards compatible with a module, or offer modules with upgraded specs that can be purchased down the line.
Now, let’s take a closer look at the LattePanda Mu, starting with the hardware specs.
LattePanda Mu module: hardware specs
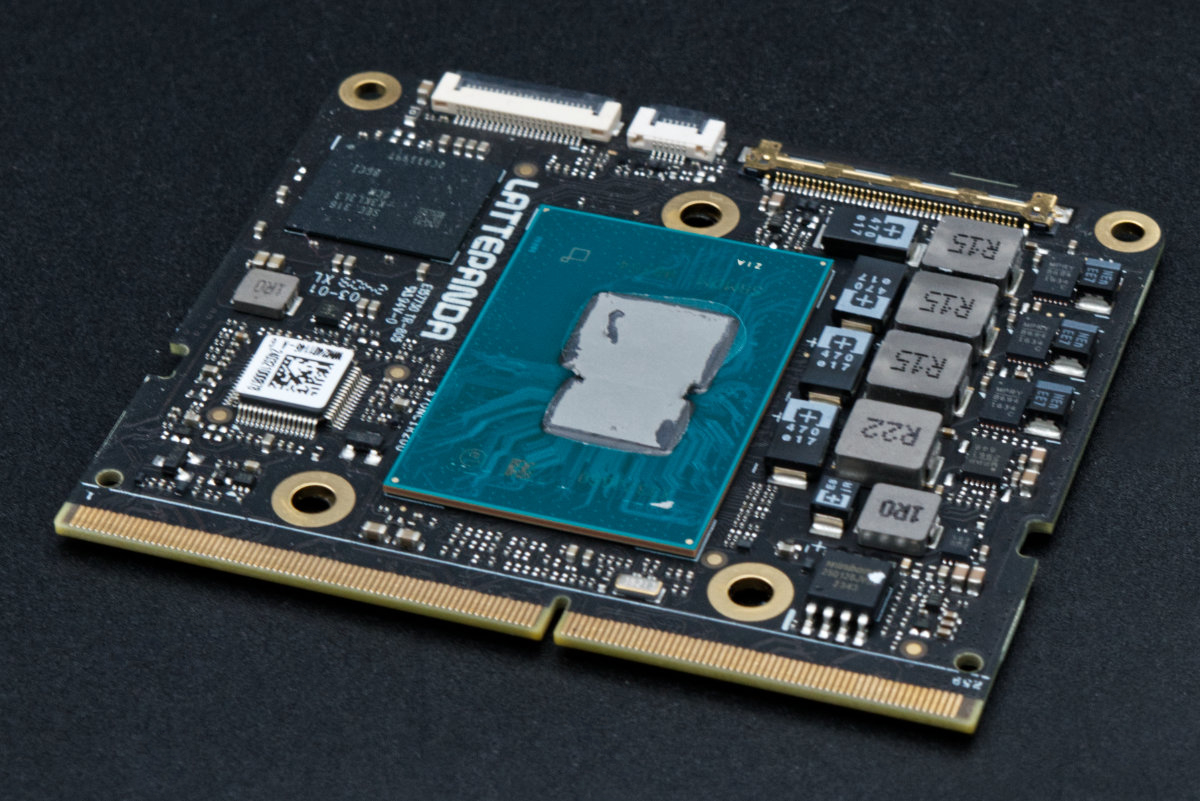
At the heart of the LattePanda Mu lies the Intel Processor N100, a quad-core chip with a turbo clock of up to 3.4 GHz (and yes, there’s no hyper-threading). The N100 is an entry-level chip (with a MSRP of just $55), based on Intel’s Gracemont architecture. You might already be familiar with Gracemont cores as the energy-efficient “E-cores” found in Intel’s 12th, 13th and 14th generation hybrid CPUs. But in the N100, like in all other Alder Lake-N series chips, they’re all you get.
This makes a bit more sense once you work your way out of the naming conundrum Intel’s been cooking up over the past few years. Intel has killed off (legendary) Pentium and Celeron branding in favor of the Intel Processor moniker, shoving all of their new entry-level chips, both mobile and desktop, under the same product line. To solve the puzzle of what exactly an Intel Processor N100 is, we have to look into some details about the Gracemont architecture itself. It’s a successor to the Tremont architecture found in many of the last N-series mobile Pentiums and Celerons. Notably, Tremont was featured in the Celeron N5105, a popular SBC chip which we’ve already covered twice — in the LattePanda 3 Delta and Youyeetoo X1. With the N5105’s popularity waning, we’re seeing more and more N100-based boards pop up.
The integrated GPU is exactly what we’re used to seeing in these entry-level Intel chips. The Xe-based Intel UHD Graphics feature 24 (out of the 32) execution units, and are seemingly clocked a little lower than usual, at 750 MHz. The performance is additionally held back by the N100’s memory controller only supporting single-channel memory clocked at up to 2400 MHz. Overall, this iGPU won’t be winning any performance contests, but it’s more than capable of pushing an image out to a display.
Finally, the N100 is built on a 10 nm Enhanced SuperFin node which Intel curiously brands as “Intel 7”. This should make it a bit more efficient than the company’s older, SuperFin-based offerings.
Even though the N100 is still a Celeron at heart (or at least, a next-of-kin to a Celeron), all of the generational architecture and process improvements do add up — almost shockingly so. We were quite surprised to see certain benchmark scores almost double the Celeron N5105’s, with most showing an improvement of ~50%, all while having a lower nominal TDP at just 6 W.
Now, we do think there’s a bit more to the story and that the the TDP figures might be misleading to most users, especially as there’s a difference in how Intel defines TDP and what people take it as. There are also important things to note regarding the way modern Intel processors (and motherboards in general) handle turbo clocks. We’ll dig deeper into this in the benchmarking section of the review.
Aside from the processor, the LattePanda Mu module also packs onboard RAM and 64 GB of eMMC 5.1 storage. eMMC isn’t the fastest storage out there, and we do wish there was a 128 GB version of the module — but for what it’s worth, it’s enough for most projects.
Update (3/14/2025) – Added mention of the new 16 GB SKU of the N100 LattePanda Mu in the following paragraph, as well as in the conclusion.
Moving onto RAM — our review module has 8 GB of single-channel LPDDR5 RAM running at 2400 MHz (which works itself out to 38.4 GB/s of bandwidth). There’s also a 16 GB version of the module available. These specs might seem a little lackluster — and we were ready to complain about it as LattePanda has a bit of a tradition of putting single-channel RAM in places where they really shouldn’t be — but as we mentioned already, in this case the speed and number of channels are limited by the processor’s specs.
Granted, what most of us (including Intel in their specifications) refer to as single-channel due to the way standard DDR RAM works — a 64-bit wide memory bus — is technically dual-channel when it comes to LPDDR, as single LPDDR channels are 32-bit wide.
Additionally, LPDDR5 (and many LPDDR4) implementations further feature “split” channels — with each of their 32-bit channels actually comprised of two 16-bit ones. This means that the 64-bit wide memory bus of the LattePanda Mu is actually comprised of four separate 16-bit wide channels (which is also confirmed by lshw and dmidecode).
But all technicalities aside, for clarity’s sake, it might be best to just simply stick to calling a 64-bit wide bus a single-channel one, especially when LattePanda themselves also stick to this convention, calling their flagship LattePanda Sigma’s 128-bit memory bus dual-channel. The Sigma, like the Mu, uses LPDDR5 RAM, which would technically make it quad-channel… no, wait… octa-channel…
You get the point. While there’s a bit of truth in calling the LattePanda Mu a dual-channel (and even a quad-channel system, if you’re willing to push it a bit) it’s confusing — and unnecessary.
There’s another interesting thing about the memory: in-band ECC support (IBECC for short). But to understand how it works and what it really means, we’ll have to dig a bit deeper into the specifics.
For those not acquainted with ECC RAM in general — it’s a specialized type of memory which helps mitigate certain random data corruption events by storing additional parity bits (often collectively called an ECC code) that carry the necessary information to detect and even correct single-bit errors in each word of transmitted data (and in most setups, detect but not correct even two-bit errors — as a reference for further reading, this is known as SECDED). This type of RAM can significantly reduce the chance of data corruption or system instability and is especially important in enterprise and other mission critical systems where maintenance can be costly and downtime devastating.
There are quite a few ECC implementation strategies, but most common in enterprise and industrial systems is side-band EEC. In this setup, the memory controller sends and receives an extra 8 bits of parity data alongside 64 bits of information in each cycle, comparing the data read with its corresponding stored ECC code generated during writing. Any discrepancy here would notify the controller that data has been compromised. This, however, requires a 72-bit (64+8-bit) wide bus per memory channel. In addition, side-band ECC requires an additional dedicated memory chip per channel for storing the ECC codes.
This entire process is fully reliant on the memory controller itself, but not all support the required functionality for side-band ECC. In fact, most consumer-grade ones don’t, and the one found in the Intel Processor N100 is no exception. It does not support traditional side-band ECC configs. So how exactly can the LattePanda Mu claim to have ECC support?
The type of ECC used here, IBECC, is a bit of a compromise. Aside from being cheaper to implement, it also uses less power and takes up less board space, all crucial things for an embeddable module, as it doesn’t require extra memory chips and wider data busses.
Instead, IBECC relies on interleaving parity bits and general data, thus making do with a standard 64-bit wide memory bus. The verification/correction mechanism is essentially the same as in other ECC types, but as there’s no extra bandwidth on offer for parity bits, there’s a certain performance hit that comes with utilizing in-band configs. If you were to implement the exact same “8 parity bits per 64 data bits” split used in side-band ECC, you’d end up cutting the bandwidth in half (or lower), as essentially every other access cycle would be used for transferring the parity bits while also obstructing burst transfers. Without getting too much into the exact specifics of how burst mode works on LPDDR RAM as it’s out of the scope of this review, we’ll just mention that Intel’s IBECC implementation — the one we have here — works by transferring 512 bits of data and 16 corresponding parity bits (if you’re interested in further reading, check how different types of RAM handle bursts, and why BL8 is the most common in DDR4, while BL16 and BL32 are seen in DDR5 and LPDDR5 — it has to do with why 512 bits were chosen).
This, however, still leads to a performance hit (which does, however, range from unnoticeable to relatively visible depending on the operating system and software used). It also requires additional RAM to be reserved for storing the parity bits (exactly 1/32 of the total system memory). In an 8 GB system like the LattePanda Mu, this works out to around 250 MB resolved for IBECC.
While less demanding on the memory controller than traditional side-band ECC (if only because it uses regular 64-bit wide channels), IBECC still requires certain features to be present, including the ability to generate proper ECC codes, manage their storage and keep track of associated data values.
There’s one last trick up Intel’s IBECC implementation’s sleeves. The 16 parity bits still have to get transferred somehow, and taking up a whole access cycle just for that isn’t efficient at all. The memory controller in the N100 also has ECC code cache for this reason, offloading some of the stress and minimizing speed penalties as much as possible. Apparently, there’s even more optimization magic behind the scenes, but Intel isn’t perfectly transparent about how it exactly works. As for the reasoning why the Intel Processor N100, an entry-level consumer-grade chip, has all these features? Well, Intel sees its energy-efficient N Series (and a few others) as perfect for network and edge applications, so, interestingly enough, several unexpected business-oriented features — IBECC support included — have made their way into these processors.
Whew! That’s it for the ECC section. It might feel like we’ve given too much attention to this specific feature, but we feel it’s quite a strong selling point for a module like this. Additional data ruggedness in a small, embeddable form-factor? Yes, please!
Interface-wise, the LattePanda Mu module exposes just about everything the Intel Processor N100 has to offer: 9 PCIe 3.0 lanes, 4 USB 3.2 Gen 1 and/or 8 USB 2.0 lanes, 2 SATA 3.0 lanes, 4 UART and 4 I2C lanes and 64 GPIO pins (do keep in mind that the PCIe, USB 3.2 and SATA lanes are multiplexed and can’t all be used at the same time). That’s a lot of great connectivity! All of these are exposed through an edge connector, and LattePanda claims it’s relatively easy to design full-featured custom carrier boards thanks to the open-source software and hardware documentation available on GitHub.
Additionally, the module itself has three physical connectors: a MIPI CSI connector for a camera, an eDP connector for a screen and a touch ribbon cable connector. We’re guessing that the reason these are located on the module is to save up on edge connector pins, leaving room for more interfaces with carrier boards.
It’s sad we have to wave goodbye to one of the hallmark features of previous LattePanda boards: there’s no integrated Arduino “co-processor”. It might be a bit silly to lament over such a feature, but every single LattePanda board, from the old Alpha 864 to the flagship Sigma, had Arduino functionality built-in. This time around, it seems the focus is on using GPIO taken straight from the N100. Sadly, as of this writing, the Mu’s GPIO is still non-functional, and LattePanda’s website offers a very meek “But sorry, the firmware engineers couldn’t keep up with the hardware engineers. Some of the features that have hardware pins reserved for them don’t have firmware adaptations yet, and they don’t work at the moment.”
We get when things like I2S, DisplayPort or MIPI CSI don’t work — which by the way, also don’t. But GPIO is the whole point of a system like this. Why wasn’t this sorted before release — or better yet, why was the system released before this got sorted?
Do keep in mind that a lot of Intel’s data sheets and other technical data on their processors are kept under an NDA and are not available to hobbyists (and perhaps neither to the LattePanda team). This is something to keep in mind when tackling a design based on a proprietary chip. While we can’t say how things will unfold for sure, we’ve seen how much damage withholding documentation or development firmware can do to a community. Just look at the situation with many Rockchip SoCs and their graphics drivers.
On their website, LattePanda put up some neat would-be carrier board designs, including a NAS-style carrier board with eight M.2 slots and a cluster carrier board for multiple LattePanda Mu modules. Given the massive IO available, this is all plausible. We’re quite excited to see what the community comes up with over the next few years.
Carrier boards and accessories
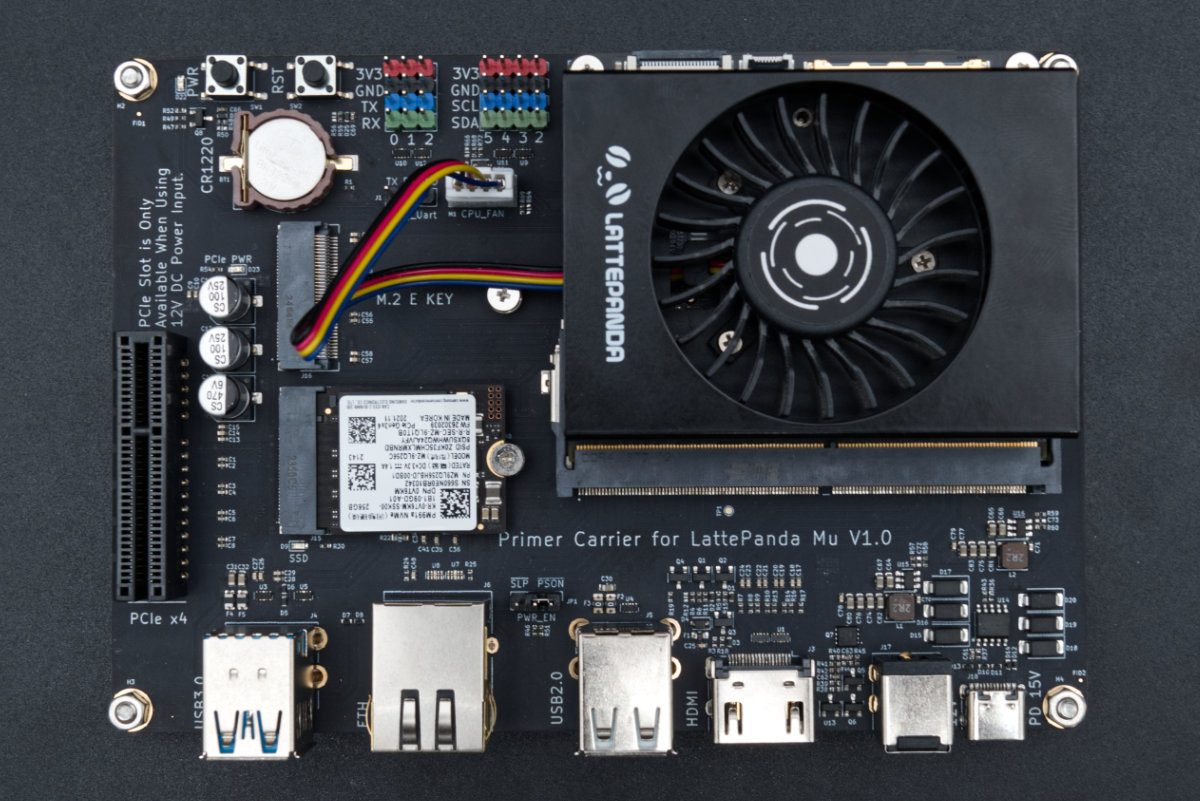
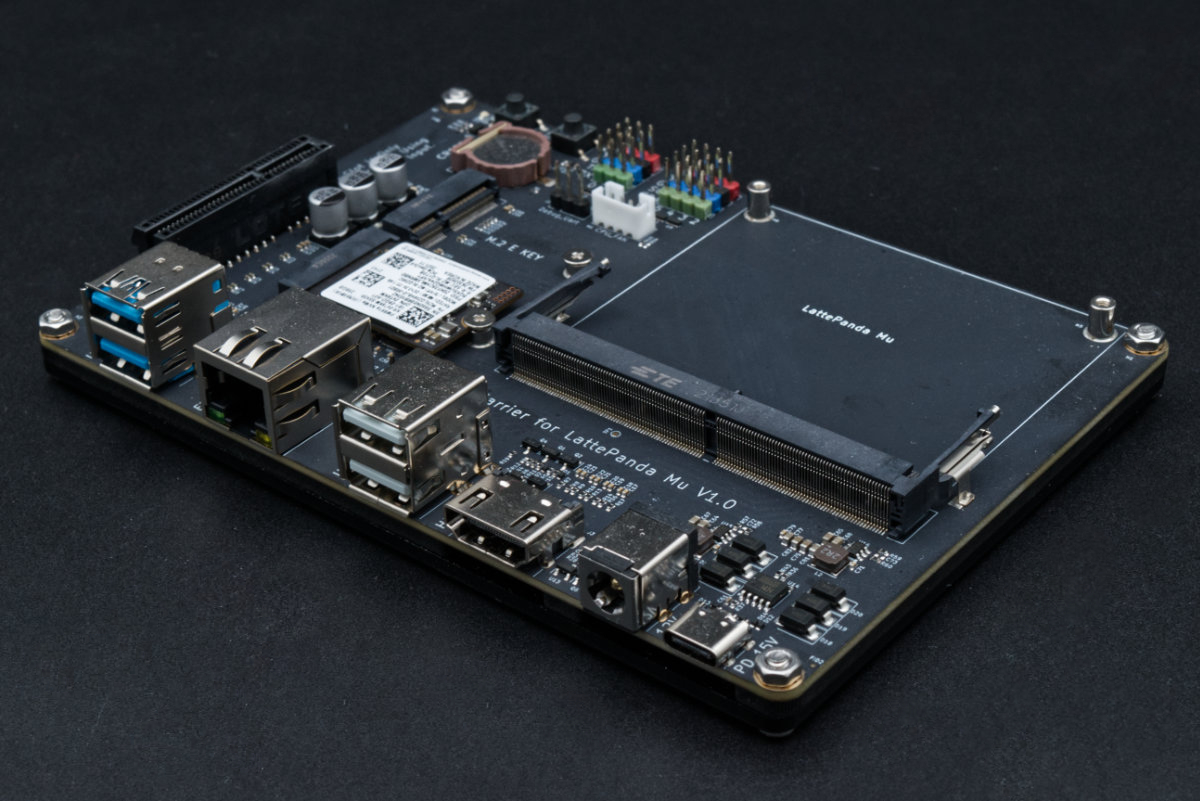
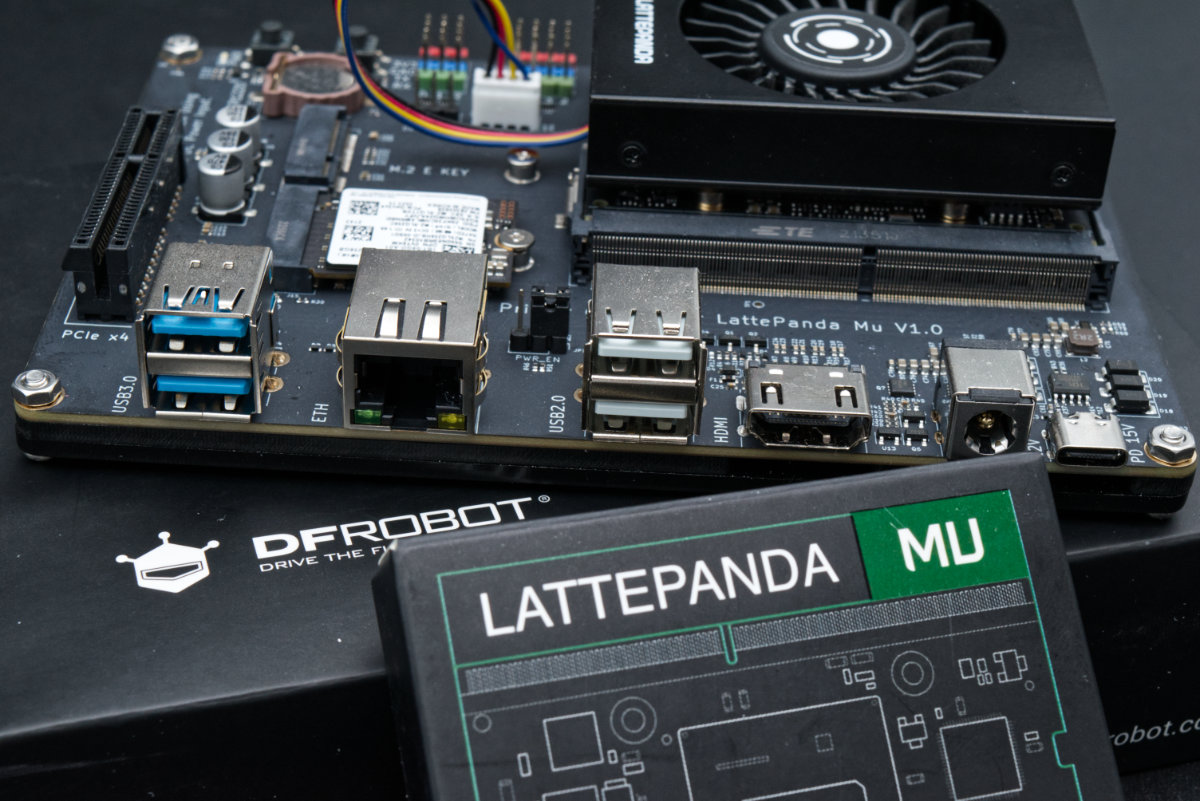
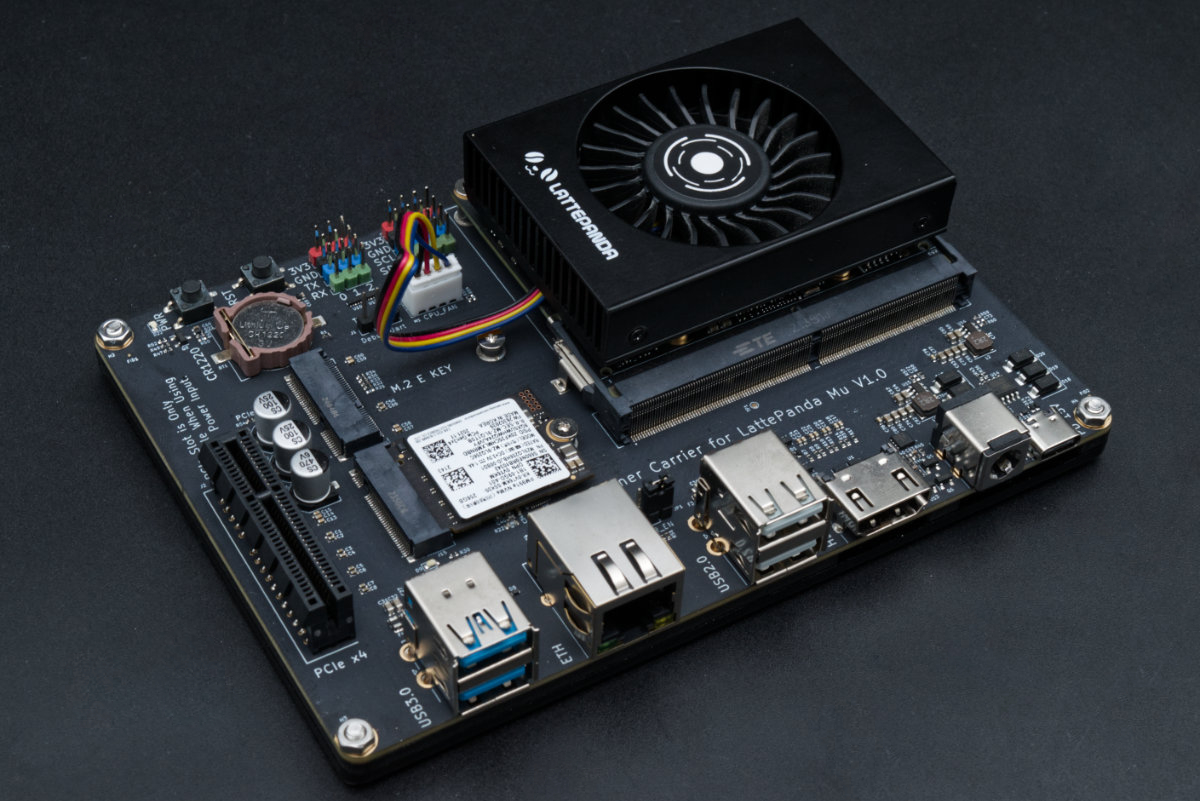
Unlike the adventurous carrier board ideas LattePanda’s showcasing on their website, the two official carriers, designed by DFRobot, are a bit more grounded. The $39 Lite Carrier Board is compact and SBC-like, and is about what you’d expect from a module carrier. It’s also the one that came with our review unit — so we can dig a bit deeper into its connectivity options and other features.
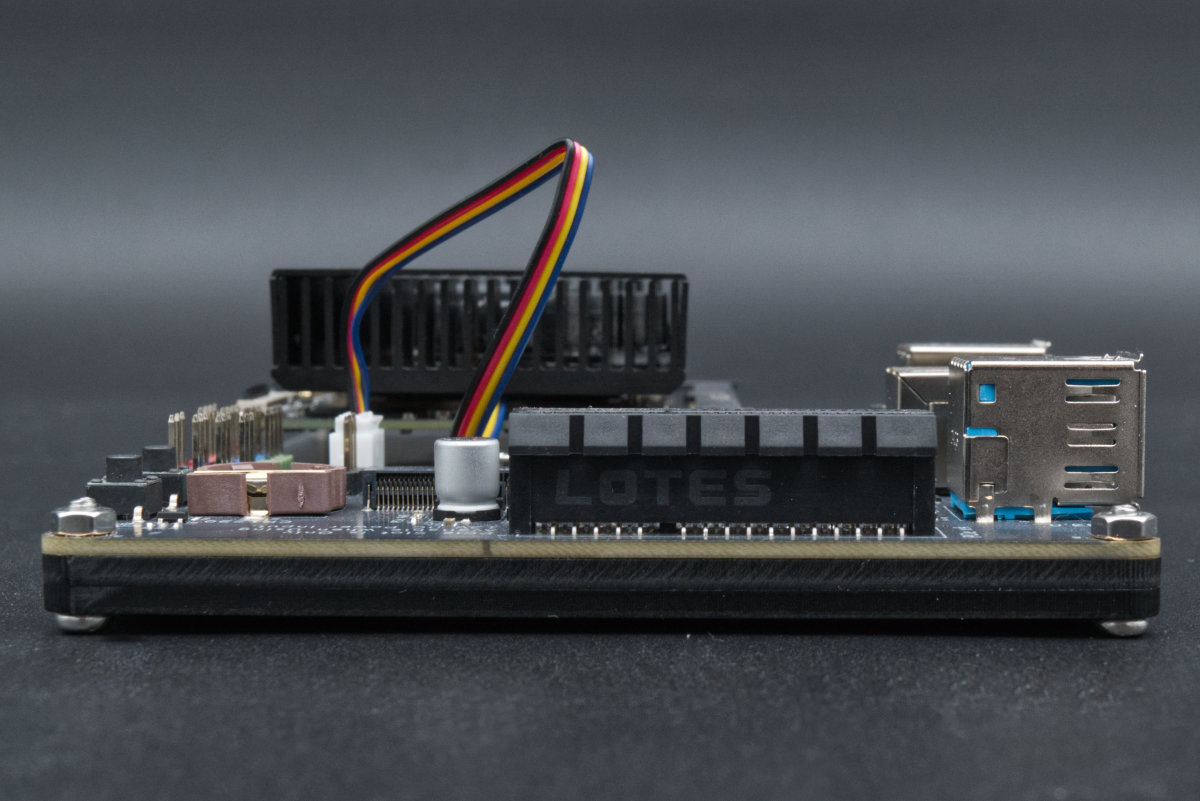
On the top right, there’s a slot for the LattePanda Mu module, immediately next to which is a set of three UART and four I2C four-pin connectors. A fourth UART connector is available below these and is used for accessing the debug console. Next to this debug UART is a four-pin fan connector — with PWM control!
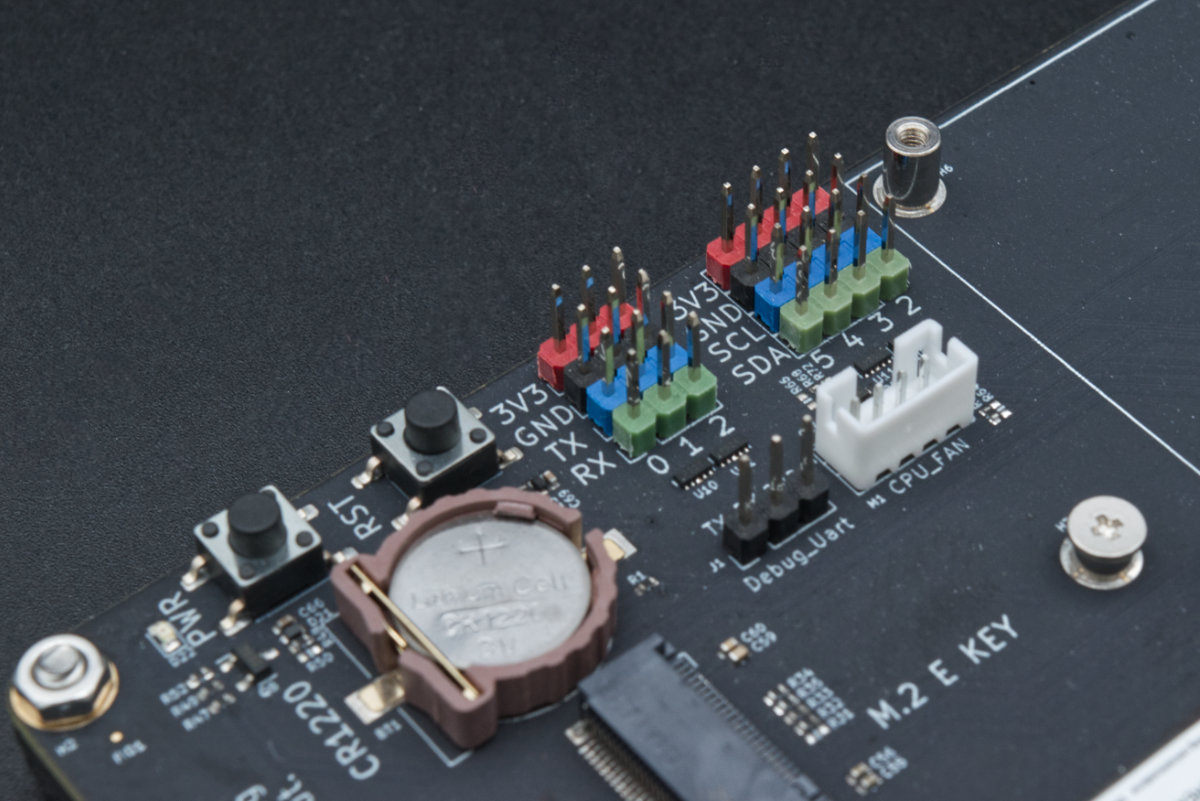
A reset and power switch also populate the top of the Lite carrier, as does an RTC battery holder. Right underneath it are two M.2 slots: an E-Key and an M-Key one. Oddly enough, both of these slots only have mounting holes for small 2230-sized devices. We get it, space was at a premium on this carrier, but keep this in mind if you’re planning on grabbing an SSD to go with your Mu. Longer drives will bump right into the module.
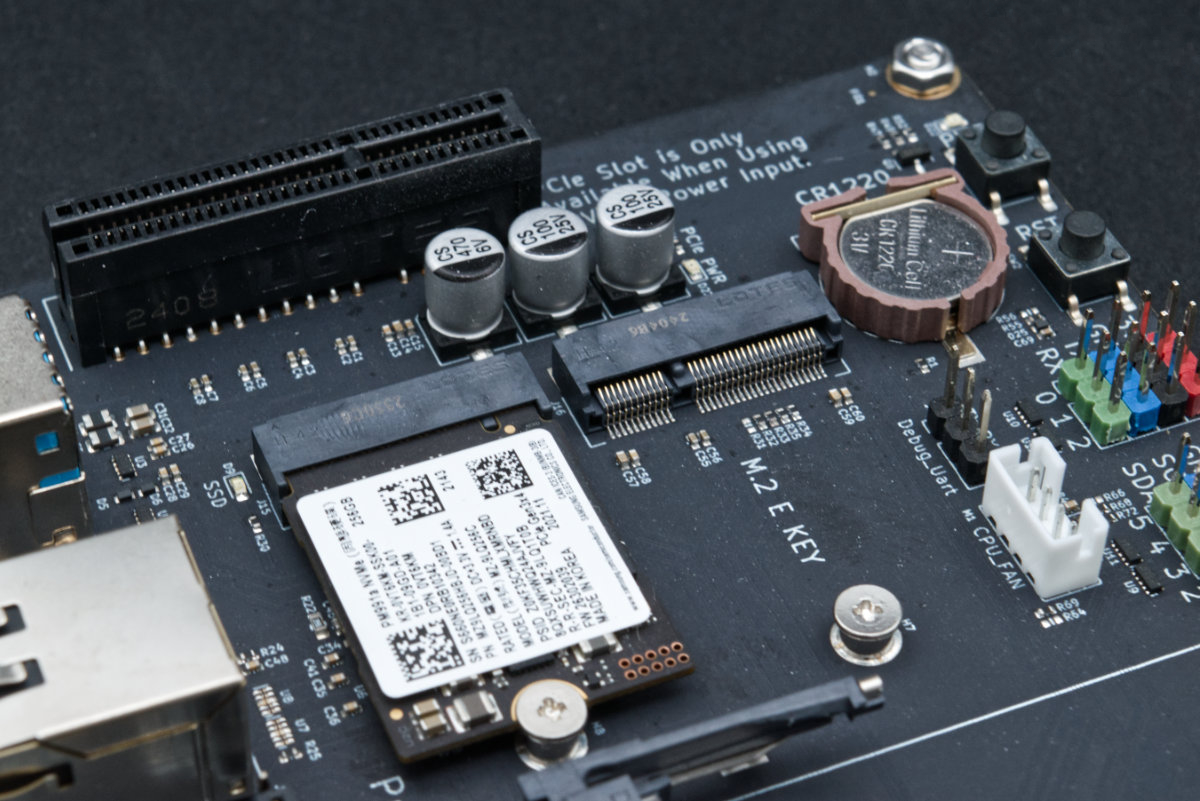
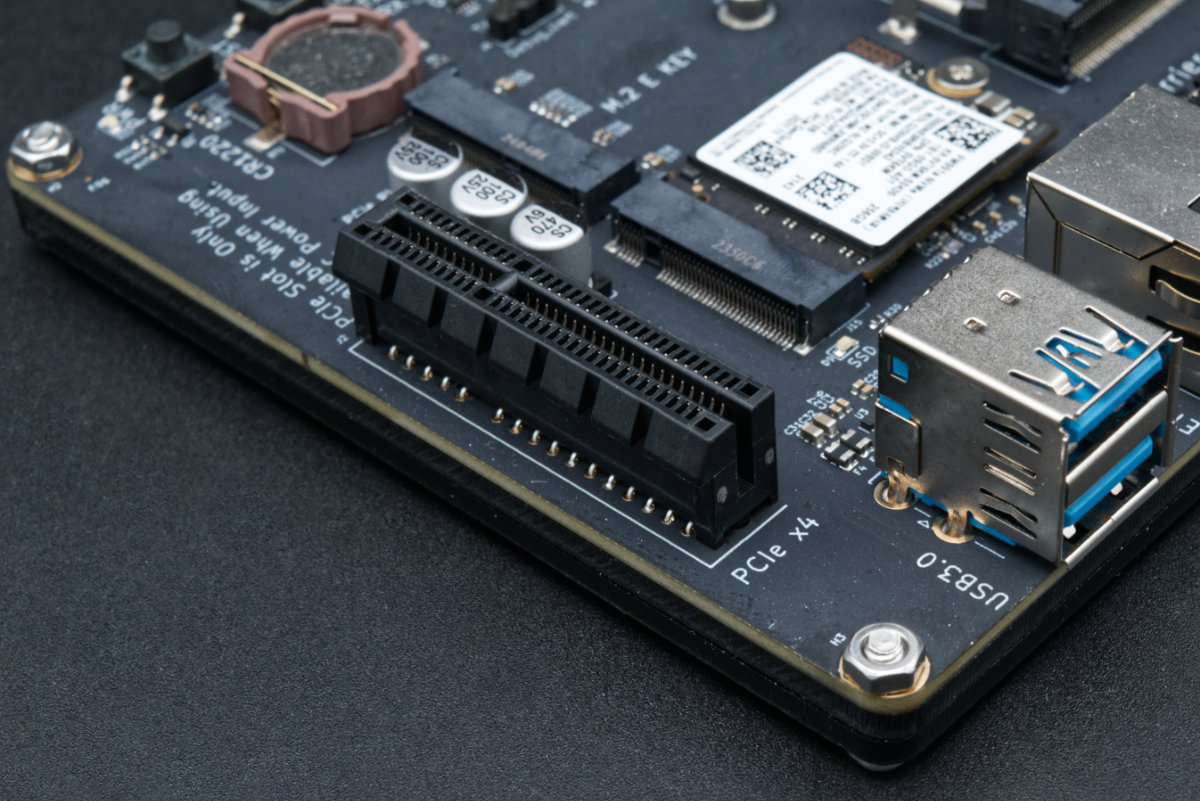
A bit rare for systems like this, there is a full-size PCIe 3.0 x4 slot on-board, which supports anything from graphics cards to network adapters — as long as you’re powering the board from the DC barrel jack.
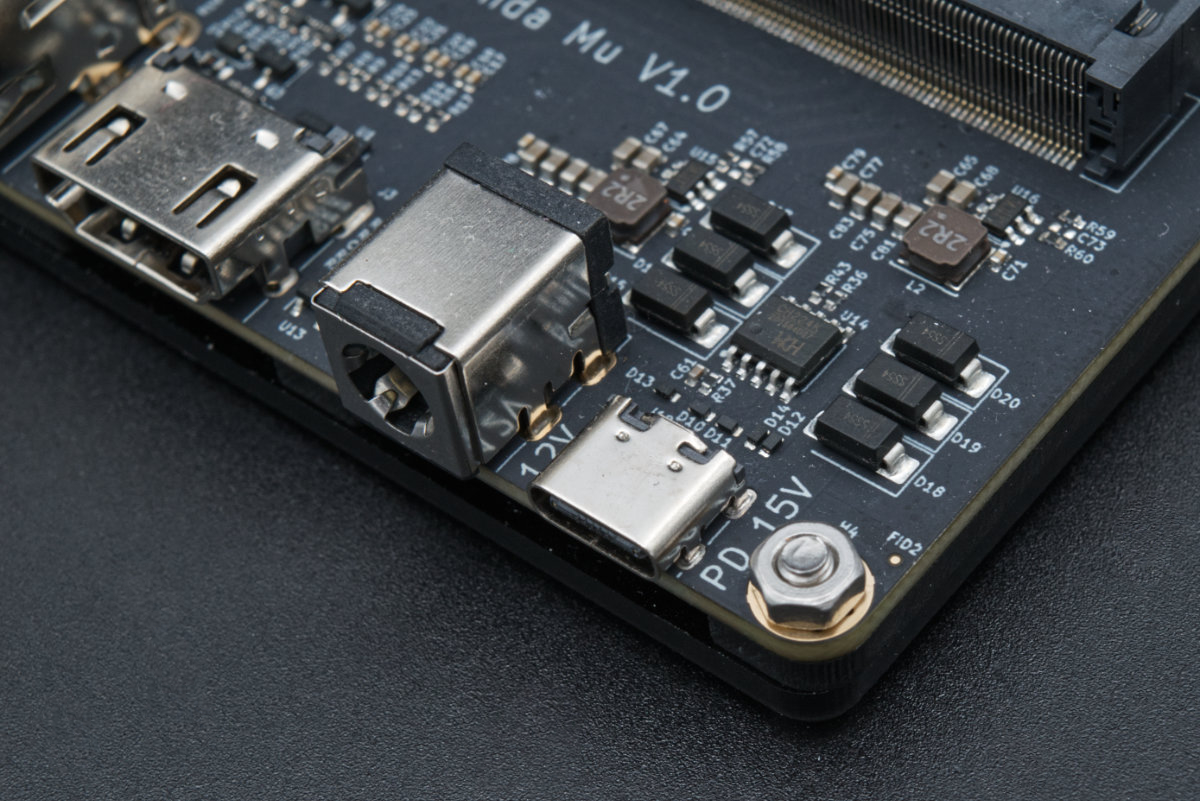
Now that we’ve mentioned powering the board, it might be a good idea to briefly cover the two ways in which it’s possible to power the system. The first, which we’ve already hinted at, is a 5.5 x 2.5 mm DC barrel jack. This input accepts 12-20 V and can draw a max of 10 A — but it’s highly unlikely you’ll be hitting the maximum 200 W unless you’re planning on installing a pretty power-hungry graphics card which gets power from the PCIe slot. On top of that, you’ll need to actually track down a 200 W DC power supply, which might be a bit more difficult (and expensive) than it seems. LattePanda’s official DC power supply is a 90 W one (19 V/4.74 A), which should be enough for most things you’re planning to throw at the Mu.
The other way to power the system is by using a USB-C PD power supply. There’s no official one on offer, so you’ll have to bring your own — but make sure it can put out 15 V and that it’s reasonably powerful. The official specs state a 3 A maximum power draw, which works out to 45 W over USB total. We’ve mostly been using a 96 W Apple Macbook charger (a bit overkill, we know, but at 15 volts it’s rated at exactly 3 amps), but we had luck with a 27 W Raspberry Pi power supply too.
Both the DC barrel jack and USB-C power connector sit along the bottom edge of the Lite carrier board.
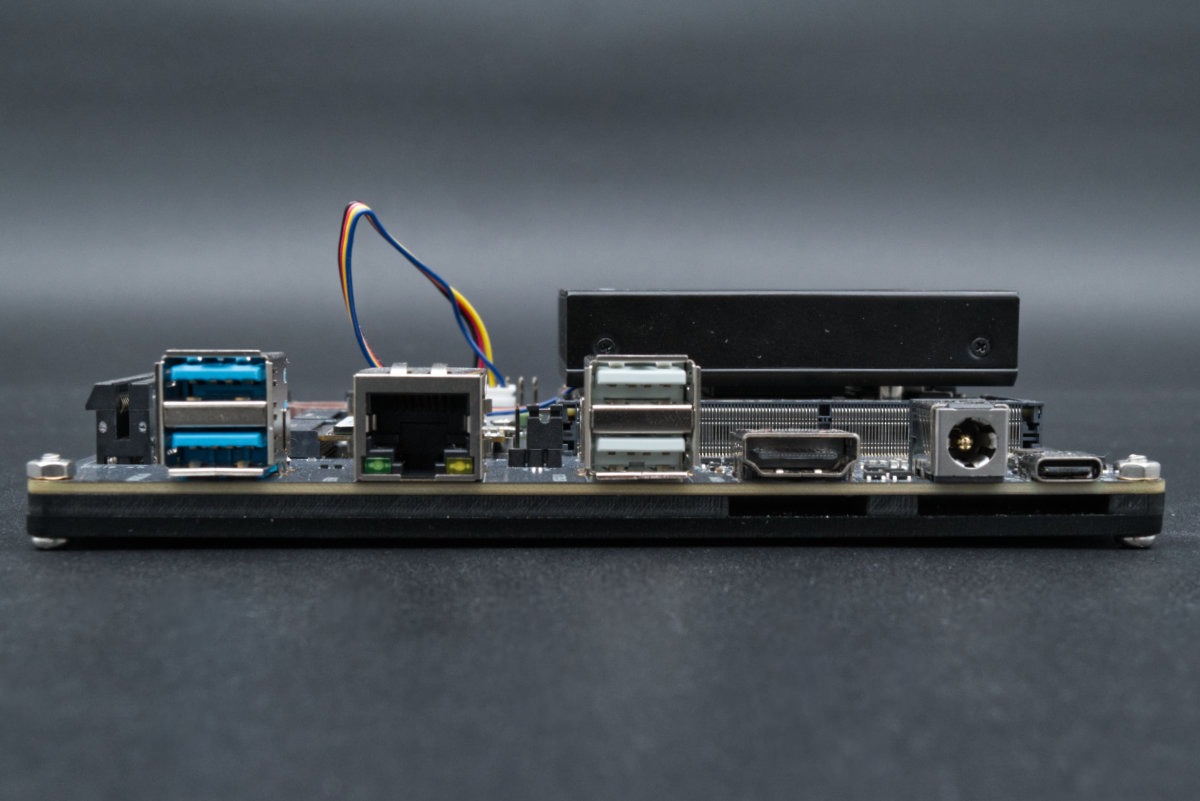
This edge also offers a selection of everyday ports. Left-to-right, there are two USB 3.2 Gen 1 USB ports, a gigabit Ethernet port, two USB 2.0 ports and a full-size HDMI 2.0 port. This is a pretty standard lineup, and is quite similar to what you’d get on a standard full-size SBC. We would have liked to see more USB ports overall (especially as the LattePanda Mu itself supports a whopping 12 total), or at least to have all four supported USB 3.2 ports made available. We understand that space was at a premium and that having USB 2.0 ports is valuable for development, but we still feel like having an all USB 3.2 setup would have been better for most people.
Oddly enough, the Lite carrier board lacks a 3.5 mm audio jack. We don’t know why it had to get cut, as there definitely was enough space. Apple would be proud.
DFRobot also offers an $89 ITX-sized Full-Function Evaluation Carrier Board (that’s a mouthful) which features a significantly more expansive IO set, featuring dual 2.5 Gbps Ethernet ports, a total of six USB ports, two PCIe slots (one x4 and one x1 one), two HDMI 2.0 outputs, two SATA connectors and dedicated 3.5 mm audio input and output. There’s also an additional robust DC screw terminal, an RS232 port, a SIM card slot and a vastly expanded selection of GPIO pins and other pin headers — including a header for an external TPM module, HD audio and front panel buttons. According to DFRobot, this carrier exposes all of the pins on the LattePanda Mu module and is as comprehensive as it gets. That checks out, however, keep in mind that there’s no USB-C PD this time around, so you’ll have to use one of the two DC power inputs — with this being the only feature absent on the Full-Function but present on the Lite carrier.
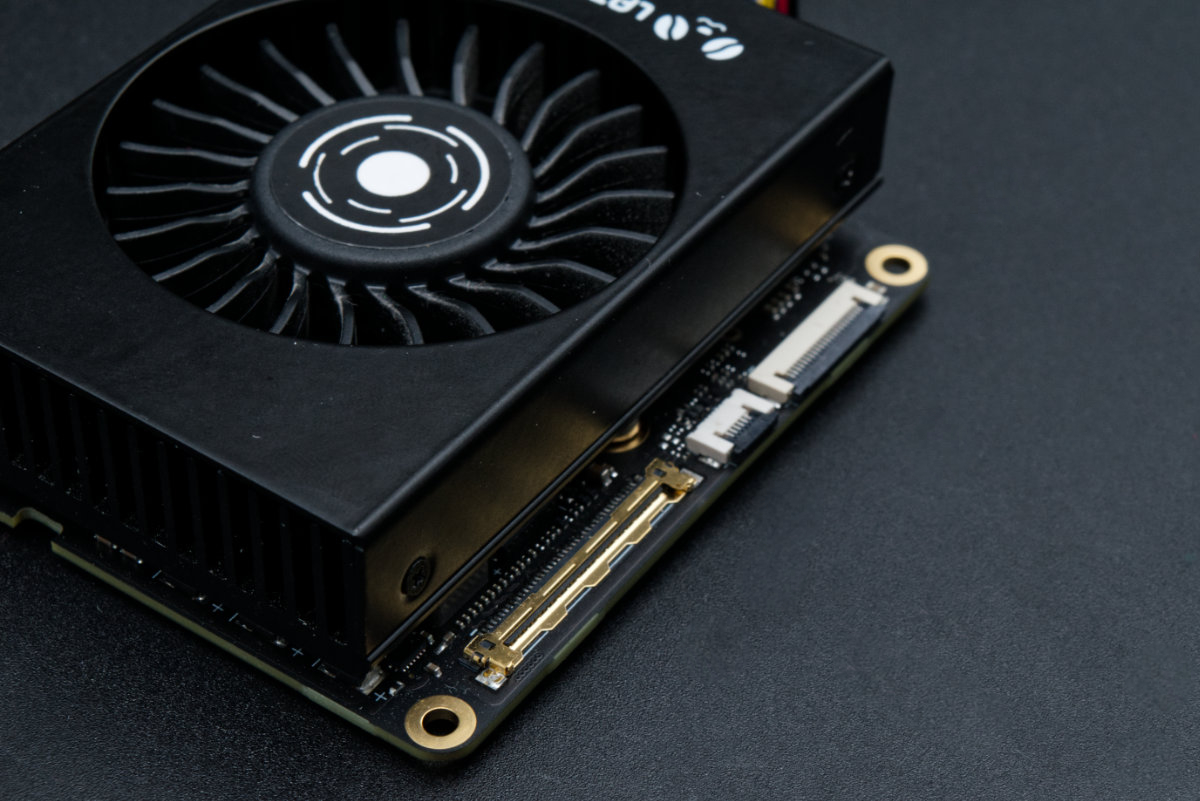
Both of these carriers come with no cooling solution of their own, but luckily DFRobot makes three models, depending on your intended application. Two of these are passive aluminum heatsinks meant for quiet operation in less demanding scenarios. Naturally, the $7.90 Tall model should thermally outperform the $4.90 Thin one, but the extra vertical space it takes up might not be acceptable to everyone.
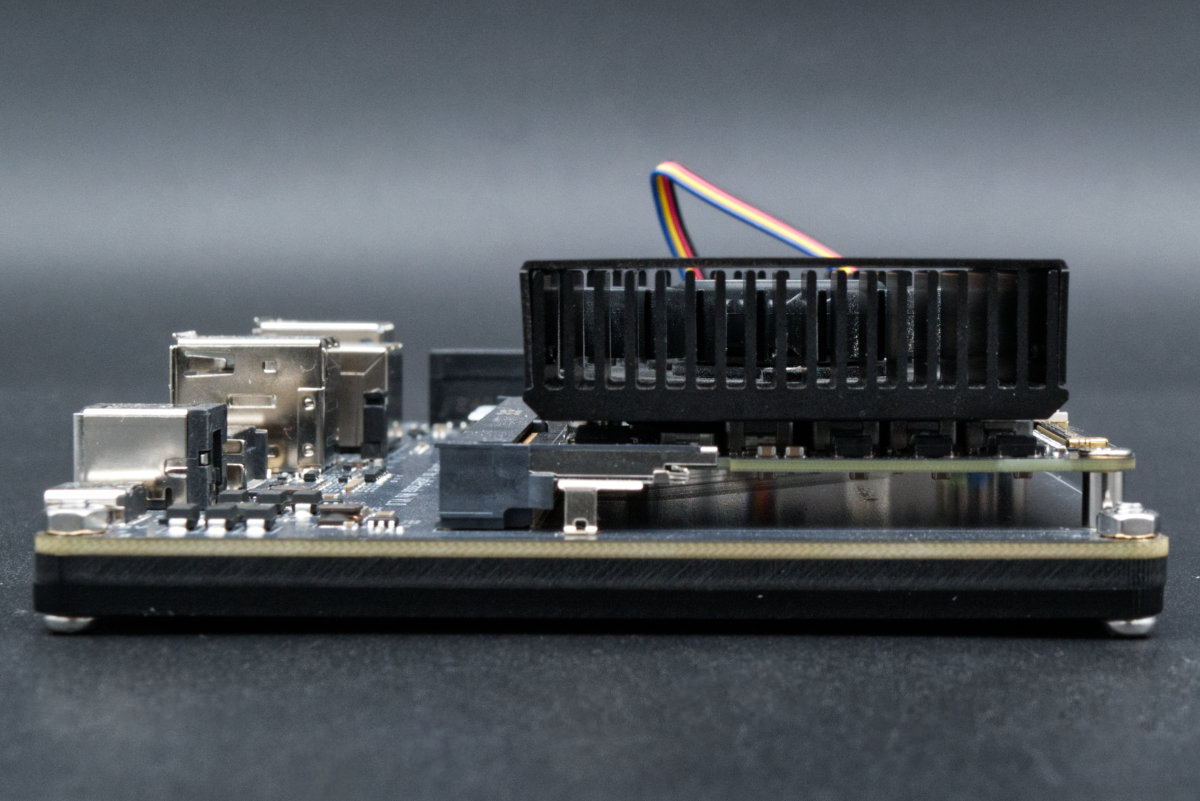
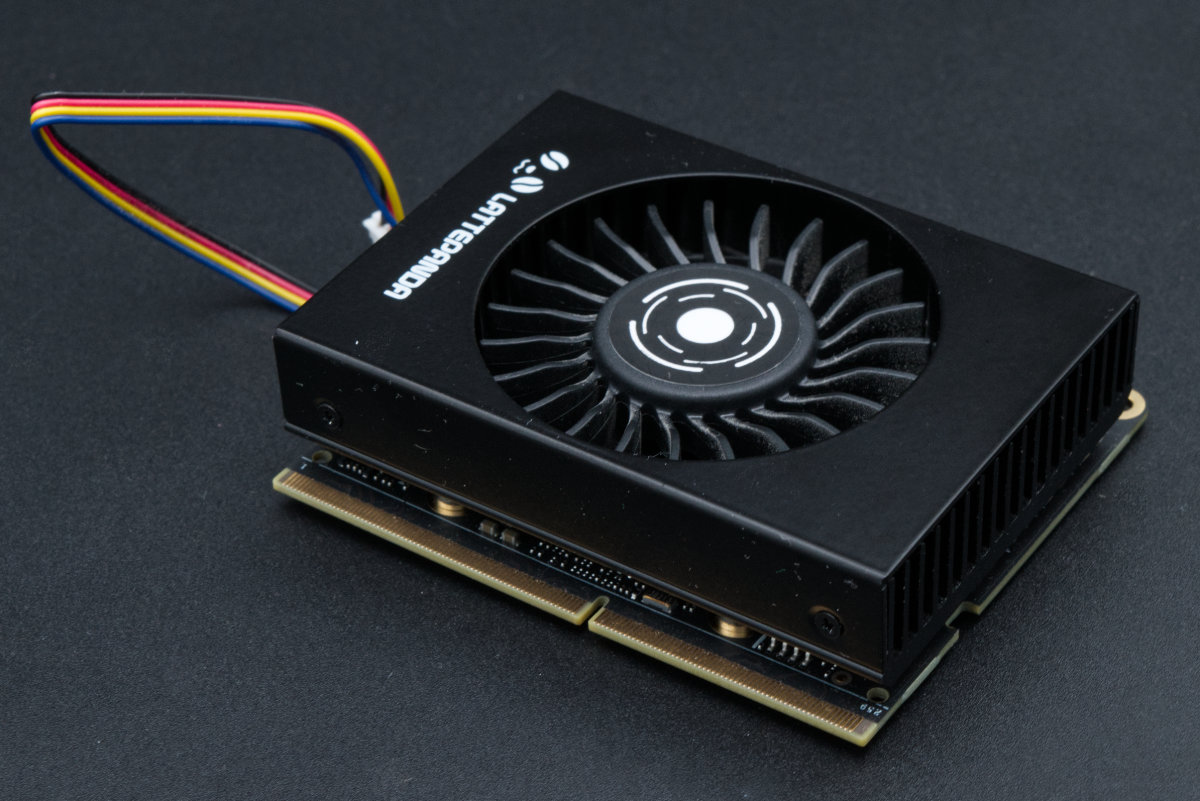
The final option, a $12 active cooler, is the most capable of the bunch and should keep the LattePanda Mu cool under all conditions. However, the tradeoff here is pretty obvious: active cooling isn’t silent, and this might be a total no-go in certain applications (remember that Korg synthesizer from the beginning of the article)?
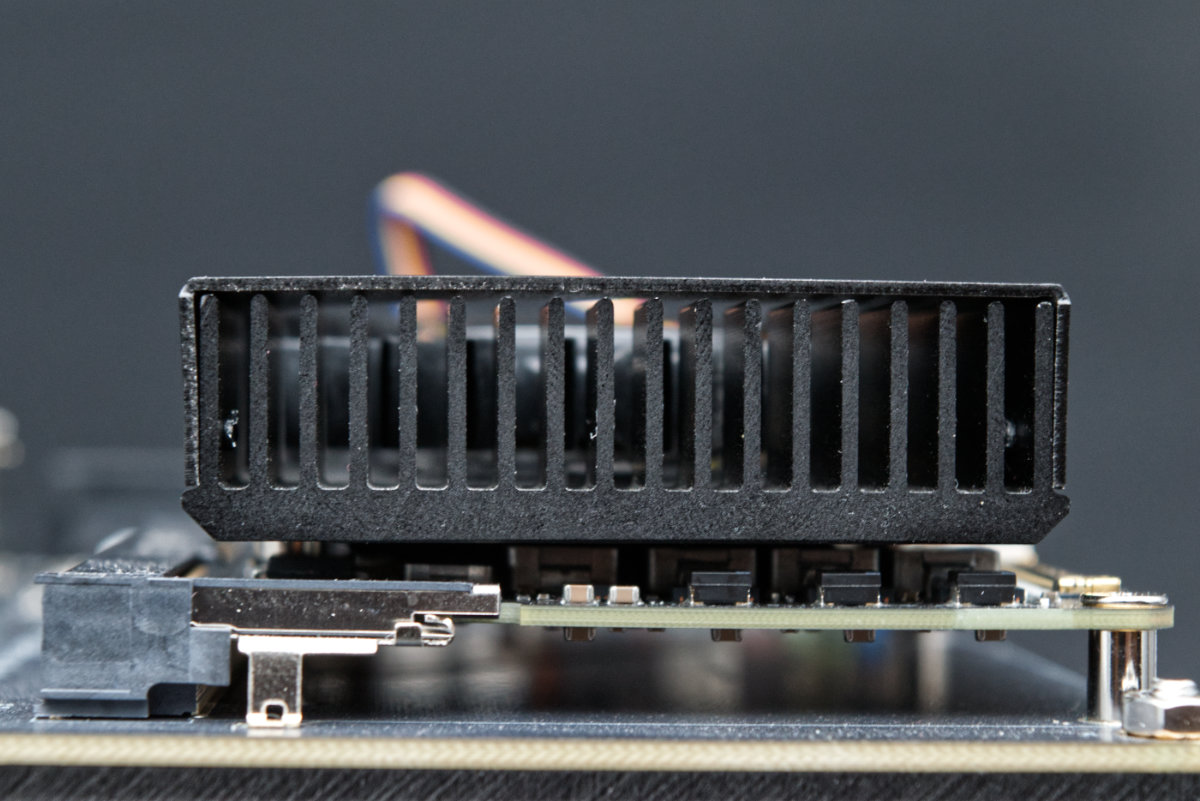
All three cooling options come with thermal paste pre-applied and are quite easy to mount onto the module using just three screws. Do note that with the screws fully tightened the module warps a little bit horizontally, which is obviously a bit worrying, but hasn’t caused any problems (yet) during testing and general use.
Look, feel and presentation
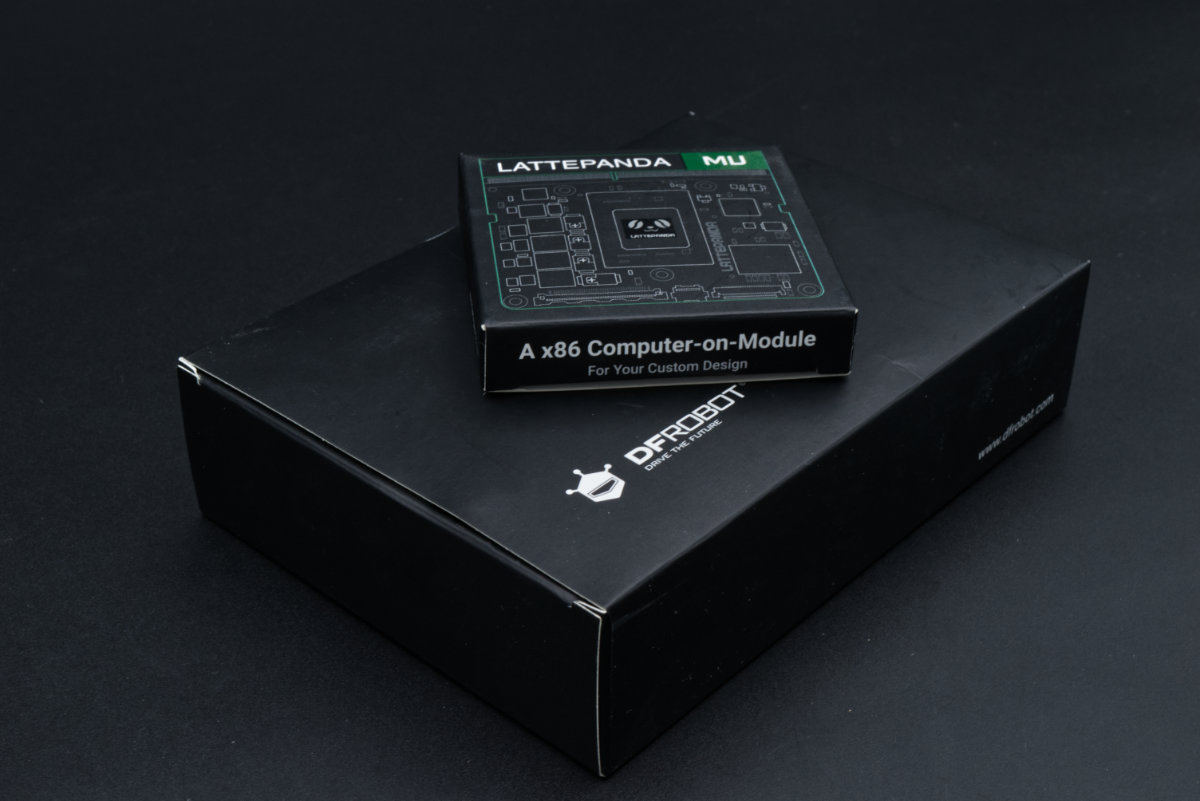
We have to admit, LattePanda always gets the look and feel of their gear and packaging right. It might seem like a minor thing, but attention to detail sells. In traditional LattePanda fashion, the Mu comes in a sleek black cardboard box with green highlights. There’s not a whole lot included: just the module itself and a small quick start sheet showing you how to mount a cooler.
The Mu module itself also feels pretty solid, with a clear and legible silkscreen, as is expected of LattePanda products. Granted, it’s a bit difficult to evaluate hands-on build quality of a module given the general lack of everyday ports and other interactive elements. It’s not a piece of you directly handle once mounted in place.
There isn’t as much thought put behind packaging of DFRobot’s carrier boards and other accessories, but that’s not to say that the plain textured black boxes these come in aren’t presentable. Still, we do wish there was a LattePanda Sigma-style boxed kit for the Mu, containing the module, a carrier, a PSU and a cooler — essentially a similar package to the Jetson Developer Kits.
Now, all of the accessories themselves feel great. The ports on the carrier boards are solid, the heatsinks feel substantial and durable and the fan on our active cooler is very quiet most of the time. We’re intentionally saying most of the time as it does have a tendency of getting a bit noisy, perhaps due to the physical design of the heatsink and the short air intake path. It’s not so much the volume itself that’s noticeable, as is the sharp whoosh that comes (and goes) surprisingly fast as the fan picks up speed. You get used to a fan that’s consistently loud, but it’s considerably harder to get used to one that goes from being inaudible to quite audible a few times within ten seconds.
Whooshing aside, the active cooler actually does a great job at keeping the LattePanda Mu cool (more on that in the benchmarks section), so we can’t complain too much. We wish we had one of the passive heatsinks on hand to check out if they are a viable alternative in medium-to-heavy workloads, but for now that’ll have to wait.
LattePanda Mu performance and benchmarks
Whew — with all of the specs out of the way, it’s finally time to get to checking out some performance figures and also putting some of the specified claims to the test. How well does the Intel Processor N100 perform in general? Is there a performance penalty to using IBECC? How does the performance correlate with TDP, and how much power does the system exactly draw?
We’ll be comparing the LattePanda Mu with the N5105-based LattePanda 3 Delta. As it’s been quite a bit since we’ve reviewed the 3 Delta, we’ll fill in the gaps with results from the Youyeetoo X1, another N5105-based system with essentially identical performance. We’ll be sure to label which set of benchmarks we’re drawing results from in each test.
We’ll also be comparing the LattePanda Mu with the Raspberry Pi 5, as well as the RK3588-based Orange Pi 5. These are some of the finest ARM-based SBCs on the market right now, and it’s interesting to see how all four (well, five) of these boards stack up.
We ran all of the following tests on Ubuntu 24.04 LTS with Linux kernel 6.8.
CPU and RAM
The LattePanda Mu scores quite well in Geekbench 5, with a 1062/3025 single/multi-core score. This is a marked improvement from the LattePanda 3 Delta’s 685/2051 result. While we expected the Mu to beat the Raspberry Pi 5, we weren’t quite sure it’d overtake the beefy RK3588. Well — the N100 does what the N5105 couldn’t, and delivers around ~20% better multi-core performance.
Geekbench 6 results tell mostly the same story, with the LattePanda Mu leading the pack with 1237/3288 points in the singe/multi-core tests. Instead of the 3 Delta, we’ll have to look at the Youyeetoo X1 for this test, which scores just 533/1553 points. The Raspberry Pi 5 and Orange Pi 5 are where you’d expect them, though the gap between the Mu and the Orange Pi is much smaller this time around. This is likely due to Geekbench 6 being more optimized for heterogeneous processors than its predecessor.
Now, we’ve said our two cents on Geekbench 6 before and the decision to change the way multi-core tests work by sharing a single workload over multiple threads instead of starting multiple instances of the workload. This makes sense for consumer-oriented systems, as it’s often how user-level software runs. However, many server and embedded applications rely on running a large number of simple threads in parallel. This is why we still keep the older Geekbench 5 around, as we feel it more accurately models real-world performance in quite a few scenarios.
As a side-note, we want to mention that LattePanda’s marketing material claims a 1217/3115 Geekbench 6 result. We’re happy to say that checks out!
The next test in our lineup is the Sysbench CPU test. This test relies on simple operations and mostly relies on pure clock speed and core count, so its scores translate well across architectures. The LattePanda Mu does well, delivering a 1299.67/4416.6 single/multi-core score. This is, however, where the Mu’s lead ends. Due to the nature of this test, the RK3588’s finds strength in numbers. Its eight cores simply crunch more numbers than the N100’s four, as is evident in the Orange Pi 5’s excellent 968.2/5301.4 result. The Raspberry Pi 5 also does a surprisingly good job here, coming quite close to the LattePanda Mu, and is even capable of surpassing its score when slightly overclocked. If you’re interested, you can read our guide on overclocking the Pi 5 here.
Unixbench scores mark a return to form for the LattePanda Mu. A 1657.7/4728.1 single/multi-core index score is pretty great and above all of the other options in our little comparison. Granted, we’ve seen some RK3588 boards get a multi-core index score of ~4840.7 (Radxa Rock 5A) and some outliers even reach up to an impressive ~5900 (NanoPi R6S/6RC) — but this seems heavily dependent on the OS environment.
Interestingly, we got a shockingly low system call overhead score during every single run on the LattePanda Mu (lower than even on the Youyeetoo X1). We immediately suspected thermal throttling, and while the system did hit 90 °C during multiple multi-core UnixBench tests, it showed no signs of actually dropping the clocks. Additionally, the single-core score for this test was also low, and the CPU temps were comfortably in the mid-70s during single-core runs. Software issue?
Let’s get to encryption performance. In the past, we’ve seen Intel’s AES-NI extensions generally outperform ARM’s hardware encryption accelerators. The LattePanda Mu is the clear winner here, and is surprisingly quite a bit faster than the N5105, which itself trades punches with both the Raspberry Pi and Orange Pi.
RAM performance is a bit stunted, as expected from the specs. Sure, it’s a bit faster than on the 3 Delta, but we already had some gripes with it there. What’s a bit disappointing is seeing the Orange Pi 5 comfortably beat the LattePanda Mu. On a bit of a brighter note, we see a multi-thread score of 20999.46 MiB/s according to the Sysbench RAM test, or around 22 GB/s. Not quite at the theoretical bandwidth limit — but close enough for a benchmark.
Tinymembench sees even the Raspberry Pi 5 scoring wins in certain tests, which was quite surprising. Nevertheless, we can’t complain too much about it as it really isn’t LattePanda’s fault.
Regarding RAM, we also have to check out how much of a performance penalty there is to enabling IBECC. After all, we’ve talked so much about it and we do think it’s an exciting feature.
Enabling IBECC isn’t as straightforward as we’d have liked. After trying desperately to locate the setting to enable it in the stock BIOS, we finally stumbled upon the LattePanda Mu GitHub page explaining that a beta BIOS version was required for that. Sure — we grabbed the beta .bin file, but then what? There was absolutely no documentation anywhere about how to get in installed. After a lot more digging around, we found the Windows-based AfuWin64 tool. Its GUI was pretty handy, and even though we were unsure what all of the boxes on the screen did (again, no documentation of any kind), scrambled our way through and managed to update the BIOS.
Now, BIOS is the last thing you should be touching when you’re unsure what you’re doing — and we were absolutely driving blind here. And as you can probably guess, that first reboot after the update was extremely stressful. We were just waiting for something to go horribly wrong, but alas, it was all good. And finally, under Advanced > OEM Settings, we found the shiny Enable In-band ECC option. Yay! Click.
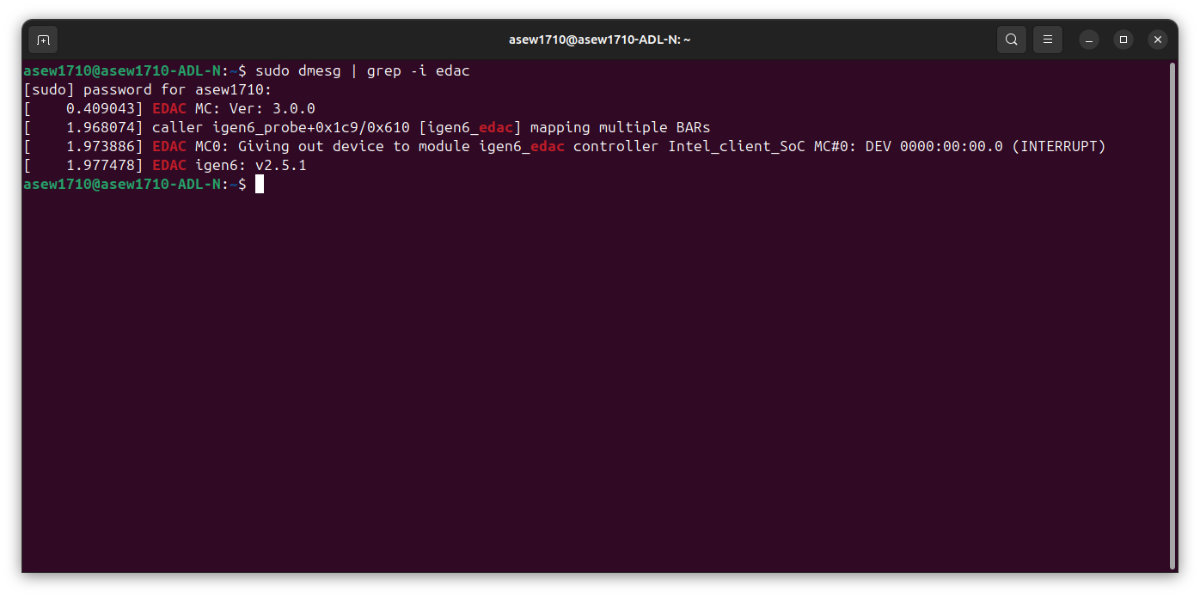
After we booted back into Ubuntu (which also took a little extra work since the beta BIOS version really didn’t feel like finding the Ubuntu installation), we immediately ran a quick:
sudo dmesg | grep -i edac
to check whether IBECC had truly been enabled. Success! We were up-and-running, and it was time to run some benchmarks.
We’ll keep it simple and just use the Sysbench RAM test once again. A single-threaded run returned a score of 8260.22 MiB/s, which is a drop of around 20%, while the multi-thread test returns 14252.91 MiB/s. The latter result fluctuated widely, and we had certain runs deliver scores as low as 9000 MiB/s. Whether this is a memory controller limitation in generating or tracking ECC codes, software issue or something else, we can’t quite tell. Still, it seems that performance losses of roughly around 20-25% are present across the board.
Just to make sure the degradation wasn’t related to the beta BIOS version, we went ahead and disabled IBECC before retrying the benchmark. The scores returned back to normal.
What’s our verdict on this? Honestly, we thought the performance difference would be a little smaller, and more in the 5-15% range. Perhaps a future BIOS revision, once the feature is out of beta, will bring better optimization. The already mediocre RAM paired with yet another performance hit simply isn’t the dreamiest combo out there, but in applications where stability is key, it can be justified. Would we prefer keeping IBECC on for daily use? No, absolutely not. But for a crucial edge IoT node which simply cannot afford to fail? Ideal.
Next, let’s check out the Octane 2.0 score. It’s an old, web-based test, very reliant on the underlying OS and other installed software. However, it’s surprisingly great at predicting how snappy a system feels during general use — and as one of the first tests we’ve ever selected for our benchmark lineup, it’s valuable for comparing numbers with some of our oldest reviews.
The LattePanda Mu gets a nice 51560 points here, putting it comfortably above the N5105-based systems. Octane seems to prefer x86 CPUs to ARM-based ones, so it isn’t as fair cross-comparing these — but taken at face value, the numbers show the Mu outperform both the Raspberry Pi 5 and Orange Pi 5.
Overall, we’re satisfied! Raw CPU performance is quite excellent here, and we’re especially happy with the Geekbench results. However, the RAM is a pain point of sorts — definitely serviceable, but far from ideal.
GPU
For GPU testing we primarily use two Linux-based tools: glxgears and glmark2. And while our journeys with ARM chips and benchmarking their graphical performance have often been filled with epic stories of locally compiling semi-broken drivers and praying to whatever deity seemed interested in answering software-related prayers on a given day, Intel chips seem to (disappointingly) just work. Almost equally disappointingly, however, Intel seems to have downgraded the GPU a little from the one found in the N5105.
We were immediately surprised by the glxgears score, with the N100 managing 7018 FPS and the older N5105 managing 7324. While this might seem like a tiny difference, it does roughly correlate to the ~6% frequency decrease — the N5105’s iGPU was clocked at up to 800 MHz, while the N100’s sits at 750 MHz.
We got another very similar set of scores from glmark2, with the N100 getting 2213 points and the N5105 getting 2364. Another set of scores almost exactly 6% apart? Go figure.
Of course, both of these results are better than those of both the Raspberry Pi 5 and the Orange Pi 5 — so if ARM boards aren’t quite cutting it for you in terms of their graphical performance, the LattePanda Mu could be a great pick.
Storage and IO
Let’s move on to storage performance, starting with the built-in eMMC drive, hdparm returned a read speed of 316 MB/s. This is quite a good number, putting the LattePanda Mu up there with the fastest SBCs. As a rule of thumb, any eMMC result above 300 MB/s is solid.
Our tiny Samsung PM991a NVMe SSD (yeah, shocker — we can’t use our traditional Kingston NV1 as it’s 2280-sized) reported back 904 MB/s read speeds using the same tool. Even though the drive is rated at up to 3100 MB/s, the Lite carrier’s M.2 slot exposes only a single PCIe 3.0 lane, so it’s a number we expected.
We also tested USB port speeds with Gnome Disk Utility’s benchmarking tool. USB 2.0 ports reported a 43.8/1.6 MB/s read/write speed, while USB 3.2 Gen 1 ports reached an excellent 1024/965.1 MB/s read/write. That’s pretty much all in spec, as you’d expect from a LattePanda board.
Power draw and thermals
Intel states that the N100’s TDP is 6 W. We already hinted at this being a little misleading to users for a reason — most people see this number and think it’s the processor’s power consumption. It’s closely related, but not quite the same thing.
See, we generally always use an in-line power meter when we test hardware, just so we can keep an eye on power usage. This is where we saw the first discrepancy — the LattePanda Mu with its carrier board drew 26 W during one of the benchmarks!
This would mean that, if we were to take the 6 W figure at face value, the rest of the board’s hardware somehow guzzles 20 W, which is highly unlikely. We had no power-hungry peripherals plugged into the board except an NVMe SSD, and even that could only account for a couple of watts at best.
Even more confusing was LattePanda’s website claim of the processor’s TDP being configurable between 6 and 35 watts. Where on Earth does the 35-watt figure come from? Overclocking?
Well — we had to dig deeper if we wanted to get to the bottom of this. For starters, Intel’s website does not specify the base clock for the N100, instead only mentioning the 3.4 GHz max turbo frequency. This is, of course, a single-core turbo, with all four cores generally maxing out at ~2.9 GHz.
This lack of data is problematic as Intel always defines their TDP at base clock, formally defined as the frequency a CPU is likely to spend most of its time under normal conditions. However, for years most Intel processors have featured Turbo Boost Technology which allows them to run at significantly higher frequencies than base for as long as a power or temperature limit isn’t being hit. In fact, this is the preferred state — modern Intel chips will opportunistically try to turbo boost, and will rarely ever drop all cores to their base clocks, even when idling. Naturally, this makes the processor draw extra power to keep up.
So, it’s clear that TDP has little to do with actual power draw of processors. In the case of the N100, we’ve measured a sustained CPU power consumption of 13.5 W during an s-tui stress test. Does this mean that Intel is lying? Not exactly — as TDP is a thermal metric at the end of the day (remember: thermal design power) and is a measure of how much heat the processor dissipates. And while it’s true that TDP and power draw often line up, as processors essentially turn all of the energy they draw into heat (after all, from an energy standpoint, computation is just heat generation), the purpose of a TDP metric isn’t to represent peak dissipation (which would correlate with peak power draw), but to define baseline dissipation capability required of a cooling solution.
Think of it this way — it would be very difficult to work a 150 W TDP chip into a thin-and-light laptop. A thermal solution small enough to fit a portable device of this size yet capable of consistently dissipating 150 W of heat for such a processor would be quite a feat of engineering, so the TDP metric is a useful tool for OEMs to assess design viability. On the other hand, a 45 W TDP chip is well-suited for such a device, as its cooling requirements are much more modest. This is not to say, however, that the 45 W chip won’t ever dissipate more heat (and draw more power) than that — in fact, it’s quite likely to spend a significant amount of time doing just that, turbo boosting for as long as the thermal solution can keep up with the extra heat.
But even a modest thermal solution eats up valuable space, so in portable devices it’s matched to the processor’s TDP with little to no headroom, which is (along with dust buildup, naturally) often the reason why laptops tend to overheat under prolonged heavy loads. Thermal throttling is a way of ensuring the processor stays under its TDP, allowing the overworked thermal system to return the processor to a safer temperature.
In desktop systems where there’s a lot more space to go around, thermal solutions provide significantly more headroom, which is why you’re a lot less likely to encounter thermal throttling there.
There’s a lot more science involved in generating and dissipating heat which we won’t get into, including the fact that heat dissipation efficiency varies with temperature. At the end of the day, no matter how much power a processor draws, Intel guarantees that a cooler rated at the same TDP as the processor will suffice at keeping the chip running at base clock, and any extra thermal headroom just helps the processor boost more ambitiously.
This is exactly where PL1 and PL2 settings come into play, as does LattePanda’s 6-to-35 W TDP claim. These settings are accessible from the BIOS and define the default power draw at low loads and while turbo boosting, respectively. By setting PL1 to 6000 and disabling PL2, it’s possible to limit the N100 to drawing just 6 W or less. This enables much cooler operation and is the intended setting for when passive heatsinks are used. Naturally, the tradeoff here is performance. We’ll get back to this in a second.
The 35 W figure is suspect, as we found no way to overclock the N100 in the BIOS, and no way to make it draw more than ~20 W (30.1 W measured at the wall for the whole system) with both the CPU and GPU stressed. And trust us, we tried. The only real difference we saw getting the PL1 and PL2 values way up was that it stopped the CPU cores from throttling during intense graphical loads.
That 30.1 W result had us considering the option that this number was supposed to represent the maximum power draw of the LattePanda Mu module together with the carrier — much like that 26 W figure we got at the beginning — but it makes no sense then to name such a value TDP.
When we asked around in the LattePanda community, we caught wind of an Intel Core i3-305N variant of the LattePanda Mu in the works. Looking at the specs of that chip, the 35 W power draw could be quite accurate for an i3-305N running at its full 3.8 GHz. Does this blooper mean that both of the configs were supposed to be released at the same time? Were there some last-minute design changes that pushed back the more powerful module? We’ll have to keep wondering for now.
Whew — was that a second tech rundown over the course of the same review? With that out of the way, let’s restore original BIOS settings and check out the power usage and thermal performance of the system.
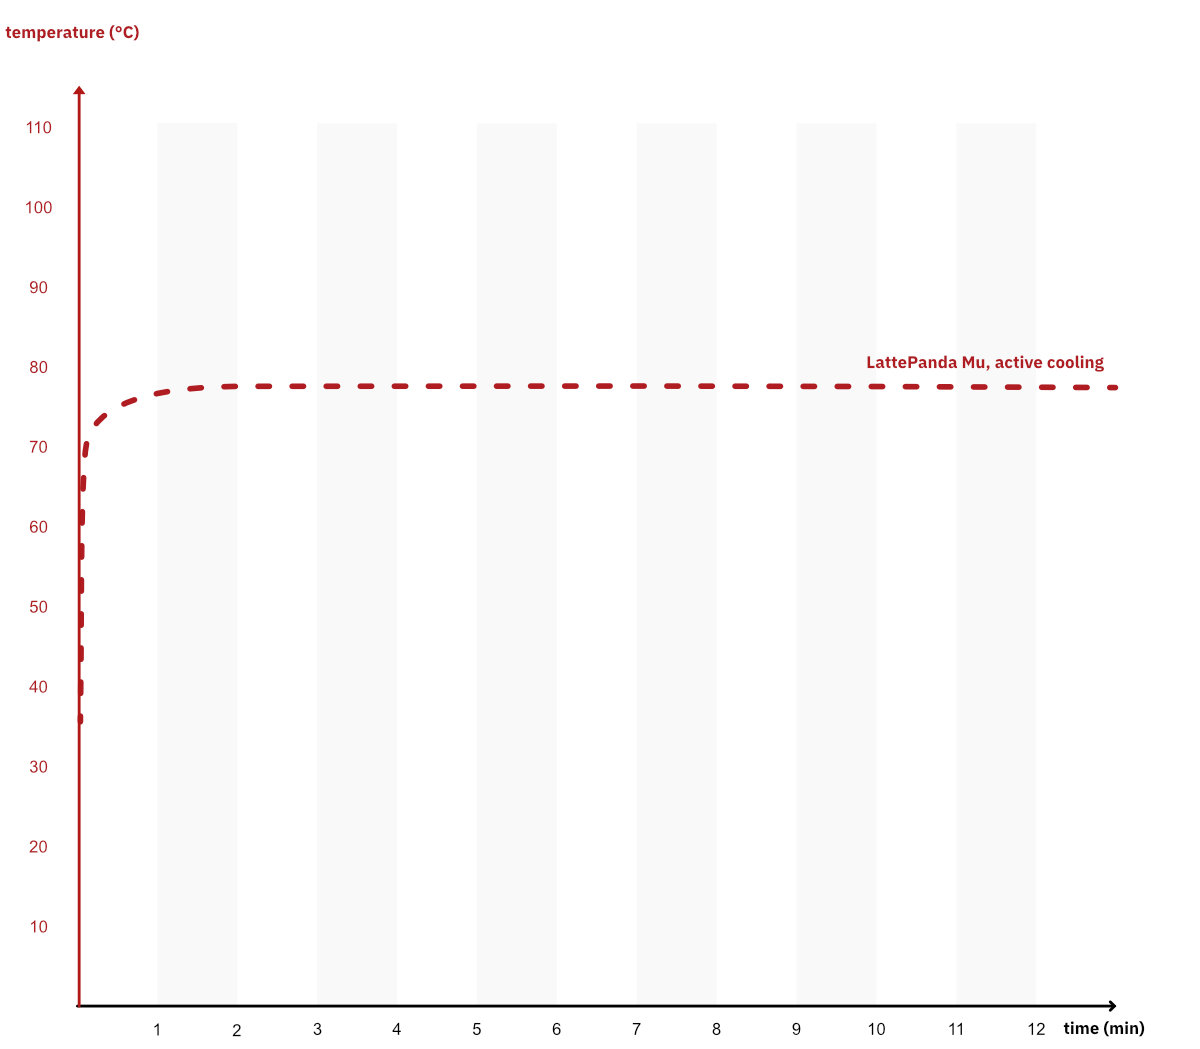
The active cooler manages to keep the system pretty cool even under load. In our thermal stress test, using s-tui, we never saw the processor exceed 78 °C, even though it did hit this limit relatively quickly, settling within two minutes. The fan governor is quite trigger-happy, and tends to enthusiastically whir up the fan before immediately slowing it down as soon as the temperatures drop even slightly (and perhaps that’s part of the reason the fan noise is so annoyingly inconsistent at times).
Our ambient temperature during the test was a bit high, at 27 °C, with idle system temps in the mid-30 °C. Still, we noticed no thermal throttling whatsoever, with clocks firmly set at 2900 MHz. A good result overall!
We saw slightly higher temperatures, up to 85 °C, while pushing both the CPU and GPU. This was observed during our TDP-related tests above, and we weren’t exactly keeping track of timestamps, so we can’t provide a graph here. It’s just a data point to keep in mind — the chip can get toasty at times.
When idle, the N100 draws around 3.6 W, with the entire board drawing around 7 W. Since we measured full-board power draw at the wall, a ~90% power efficiency of the switching-mode PSU should be taken into account. This works out to around 6.3 W for the board after losses get accounted for.
Under heavy CPU load, we’ve seen the processor draw 13.5 W, with the whole board drawing around 21 W. Again, adjusted for PSU efficiency, we get a result of 18.9 W.
While pretty efficient for an x86-based system, it’s nowhere near as efficient as ARM-based boards. The Raspberry Pi 5 draws only 8.9 W under full load, and the Orange Pi 5 Plus (yes, that Plus isn’t a mistake — we don’t have a power draw figure for the regular Orange Pi 5, but it’s essentially the same between the two boards) isn’t much more demanding at 9.9 W. This is something to keep in mind if you’re deciding to opt for the LattePanda Mu. You get a lot more raw compute, but you also require more power — something to be especially wary of in battery-powered projects.
However, as we already mentioned, it’s possible to keep the LattePanda Mu at bay by having its processor stick to a ~6 W power profile. In that case, the whole board uses under 10 W. This opens a whole new perspective, as we’ve suddenly entered the same power class as the ARM contenders.
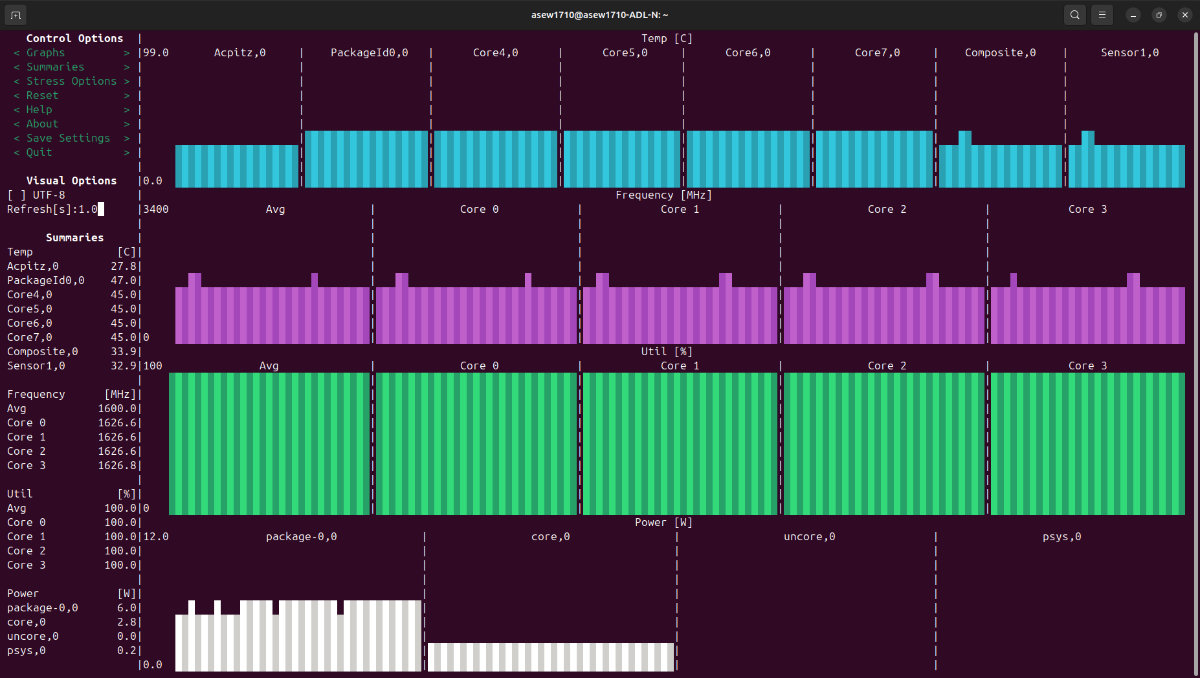
In Geekbench 5, this doesn’t affect single-core performance much as it still allows for a standard single-core turbo of 3.4 GHz, but it cuts multi-core performance in half (as there’s only enough power to run all four cores at ~1600 MHz), making the Mu just a little faster than a Raspberry Pi 5, but slower than the RK3588-based Orange Pi 5.
Geekbench 6 tells the same story. Ever so slightly above a Rapsberry Pi 5, with the Orange Pi 5’s RK3588 now firmly in the lead.
At first glance, these might seem like disappointing results, but they aren’t. It’s almost impressive — at just 10 W, the LattePanda Mu essentially beat the Raspberry Pi 5 on its home turf. Sure, the RK3588 is faster in the multi-core department than a power-limited N100 (and thus still offers better multi-core performance-per-watt), but the utility of having an x86-based processor cannot be overstated.
Software support and user experience
Our previous sentence was almost a perfect segue into this section of the review, as unrivaled software support is a cornerstone of makes x86-based boards so great. Instead of relying on the board manufacturer or the community to put out customized OS images, x86 boards tap into decades worth of mainline software. Pretty much every OS you’d want to run will run well (unless you’re planning on running something really obscure — and even that is likely to work fine). Since you’re using official software, it’s also much easier to troubleshoot issues. Perhaps most importantly, you get access to Windows, an OS that isn’t available on most ARM boards (and where it is, it’s a bodged community-made port at best).
Since the LattePanda Mu uses a standard UEFI BIOS, even dual-booting is simple enough to manage, and low-level system customization and OS installation is a breeze. Our review unit shipped with an unactivated copy of Windows 11 installed on its eMMC, but we immediately added Ubuntu 24.04 LTS to a second disk. The installation procedure was like on any other desktop computer — we created a bootable USB with the Ubuntu installer and simply let it do its thing. There’s no messing around with SD cards or such.
Both Windows and Ubuntu felt pretty snappy to use. Browsing was excellent and system applications had no hiccups. It’s safe to say that the Mu is almost perfect for modern dashboard-based interfaces — and should make the UI of any product it’s integrated into feel great.
It’s not just OS support that’s good. Programs and applications are still so much easier to find on x86 systems. Even with ARM becoming more and more relevant thanks to the efforts of Apple and Microsoft, many pieces of legacy, and even a lot of modern software still only supports x86 processors. This is unlikely to change any time soon. Simply put, just about anything bit of software you want to run will do so just fine (well, as long as the specs allow it — don’t expect the Mu to be a gaming machine).
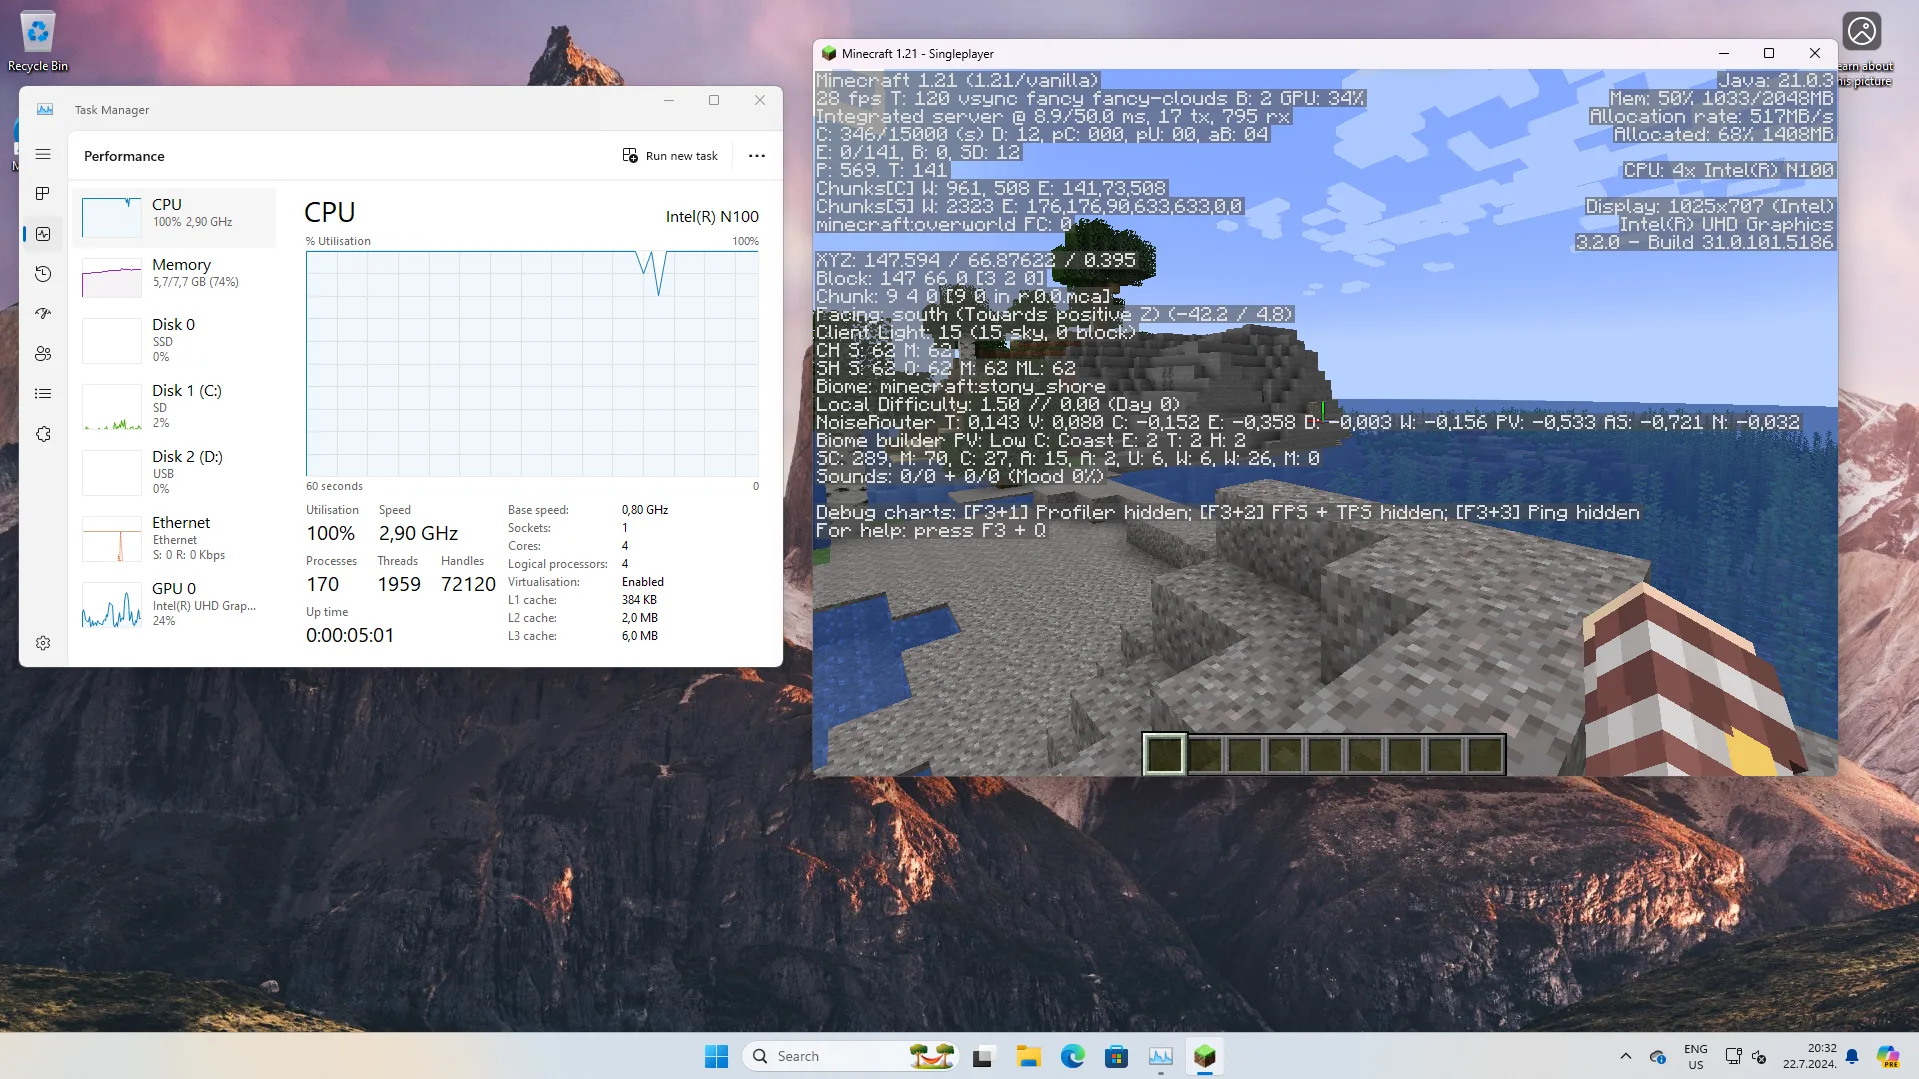
With that said, we felt obliged to try some of our daily driver software out out, so we booted up Windows and installed the Affinity design suite and JetBrains’ IntelliJ IDE, as well as a couple of games, including Minecraft. These all ran fine — not ideal, but okay enough. For Minecraft, we had to lower the render distance to 8 chunks to get a stable 60 FPS, as the default 12 chunks were too much for the CPU to handle and led to significant framerate drops every few seconds.
With the CPU being a bottleneck to the integrated graphics, we suddenly found the idea of a graphics carrier board slightly humorous. Imagine something like an RTX4090 stuck onto a Mu (or perhaps, the Mu stuck onto an RTX4090 would be a more accurate depiction of the logistics of such a situation) — yeah…
Joking aside, we’d actually love to see someone design a portable retro-inspired console around the LattePanda Mu. There’s enough power for that here. Something like the Clockwork Pi DevTerm would be wonderful — and by the virtue of being x86-based, this would-be system could natively run light Steam games like Stardew Valley in addition to PICO-8 and other fantasy consoles.
Our only real (but significant) gripe when it comes to software is, ironically, the low-level firmware currently in development by the LattePanda team. We already mentioned this in the hardware section, but multiple key interfaces, and most notably GPIO currently don’t work at all. We find it a bit odd that the Mu got released without GPIO support, but we’re hoping it won’t be a long wait.
Verdict and alternatives
The LattePanda Mu is an excellent SoM. The Intel Processor N100 was a good choice for a such a setup, and the chip’s flexible TDP allows the Mu to fight in several different weight classes. It’s ready to take on the Raspberry Pi 5 in the 10 W bracket — and it’s ready to deliver more than twice the performance when allowed to turbo boost to its heart’s content.
It’s pretty clear that our main gripe with the hardware boils down to the RAM implementation, something which was mandated by the N100’s memory controller. However, it’s not all a loss, as in-band ECC provides data safety not found on most other embedded boards at the price point.
At $139, the 8GB RAM version of module is not prohibitively expensive, but isn’t cheap either. Most ARM-based SoMs cost significantly less. You could get a Raspberry Pi 5 and-a-half for the price, and many of the best RK3588-based boards cost around this much — and both of these are fully-featured SBCs.
The 16 GB RAM version sells for $169, which is also a fair price. Keep in mind that RAM bandwidth stays the same, and the only difference between this and the base configuration is the extra 8 GB of RAM capacity.
When it comes to the Mu, though, there’s extra hardware you’ll need to get started. The $39 Lite carrier board is a must, as is the $12 active cooler. Overall, this adds up to $190 for the whole setup — and you’re still a power supply short. Granted, you’re likely to have a capable enough one already (at least if you aren’t planning on tinkering with the PCIe slot), but if you don’t (or are planning on tinkering with the PCIe slot, duh), that’s an extra $39 for the official PSU, bringing your total to $229.
If you’re interested in digging deeper and exploring every single interface on offer, the Full Function carrier board will set you back an additional $50 over the Lite carrier — which makes the whole package cost $279.
This is a tough price to swallow for someone who isn’t interested in the modular nature of the system, especially as you can get pre-made N100-based Mini PCs for as low as $100. Many of these feature things that wouldn’t make sense in a module-based system, such as upgradeable RAM, but that are genuine quality-of-life improvements for end consumers. It should come as a surprise to no one that the LattePanda Mu isn’t trying to appeal to the same audience as the Sigma and 3 Delta.
Instead, it’s meant for those looking for a flexible module to base their next product design around.
If the rumors of a Core i3-305N variant turn out to be correct (update: they are correct, read our review here) and LattePanda plans to keep releasing modules in the Mu form factor in the future, there’s additional motivation to invest your design resources in the system, especially if pin-to-pin compatibility is planned.
The main thing holding the LattePanda Mu back as of now is its firmware, with GPIO and several other interfaces not yet being ready. We’re sure the team is hard at work, but a bit hard to wholeheartedly recommend basing a design on an unfinished platform. Hopefully, this changes sooner rather than later.
At the end of the day, the LattePanda Mu is a SoM, and if you don’t know why you’d need one, it’s probably better to look at more traditional SBC offerings. However, if you’re looking for something more much performant than a Raspberry Pi to power your next embedded project and the extra flexibility offered by modules matters to you — and you’re fine waiting a bit longer for firmware to be fully fleshed out — the LattePanda Mu seems like a great choice.